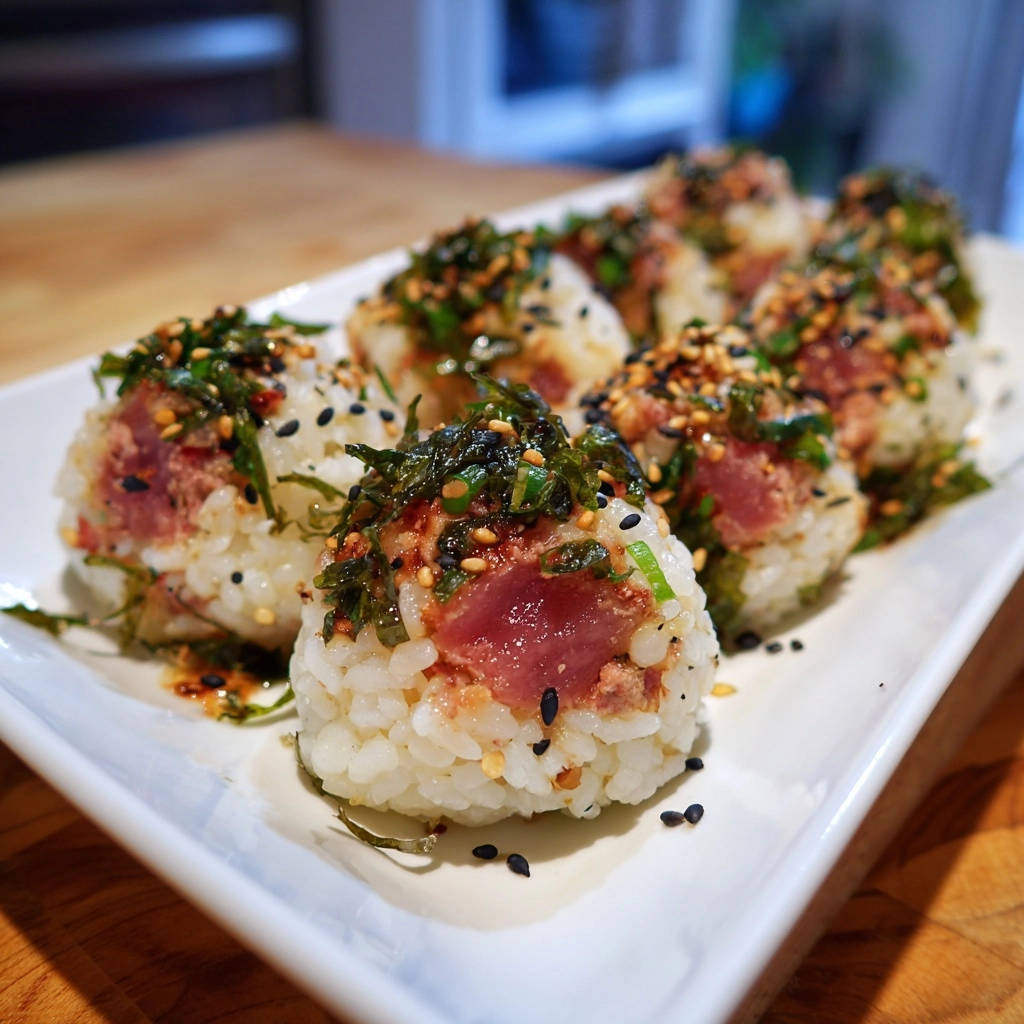
Tuna Furikake Onigiri: Your No-Stick Secret Recipe
If you’ve ever wrestled with sticky rice, trying to mold those perfectly shaped Japanese rice balls only to end up with more on your fingers than in your snack, then this recipe for Tuna Furikake Onigiri is about to change your life.
As a seasoned food strategist, I understand the frustration, which is why I’m thrilled to share my ultimate trick for effortlessly crafting these delicious, portable delights every single time. Get ready to master the art of homemade onigiri with confidence and zero mess.
Why This Tuna Furikake Onigiri Will Be Your New Go-To Snack
These savory rice balls are more than just a meal; they’re a revelation in convenience and flavor. Our recipe elevates the classic Tuna Furikake Onigiri, ensuring every bite is as delightful as it is simple to prepare.
Get Our Best Recipes Weekly!
Join thousands of food lovers and get delicious recipes delivered to your inbox.
Forget the sticky hands and uneven shapes; this method promises perfection, making it an ideal choice for busy individuals and culinary enthusiasts alike.
Master the No-Stick Onigiri Method
The genius of this recipe lies in its revolutionary salted water trick. This simple yet profound technique creates a barrier that prevents rice from adhering to your hands.
It transforms the shaping process from a sticky challenge into an enjoyable, fuss-free experience. Perfect, compact onigiri are now accessible to everyone, regardless of prior experience.
Quick, Customizable, and Utterly Delicious
Beyond its ease, this Tuna Furikake Onigiri recipe shines for its speed and versatility. The tuna filling comes together in minutes, and the rice shaping is quick once you master the technique.
These irresistible rice balls are perfect for packed lunches, impromptu picnics, or a satisfying grab-and-go snack. They offer a harmonious blend of creamy tuna, savory furikake, and perfectly seasoned rice.
Your Onigiri Toolkit: Essential Gadgets for Easy Shaping
Crafting perfect Tuna Furikake Onigiri doesn’t require a kitchen full of specialized tools. A few essential items will ensure a smooth and successful shaping process.
Non-Stick Rice Cooker: For perfectly fluffy, non-sticky rice every time, which is crucial for easy shaping and a superior texture in your onigiri.
Small Mixing Bowls: You’ll need one for combining the delicious tuna filling and another for preparing the all-important salted water for your hands.
Measuring Cups and Spoons: Accuracy ensures consistent flavor and texture in your filling and helps with portioning the rice for uniform onigiri.
Optional: Onigiri Molds: While not essential for this no-stick method, these molds are a great alternative for beginners or for achieving perfectly uniform shapes with minimal effort.
The Heart of the Flavor: What You Need for Tuna Furikake Onigiri
Here’s a concise list of the fresh and pantry staples you’ll need to create these delightful rice balls:
Full Ingredient List:
- 2 cups cooked Japanese short-grain rice, warm
- 1 can (5 oz) tuna in water or oil, drained very well
- 2 tablespoons mayonnaise
- 1 tablespoon soy sauce, plus extra for drizzling
- 1 teaspoon sesame oil
- 1/4 cup chopped green onions (scallions)
- 2 tablespoons furikake seasoning
- 1/2 teaspoon salt
- Water (for the no-stick trick)
Selecting Your Rice: The Foundation of Perfect Onigiri
Japanese short-grain rice is absolutely essential for authentic onigiri. Its high starch content provides the ideal stickiness and resilience needed for shaping.
Cooking it perfectly in a rice cooker ensures a fluffy texture that binds together without being overly mushy.
The Creamy, Savory Tuna Filling
Thoroughly draining the tuna is paramount; excess moisture will make your onigiri soggy and difficult to hold. Mayonnaise adds a creamy richness, while soy sauce provides umami depth and sesame oil lends an aromatic warmth.
This trio creates a balanced, moist, and incredibly flavorful filling that perfectly complements the rice.
Furikake & Green Onions: The Essential Finishing Touch
Furikake seasoning offers an irresistible blend of savory, umami flavors, often incorporating dried seaweed, sesame seeds, and sometimes egg or fish flakes. It adds a delightful texture and visual appeal to your Tuna Furikake Onigiri.
Fresh green onions contribute a subtle oniony bite and a vibrant pop of color. Experiment with different furikake varieties, such as nori-tama or spicy mentaiko, to customize your flavor experience.
Step-by-Step Guide: Crafting Your Tuna Furikake Onigiri (No Mess!)
- Prepare the Tuna Filling:
In a small bowl, combine the thoroughly drained tuna, mayonnaise, 1 tablespoon of soy sauce, and the sesame oil.
Add half of the chopped green onions. Mix well until everything is evenly combined. Ensure the tuna is very dry to prevent a soggy filling, which can compromise the onigiri’s structure.
- Master the No-Stick Trick:
Fill a small bowl with cold water and stir in the 1/2 teaspoon of salt until dissolved. This salted water is your secret weapon for fuss-free shaping, making your hands non-stick.
Keep this bowl right next to your workspace. Before you touch the rice, dip both your hands into the salted water, letting any excess drip off. The salt creates a natural barrier, preventing the rice from sticking to your skin, and the moisture makes shaping effortless and clean.
- Start Shaping the Base:
Take about 1/2 cup of the warm, cooked rice into your damp, salted hands. Gently press it into a rough, flat disc in your palm, creating the base for your onigiri.
Create a slight indentation in the center of the rice; this will be the perfect pocket to securely hold your delicious filling, ensuring it stays centered.
- Add the Savory Filling:
Place about 1-2 tablespoons of the prepared tuna mixture into the indentation you just made, ensuring it sits neatly in the center.
Avoid overfilling, as this can make the onigiri difficult to seal and prone to breaking apart. A balanced amount is key for both flavor and structural integrity.
- Seal and Form Perfectly:
Take another 1/4 cup of rice and gently place it over the tuna filling, completely covering it and sealing the filling inside.
With your hands still damp from the salted water, gently but firmly press and mold the rice into your desired shape – a traditional triangle or a simple sphere works beautifully. Use consistent, even pressure.
Continue turning the rice ball in your hands, applying even pressure to compact it and ensure it holds its shape securely. If at any point the rice starts to feel sticky, simply re-dip your hands in the salted water and continue shaping. Patience and gentle pressure are key here for a well-formed onigiri.
- Garnish and Serve Immediately:
Place the beautifully formed onigiri on a serving plate. Sprinkle generously with the furikake seasoning and the remaining chopped green onions, adding flavor and visual appeal.
Drizzle with a little extra soy sauce if you like a bolder flavor. Enjoy immediately or pack for a delicious portable meal, savoring your perfectly crafted Tuna Furikake Onigiri!
Chef’s Secrets: Elevating Your Tuna Furikake Onigiri Game
Warm Rice is Best: Always use freshly cooked, warm rice. Cold rice becomes stiff and difficult to mold, leading to crumbly or hard onigiri that lack the desired soft texture. If your rice is cold, gently reheat it.
Don’t Over-Compact: While you need to press firmly to shape, avoid crushing the rice. Too much pressure results in dense, hard onigiri instead of the desired fluffy, tender bites that melt in your mouth.
Experiment with Furikake Varieties: There are many types of furikake, from classic nori-tama (seaweed and egg) to spicy mentaiko and savory bonito. Try different blends to find your favorite flavor profile and add visual appeal to your onigiri.
Choose Quality Mayonnaise: Japanese mayonnaise (like Kewpie) offers a richer, tangier, and often sweeter flavor than regular mayonnaise. It makes a noticeable difference in the creaminess and overall taste of the tuna filling.
Adjust Salt to Taste: The salt in the water is primarily for non-stick, but it also lightly seasons the rice. Taste your plain cooked rice before shaping and adjust any additional seasoning as needed for your personal preference, ensuring a balanced flavor.
Troubleshooting Your Onigiri: Solutions for Sticky Situations
Problem: Rice Still Sticking to Hands
Solution: Ensure your hands are adequately damp with the salted water and re-dip frequently. The salt creates a critical non-stick barrier, and the moisture helps the rice glide into shape. Don’t be shy about wetting your hands as often as needed, especially when shaping multiple onigiri.
Problem: Onigiri Falling Apart
Solution: This often happens if the rice isn’t warm enough or you’re not pressing firmly enough during shaping. Gently but consistently apply pressure while molding, ensuring the rice compacts and adheres together. Warm rice is naturally more pliable and easier to bind into a stable form.
Problem: Onigiri is Too Dense or Hard
Solution: This usually results from over-compacting the rice. Use firm but gentle pressure, allowing the rice grains to stick without being completely crushed. Aim for a balance that holds its shape but still offers a fluffy, pleasant texture when bitten into.
Problem: Filling is Too Wet or Soggy
Solution: Ensure your canned tuna is drained extremely well, pressing out as much liquid or oil as possible before mixing. A wet filling can make the rice soggy, difficult to mold, and prone to breaking. A dry, cohesive filling is crucial for structural integrity and a pleasant eating experience.
Beyond Tuna: Creative Fillings and Flavor Twists for Your Onigiri
While Tuna Furikake Onigiri is a beloved classic, the beauty of these Japanese rice balls lies in their endless customization possibilities. Get creative with your fillings and outer coatings to explore new flavor dimensions.
Explore New Filling Ideas
Umeboshi (Pickled Plum): A traditional Japanese choice, offering a delightfully tangy and savory burst that provides a refreshing contrast to the rice.
Grilled Salmon: Flake leftover grilled salmon and mix with a touch of soy sauce and a sprinkle of sesame seeds for a hearty, savory seafood option.
Teriyaki Chicken: Diced, cooked chicken glazed in a savory teriyaki sauce makes a hearty and flavorful center, perfect for a satisfying meal.
Spicy Mayo Shrimp: Cooked shrimp chopped and mixed with spicy mayonnaise for a zesty, creamy seafood option with a delightful kick.
Vegetarian Options: Consider sautéed mushrooms seasoned with soy sauce, seasoned crumbled tofu, or even thin slices of avocado with a pinch of salt for delicious plant-based onigiri.
Flavorful Outer Coatings & Wraps
Nori Wraps: For a classic touch, wrap your finished onigiri with strips of toasted nori (seaweed). Wrap just before eating to maintain the nori’s crispness and provide a textural contrast.
Sesame Seed Coating: Roll the entire onigiri in toasted white or black sesame seeds for added nutty flavor and texture, creating an appealing crunchy exterior. This can be done instead of or in addition to furikake.
Wasabi Kick: Mix a tiny bit of wasabi paste into your mayonnaise for an invigorating spicy kick in your tuna filling. Adjust the amount to your preferred level of heat.
Serving, Storing, and Enjoying Your Tuna Furikake Onigiri All Week Long
Best Ways to Serve
Tuna Furikake Onigiri are incredibly versatile and perfectly suited for various occasions. They are excellent on their own as a satisfying snack, a convenient light lunch, or a delightful and visually appealing addition to a bento box.
Pair them wonderfully with a side of comforting miso soup, refreshing pickled ginger, or a simple green salad for a complete and balanced meal.
Storage Instructions
For immediate consumption, freshly made onigiri can be stored in an airtight container at room temperature for up to 4-6 hours. For longer storage, refrigerate them promptly, as rice is perishable. They are best enjoyed within 24 hours of refrigeration for optimal flavor and texture.
Be aware that refrigerated rice can become hard and less palatable. To soften, lightly microwave for 20-30 seconds, or let them come to room temperature for about 30 minutes before eating, restoring their soft consistency.
Make-Ahead Tips
To save time during your busy week, you can prepare the tuna filling up to a day in advance and store it in an airtight container in the refrigerator. This allows for quick assembly later.
However, for the best texture and ease of handling, it is highly recommended to cook the Japanese short-grain rice fresh on the day you plan to shape your onigiri. Freshly warm rice is significantly more pliable and less prone to crumbling.
Your Onigiri Queries Answered: FAQs About Tuna Furikake Onigiri
What kind of rice is best for onigiri?
Japanese short-grain white rice is undeniably the best choice for onigiri. Its unique starch content gives it the perfect stickiness and texture to hold its shape well when molded, ensuring delicious and sturdy rice balls. Medium-grain rice can be used in a pinch, but long-grain rice is too dry and generally not recommended as it lacks the necessary adhesion.
Can I use brown rice for onigiri?
Yes, you can use short-grain brown rice for a healthier alternative, though it’s less traditional and will result in a different texture. Be aware that brown rice is less sticky and might be slightly harder to shape due to its bran layer. You may need to press a little more firmly and ensure it’s adequately warm for better malleability.
How do I prevent the rice from drying out?
If packing onigiri for later, wrap each individual rice ball tightly in plastic wrap immediately after shaping. This seals in the moisture and keeps the rice soft and fresh. For refrigerated onigiri, a quick 20-30 second microwave zap can help restore its soft, palatable texture before eating.
Is furikake seasoning absolutely necessary?
While not strictly necessary for the structural integrity of the rice ball, furikake adds a fantastic layer of umami, unique flavor, and appealing texture that truly defines Tuna Furikake Onigiri. It’s highly recommended for the authentic and most delicious taste experience. If you don’t have it, toasted sesame seeds are a simple alternative for some added crunch and nutty flavor.
Can I freeze onigiri?
Yes, onigiri can be frozen successfully! Wrap each shaped onigiri tightly in plastic wrap, then place them in a freezer-safe bag or container. They can be frozen for up to one month. To thaw, move them to the refrigerator overnight, then reheat gently in the microwave or let them come to room temperature for about 30 minutes before enjoying the restored texture.
Ready to Create Your Own Perfect Tuna Furikake Onigiri?
With this foolproof method and incredibly delicious filling, you’re now fully equipped to create perfect Tuna Furikake Onigiri without the usual sticky struggle. These versatile and satisfying rice balls are a testament to how simple ingredients can come together for maximum flavor, convenience, and pure culinary joy.
Whether you’re packing an impressive bento lunch, fueling a vibrant picnic, or simply craving a savory and portable snack, these onigiri are sure to become a cherished part of your culinary repertoire. We can’t wait to see your creations – don’t forget to share your masterpieces and tag us with #TunaFurikakeOnigiri!
Tuna Furikake Onigiri
Course: SnacksCuisine: AsianDifficulty: easy4
4 onigiri20
minutes240
kcal20
minutesLove perfectly shaped Japanese rice balls but hate the sticky mess? This recipe unveils the ultimate trick for fuss-free tuna onigiri. Create beautifully formed, delicious rice balls every time, no wrestling required!
Ingredients
2 cups cooked Japanese short-grain rice, warm
1 can (5 oz) tuna in water or oil, drained very well
2 tablespoons mayonnaise
1 tablespoon soy sauce, plus extra for drizzling
1 teaspoon sesame oil
1/4 cup chopped green onions (scallions)
2 tablespoons furikake seasoning
1/2 teaspoon salt
Water
Directions
- Prepare the Tuna Filling: In a small bowl, combine the thoroughly drained tuna, mayonnaise, 1 tablespoon of soy sauce, and the sesame oil. Add half of the chopped green onions. Mix well until everything is evenly combined.
- Master the No-Stick Trick: This is the key to fuss-free onigiri! Fill a small bowl with cold water and stir in the 1/2 teaspoon of salt until dissolved. Keep this bowl right next to your workspace. Before you touch the rice, dip both your hands into the salted water, letting any excess drip off. The salt acts as a barrier, preventing the rice from sticking to your skin, and the moisture makes shaping much easier.
- Start Shaping: Take about 1/2 cup of the warm, cooked rice into your damp, salted hands. Gently press it into a rough, flat disc in your palm. Create a slight indentation in the center of the rice.
- Add the Filling: Place about 1-2 tablespoons of the prepared tuna mixture into the indentation you just made.
- Seal and Form (Still No Sticky Hands!): Take another 1/4 cup of rice and gently place it over the tuna filling, completely covering it. With your hands still damp from the salted water, gently but firmly press and mold the rice into your desired shape — a triangle is traditional, but a sphere works too. Continue turning the rice ball in your hands, applying even pressure to compact it and ensure it holds its shape. If at any point the rice starts to feel sticky, simply re-dip your hands in the salted water and continue shaping.
- Garnish and Serve: Place the beautifully formed onigiri on a serving plate. Sprinkle generously with the furikake seasoning and the remaining chopped green onions. Drizzle with a little extra soy sauce if you like a bolder flavor. Enjoy immediately or pack for a delicious portable meal!
Notes
- The salted water trick is essential for preventing sticky hands while shaping the rice.