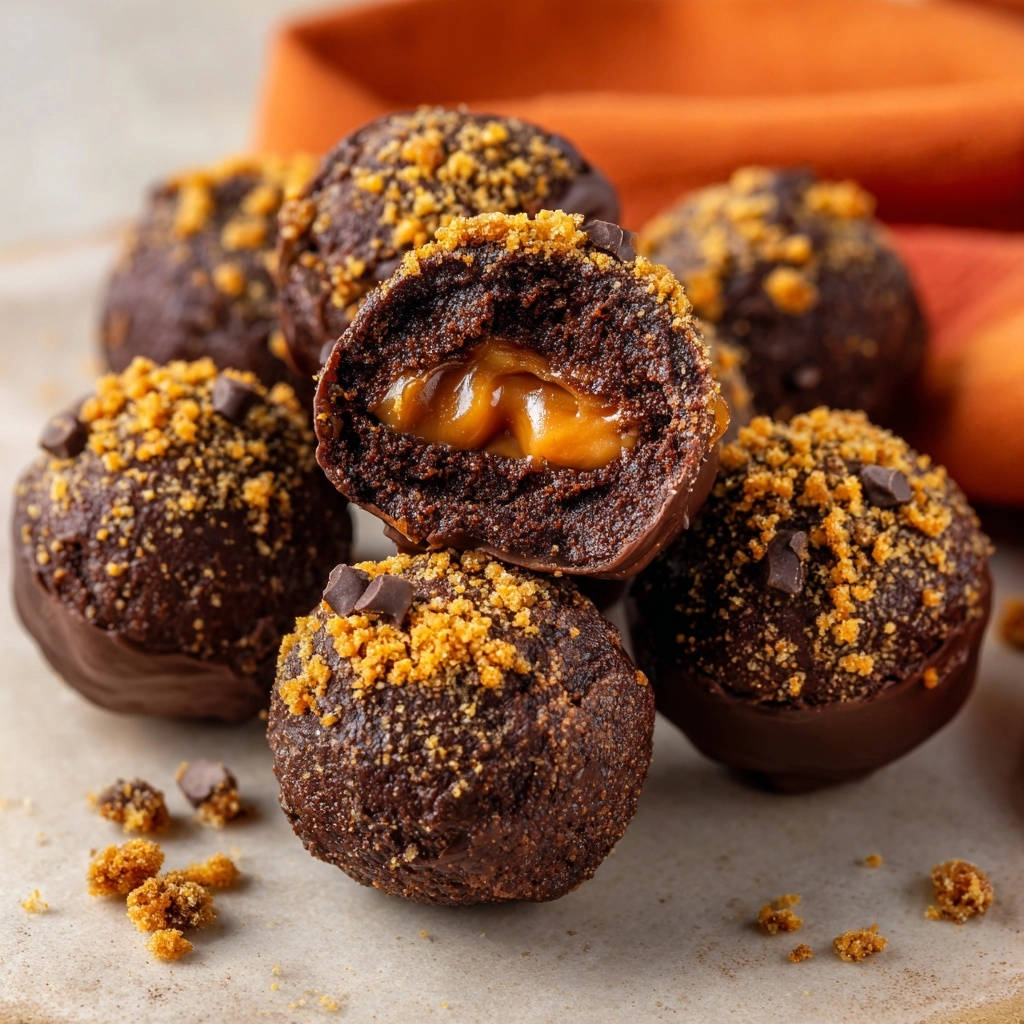
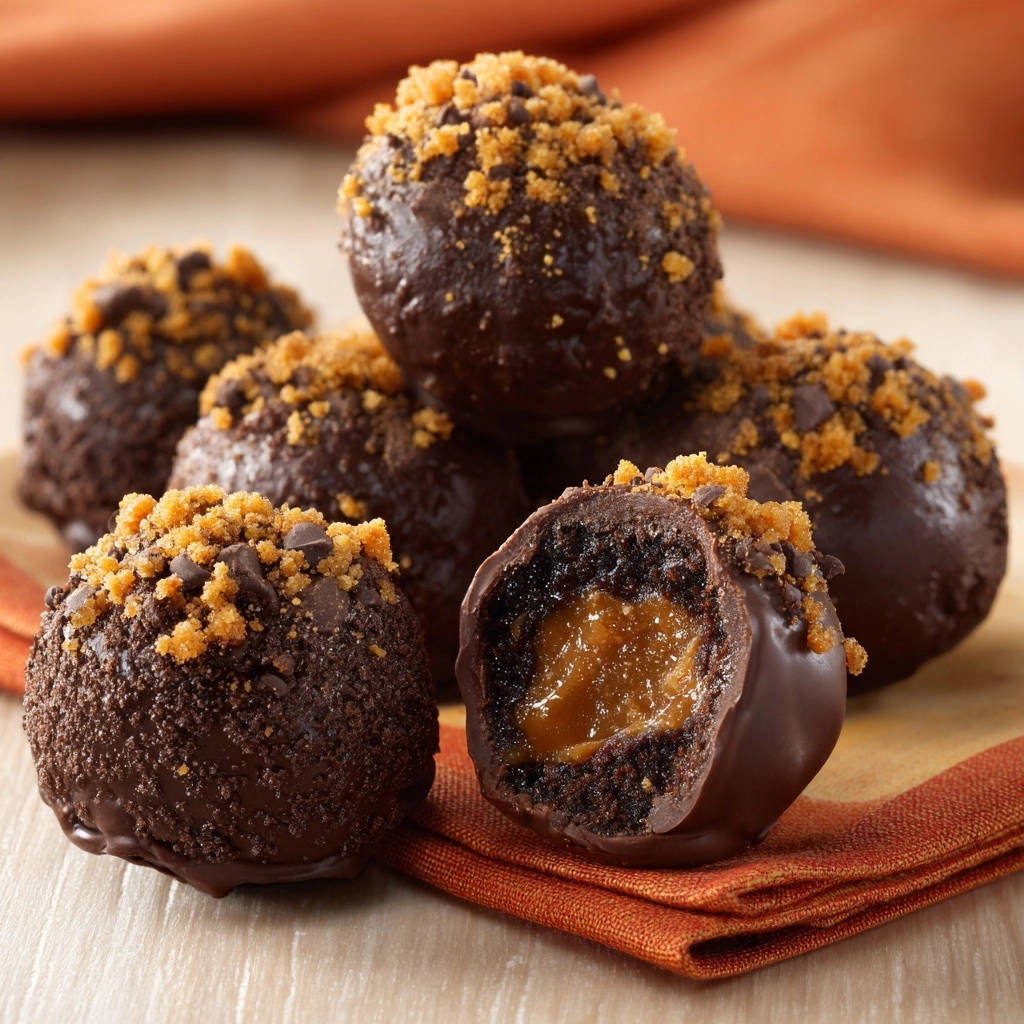
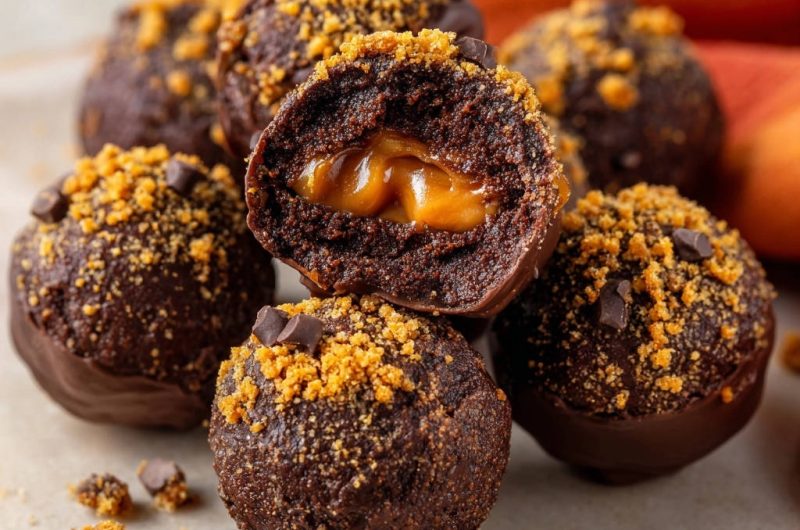
Caramel-Stuffed Chocolate Truffles: Foolproof Leak-Proof Delight
For years, I dreamt of creating perfect filled truffles at home, only to face the frustrating reality of sticky, leaky caramel centers. It’s a common struggle for anyone venturing into homemade chocolate treats, but I’ve finally perfected a method that guarantees every single Caramel-Stuffed Chocolate Truffle boasts a beautifully contained, ooey-gooey caramel core. Get ready to impress everyone with these elegant, decadent chocolate delights, crafted with absolute confidence and ease.
Beyond Basic: The Leak-Proof Secret to Irresistible Caramel Truffles
No More Leaky Caramel Catastrophes!
The biggest challenge with filled truffles is often the dreaded caramel leak. This recipe uniquely solves that problem through strategic freezing and complete encapsulation, ensuring each bite of your chocolate caramel dessert is clean and perfectly balanced without any sticky mess.
Simple Ingredients, Stunning Results
You might be surprised that such gourmet truffles can be made from approachable ingredients like a chocolate cake mix and readily available soft caramel candies. This recipe proves that you don’t need complex components to create truly stunning, impressive homemade truffles.
Get Our Best Recipes Weekly!
Join thousands of food lovers and get delicious recipes delivered to your inbox.
For more decadent caramel ideas, check out this fudgy caramel brownie pie.
Perfect for Gifting or Impressing Guests
With their rich flavor and elegant presentation, these Caramel-Stuffed Chocolate Truffles are ideal for any special occasion. They make a sophisticated addition to a dessert platter or a thoughtful, luxurious homemade gift that truly wows.
For more rich, chocolatey ideas, explore these caramel s’mores stacks.
A Versatile Base for Endless Creativity
Beyond their leak-proof core, the chocolate cake base offers incredible versatility. This easy truffle recipe can be adapted with different cake flavors, coatings, or even a hint of extract to unleash your culinary creativity.
Gathering Your Indulgent Ingredients: What You’ll Need
Creating these exquisite Caramel-Stuffed Chocolate Truffles begins with selecting the right ingredients. Opt for good quality components, and ensure everything is ready before you start for a smooth process.
For the Chocolate Cake Truffle Base:
-
Chocolate Cake Mix (or Leftover Cake): This forms the rich, fudgy foundation of our truffles. Using a box mix offers incredible convenience, or you can repurpose about 3 cups of cooled, crumbled leftover chocolate cake for a zero-waste approach.
-
Cream Cheese: Softened cream cheese is the magical binder that brings our cake crumbs together. It creates a moist, pliable, and smooth truffle dough, ensuring a delightful texture.
-
Coconut Oil (Optional): A teaspoon of coconut oil adds extra moisture to the truffle base and imparts a subtle richness. It’s optional, but highly recommended for an even more luxurious mouthfeel.
The Star: The Caramel Core:
-
Soft Caramel Candies (e.g., Kraft): These are absolutely crucial for the gooey, decadent center. Using soft caramels ensures they become perfectly pliable when frozen, and melt into a luscious liquid when bitten into.
For the Irresistible Chocolate Coating & Decoration:
-
Melting Chocolate or Chocolate Chips: This forms the crisp, glossy outer shell of your homemade truffles. Good quality melting chocolate or semi-sweet chocolate chips work best for a smooth coating.
-
Vegetable Shortening or Additional Coconut Oil: A small amount of either helps to thin the melted chocolate, creating a beautifully smooth and dippable consistency. This prevents the coating from becoming too thick or clumpy.
-
Crushed Graham Crackers or Cookies: These provide a delightful texture and classic garnish. Feel free to explore alternatives like finely chopped nuts, sprinkles, or even cocoa powder for varied presentation.
-
Mini Chocolate Chips: These add both visual appeal and a satisfying textural contrast to the smooth chocolate coating. They elevate the homemade truffles with a professional touch.
Essential Tools for Your Truffle Adventure
Having the right tools at hand makes the truffle-making process seamless and enjoyable. Gather these kitchen essentials before you begin.
-
Large Mixing Bowl: Perfect for combining the chocolate cake base ingredients thoroughly.
-
Parchment-Lined Baking Sheets: Absolutely essential for chilling the truffles and allowing the chocolate coating to set without sticking.
-
Microwave-Safe Bowl: Ideal for safely and efficiently melting your chocolate coating in intervals.
-
Fork or Dipping Tool: Simplifies the dipping process, allowing for even coating and easy removal of excess chocolate.
-
Sharp Knife: Necessary for precisely cutting the soft caramel candies into manageable, uniform pieces.
The Art of the Leak-Proof Caramel Core: Step-by-Step Truffle Creation
Follow these detailed steps, paying close attention to the chilling and encapsulation methods, and you’ll achieve perfectly leak-proof Caramel-Stuffed Chocolate Truffles every time. This easy truffle recipe is designed for success.
- Prepare Your Caramel Core (The Leak-Proof Secret Starts Here!):
Unwrap each caramel candy and cut it into 2-3 smaller, roughly 1/2-inch cubes. Uniformity here helps create consistently sized truffles.
Place these caramel pieces on a parchment-lined plate or tray and freeze for at least 30 minutes. This critical step ensures the caramel is rock-solid, preventing any melting or leaking during the later encapsulation process.
- Make the Truffle Base:
Crumble the cooled chocolate cake into a large bowl, ensuring there are no large lumps. A fine crumble creates a smooth, cohesive truffle.
Add the softened cream cheese and, if using, the 1 teaspoon of coconut oil. Using softened cream cheese is key for easy, even incorporation into the cake crumbs.
Mix thoroughly with your hands until a well-combined, dough-like consistency forms. The mixture should be moist enough to roll without crumbling, but not overly sticky, indicating it’s perfectly hydrated.
- Encapsulate the Caramel:
Take a small spoonful of the cake mixture, about 1 tablespoon, and flatten it slightly in the palm of your hand, forming a small disc.
Retrieve your frozen caramel pieces from the freezer. Place one frozen caramel piece directly in the center of the flattened cake mixture.
Carefully bring the edges of the cake mixture together around the caramel, completely enclosing it. Ensure there are absolutely no cracks or gaps where the caramel could potentially escape.
Gently roll the mixture between your palms to form a smooth, tight ball. A tight, seamless seal is paramount for the leak-proof guarantee of these filled chocolate candies.
- Chill to Set:
Place the formed caramel-stuffed chocolate balls onto a fresh parchment-lined baking sheet. This prevents sticking and makes them easy to handle later.
Refrigerate for at least 1 hour, or freeze for 30 minutes, until the truffles are very firm. This second chill step is vital; it locks in the caramel and ensures the truffles maintain their perfect shape during the warm chocolate dipping process.
- Prepare Chocolate Coating:
In a microwave-safe bowl, combine the melting chocolate or chocolate chips with 1 tablespoon of vegetable shortening or additional coconut oil.
Melt in 30-second intervals, stirring well after each, until the chocolate is completely smooth and fluid. Stirring frequently prevents scorching and ensures an even, consistent melt for your decadent chocolate treats.
- Dip and Decorate:
Remove the very chilled truffle balls from the refrigerator. Working quickly in small batches helps maintain their firm shape and prevents the caramel from softening prematurely.
One by one, drop a truffle ball into the melted chocolate. Use a fork or a dipping tool to gently turn it until it is fully coated.
Lift the truffle out, tapping the fork gently against the side of the bowl to allow excess chocolate to drip off. An even, thin coating is ideal for a professional finish.
Immediately place the coated truffle back on the parchment-lined baking sheet. While the chocolate is still wet, sprinkle generously with crushed graham crackers and mini chocolate chips for garnish and texture.
- Final Set:
Allow the chocolate coating to set completely at room temperature, which can take an hour, or expedite the process by refrigerating for 15-20 minutes. Ensure the chocolate is fully firm before handling or storing the Caramel-Stuffed Chocolate Truffles.
Store finished truffles in an airtight container in the refrigerator to maintain their freshness and prevent the caramel from softening over time.
Elevate Your Truffle Game: Expert Tips for Success
Achieving truly perfect Caramel-Stuffed Chocolate Truffles involves a few key details. These expert tips will help you master every aspect of this easy truffle recipe.
-
Master the Caramel Chill: Do not skip or shorten the caramel freezing step! This is the absolute key to preventing leaks and ensuring a distinct, perfectly gooey caramel center when you bite into your homemade truffles.
-
Texture of the Truffle Base: If your cake mixture feels too dry and crumbly, add a tiny bit more softened cream cheese or coconut oil, a teaspoon at a time, until pliable. If it’s too sticky, incorporate a tablespoon of powdered sugar or finely crushed graham crackers to absorb excess moisture.
-
The Art of Encapsulation: Ensure the caramel is completely sealed within the cake mixture with no visible seams or cracks. Any exposed caramel will lead to leaks when dipped in warm chocolate, compromising your gourmet truffles.
-
Maintain the Chill: Keep truffles chilled between dipping batches. If the truffles warm up, they become soft and difficult to dip smoothly, and the caramel might soften prematurely, risking leaks.
-
Perfecting the Chocolate Dip: If your chocolate coating starts to thicken as you work, gently re-warm it in the microwave for 10-15 seconds and stir until smooth again. Always avoid overheating, which can cause the chocolate to seize.
-
Creative Coatings: While graham crackers and mini chips are delicious, consider rolling your finished truffles in cocoa powder, finely chopped nuts, festive sprinkles, or even a drizzle of contrasting white chocolate for varied presentation and flavor profiles.
Troubleshooting Your Truffles: Solving Common Challenges
Even with a foolproof recipe, minor issues can arise. Here are solutions to common problems you might encounter while making your Caramel-Stuffed Chocolate Truffles.
Problem: Caramel is leaking from the truffles.
This is usually due to insufficient freezing of the caramel pieces or incomplete encapsulation during rolling. Ensure caramels are solid frozen before assembly, and carefully seal all edges of the cake mixture around the caramel to prevent any gaps.
Problem: Truffles are difficult to roll or too sticky.
Your truffle base might be too warm or have too much liquid. Try chilling the cake mixture itself for 15-20 minutes. If still sticky, add a spoonful of crushed graham crackers or powdered sugar to absorb excess moisture until it’s pliable.
Problem: Chocolate coating is too thick or clumpy.
The chocolate might have seized due to moisture, or wasn’t melted with enough shortening/coconut oil. Gently re-warm with a tiny bit more oil, stirring constantly. Ensure no water gets into your melting chocolate, as this is a common cause of seizing.
Problem: Truffles look messy after dipping.
This can happen if the truffles aren’t cold enough or if too much excess chocolate isn’t tapped off. Ensure truffles are very firm from chilling, and tap your fork well against the bowl’s edge to remove drips before placing them on parchment paper.
Serving Suggestions & Storage Secrets: Enjoying Your Creation
How to Serve Your Decadent Truffles:
These Caramel-Stuffed Chocolate Truffles are best enjoyed slightly chilled but not ice-cold, which allows the caramel to be perfectly gooey. Arrange them on a pretty platter for an elegant dessert or package them in small decorative boxes for thoughtful homemade gifts.
Make-Ahead Marvel:
The truffle base can be made and chilled for up to 2 days before encapsulating and dipping. The completely finished truffles also store exceptionally well, making them ideal for preparing in advance for parties or holiday gatherings.
Storing for Ultimate Freshness:
Store your finished truffles in an airtight container in the refrigerator for up to 1 week. For longer storage, they can be frozen for up to 1 month. Always thaw them in the refrigerator before serving to maintain their texture and prevent caramel from softening too quickly.
Your Truffle Queries Answered: FAQs
Can I use homemade caramel instead of store-bought?
While homemade caramel is delicious, for this specific “leak-proof” method, the consistency of store-bought soft caramel candies (which freeze very firm) is highly recommended. Homemade caramel might not freeze as solidly, increasing the risk of leaks during encapsulation and dipping.
What if I don’t have coconut oil for the truffle base?
The coconut oil in the truffle base is optional. You can omit it completely, as the cream cheese alone will still bind the mixture effectively. It primarily adds a touch more moisture and richness to the overall flavor of your homemade truffles.
Can I use different cake flavors?
Absolutely! Feel free to experiment with yellow cake, red velvet, or even spice cake for a delightful twist on these filled chocolate candies. Just ensure the cake is completely cooled before crumbling and mixing with the cream cheese.
How far in advance can I make these truffles?
You can make these Caramel-Stuffed Chocolate Truffles up to 5-7 days in advance if stored properly in an airtight container in the refrigerator. They are also freezer-friendly for up to a month, allowing you to prepare them well ahead of any event.
Are these truffles gluten-free?
This recipe uses standard chocolate cake mix and graham crackers, which typically contain gluten. To make them gluten-free, substitute with a gluten-free chocolate cake mix and gluten-free graham crackers or cookies for the topping.
There you have it – the ultimate guide to creating Caramel-Stuffed Chocolate Truffles that are as flawless as they are delicious. Embrace the leak-proof secret and enjoy every single gooey, chocolatey bite!
Ready for More?
Round out your meal with these satisfying options that complement the rich chocolate truffles.
- If you’re planning a full meal, consider the Sheet Pan Chicken & Roasted Veggies for a complete dinner that promises juicy chicken.
- For a flavorful vegetarian choice, explore the Chickpea & Pea Curry, offering a unique depth of flavor.
Caramel-Stuffed Chocolate Truffles
Course: DessertCuisine: American CuisineDifficulty: easy4
24-30 truffles1
hour5
minutes180
minutesAmerican Cuisine
Ingredients
1 box (about 15-18 oz) chocolate cake mix, baked according to package directions and cooled (or 3 cups leftover chocolate cake crumbs)
1/2 cup cream cheese, softened
1/2 cup store-bought soft caramel candies (like Kraft Caramels)
1 teaspoon coconut oil (optional, for truffle base)
10-12 ounces melting chocolate or chocolate chips
1 tablespoon vegetable shortening or additional coconut oil (for coating)
1/4 cup crushed graham crackers or cookies
2 tablespoons mini chocolate chips
Directions
- Prepare Your Caramel Core (The Leak-Proof Secret Starts Here!): Unwrap each caramel candy. Cut each caramel into 2-3 smaller pieces, creating roughly 1/2-inch cubes. Place these caramel pieces on a parchment-lined plate or tray and freeze for at least 30 minutes. This is KEY to preventing leaks later.
- Make the Truffle Base: Crumble the cooled chocolate cake into a large bowl. Add the softened cream cheese and, if using, the 1 teaspoon of coconut oil. Mix with your hands until well combined and a dough-like consistency forms. It should be moist enough to roll, but not overly sticky.
- Encapsulate the Caramel: Take a small spoonful of the cake mixture (about 1 tablespoon). Flatten it slightly in the palm of your hand. Retrieve your frozen caramel pieces. Place one frozen caramel piece in the center of the flattened cake mixture. Carefully bring the edges of the cake mixture together around the caramel, completely enclosing it. Roll gently between your palms to form a smooth, tight ball.
- Chill to Set: Place the formed caramel-stuffed chocolate balls onto a parchment-lined baking sheet. Refrigerate for at least 1 hour (or freeze for 30 minutes) until they are very firm. This second chill step helps lock in the caramel and ensures the truffles hold their shape during dipping.
- Prepare Chocolate Coating: In a microwave-safe bowl, melt the melting chocolate or chocolate chips with 1 tablespoon of vegetable shortening or additional coconut oil in 30-second intervals, stirring well after each, until completely smooth.
- Dip and Decorate: Remove the chilled truffle balls from the refrigerator. One by one, drop a ball into the melted chocolate. Use a fork or a dipping tool to gently turn it until fully coated. Lift it out, tapping the fork gently against the side of the bowl to remove excess chocolate. Immediately place the coated truffle back on the parchment-lined baking sheet. Sprinkle with crushed graham crackers and mini chocolate chips while the chocolate is still wet.
- Final Set: Allow the chocolate coating to set completely at room temperature or by refrigerating for 15-20 minutes. Store finished truffles in an airtight container in the refrigerator.
Notes
- Freezing caramel and chilling truffles are crucial for leak-proof centers.