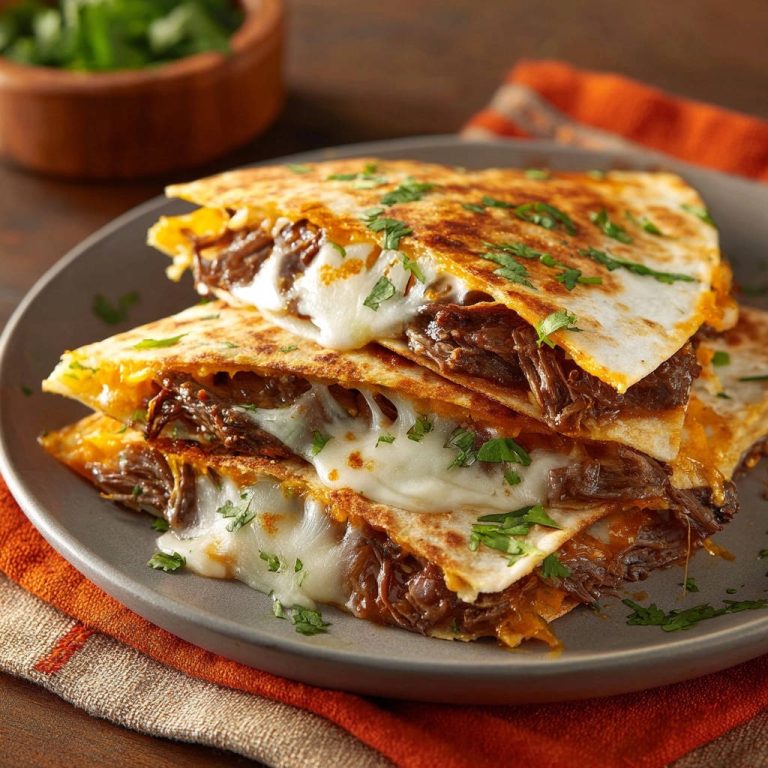
Classic Cheesy Beef Melts: No More Soggy Bread!
There’s nothing quite like the dream of a perfect cheesy beef sandwich-until you take that first bite and your bread turns into a soggy mess. I’ve been there, and it’s truly disappointing when a hearty meal like Classic Cheesy Beef Melts falls victim to a flimsy base.
This recipe is my definitive answer to that challenge, ensuring every bite delivers rich, savory beef and gooey cheese atop a perfectly crisp, sturdy foundation. It’s a game-changer for anyone craving that ultimate comfort food experience without the soggy frustration.
Why This Classic Cheesy Beef Melts Belongs in Your Recipe Box
The Crispy Bread Secret Unveiled (No More Soggy Bottoms!)
Soggy bread is the nemesis of any open-faced sandwich, detracting from the overall enjoyment. Our method directly addresses this by pre-toasting buttered bread slices, creating a robust, protective barrier.
Get Our Best Recipes Weekly!
Join thousands of food lovers and get delicious recipes delivered to your inbox.
This simple yet crucial step ensures the bread remains beautifully crisp, supporting the generous beef and cheese topping without yielding to moisture.
For another take on a satisfying melt, try this cheesy corned beef melt.
Speed and Simplicity for Busy Weeknights
Life gets hectic, but delicious home-cooked meals shouldn’t be sacrificed. This recipe for Classic Cheesy Beef Melts is designed for efficiency, coming together quickly with straightforward steps.
It’s an ideal solution for weeknights when you need a satisfying meal without spending hours in the kitchen.
A Hearty, Flavor-Packed Family Favorite
Bursting with savory ground beef, tangy tomato sauce, and savory Worcestershire, this dish delivers an explosion of comforting flavors. The rich blend of seasonings creates a depth of taste everyone at the table will love.
It’s a truly satisfying and wholesome meal that consistently earns rave reviews from family and friends.
Gathering Your Essentials: Ingredients for Delicious Melts
The Savory Beef Base
Start with one pound of lean ground beef for optimal flavor and texture. Choosing lean beef helps minimize excess grease, ensuring a cleaner, richer sauce.
Thoroughly browning the beef is essential for developing deep, savory notes that form the core of these cheesy beef sandwiches.
Crafting the Signature Sloppy Joe Sauce
Tomato sauce and ketchup provide the classic tangy-sweet foundation for our sloppy joe-style topping. Worcestershire sauce adds a crucial umami depth, elevating the overall flavor profile.
Brown sugar balances the acidity, while chili powder, salt, and pepper round out the robust seasoning. A splash of water or beef broth ensures the sauce simmers to a perfect consistency.
Our Anti-Soggy Bread Foundation
The choice of bread is paramount: opt for 4-6 slices of thick-cut, sturdy white bread, such as Texas toast. Its substantial structure provides the necessary support for our generous toppings.
Softened butter, spread generously on both sides and pre-baked, creates an impermeable, crispy shield. This barrier is the secret to preventing any hint of sogginess.
The Melty Cheese Topping
Shredded sharp cheddar cheese is the star for its creamy texture and tangy bite. Its excellent melting properties create that irresistible gooey layer on top of your Classic Cheesy Beef Melts.
For variety, consider Monterey Jack or a Colby-Jack blend for a slightly milder, equally melty alternative.
A Fresh Finish: Garnish Options
Fresh chopped parsley adds a vibrant pop of color and a touch of herbaceous brightness. It beautifully complements the richness of the beef and cheese.
Alternatively, a sprinkle of fresh chives or a dash of finely chopped cilantro can offer different aromatic accents.
Essential Tools for Your Cheesy Beef Melt Mission
Skillet Savvy
A large, heavy-bottomed skillet is indispensable for browning the ground beef evenly. It also provides ample space to simmer the sauce effectively, ensuring all ingredients meld beautifully.
The skillet’s size helps prevent overcrowding, which is key for developing rich flavors without steaming the ingredients.
Baking Sheet Best Practices
A sturdy baking sheet is crucial for the anti-soggy bread prep. It allows for even toasting and crisping of the buttered bread slices.
This ensures each slice develops a uniform, golden-brown crust, ready to support your hearty beef topping and achieve that perfect melted cheese finish.
For perfectly tender bites, explore our guide to savory shredded beef.
Step-by-Step: Crafting Perfect Classic Cheesy Beef Melts
-
Browning Your Beef to Perfection
In a large skillet, cook one pound of lean ground beef over medium-high heat. Break the meat into small pieces with a spoon as it browns, ensuring even cooking.
Once fully cooked and no pink remains, drain off any excess fat from the skillet. This step is crucial for preventing a greasy sauce and setting the stage for deep flavor.
-
Building the Robust Sauce Base
Reduce the skillet heat to medium and add one tablespoon of olive oil. Stir in the finely chopped medium onion and cook for 5-7 minutes, until the onion softens and becomes translucent.
Add two cloves of minced garlic and cook for just one more minute until fragrant. Be careful not to burn the garlic, as this can introduce a bitter taste.
-
Simmering for Deep Flavor and Optimal Thickness
Return the browned ground beef to the skillet with the sautéed onions and garlic. Stir in the tomato sauce, ketchup, brown sugar, Worcestershire sauce, chili powder, salt, pepper, and water or beef broth.
Mix thoroughly to combine all ingredients. Bring the mixture to a gentle simmer, then reduce the heat to low and cook for 10-15 minutes, stirring occasionally.
The goal here is for the sauce to thicken beautifully and for the flavors to meld. A thick sauce is paramount to preventing soggy bread later on, ensuring it adheres well to the toasted base.
-
The “No More Soggy Bread” Prep: Toasting Your Foundation
While the beef mixture simmers, preheat your oven to 375°F (190°C). Spread a thin, even layer of softened butter on both sides of each thick-cut bread slice.
Place the buttered bread directly onto a baking sheet. Bake for 5-7 minutes, flipping once halfway through, until both sides are lightly golden brown and feel slightly firm to the touch.
This crucial pre-baking step creates a perfectly crispy, protective barrier. It prevents the flavorful beef sauce from seeping into the bread, eliminating any risk of sogginess for your Classic Cheesy Beef Melts.
-
Assembling Your Melts
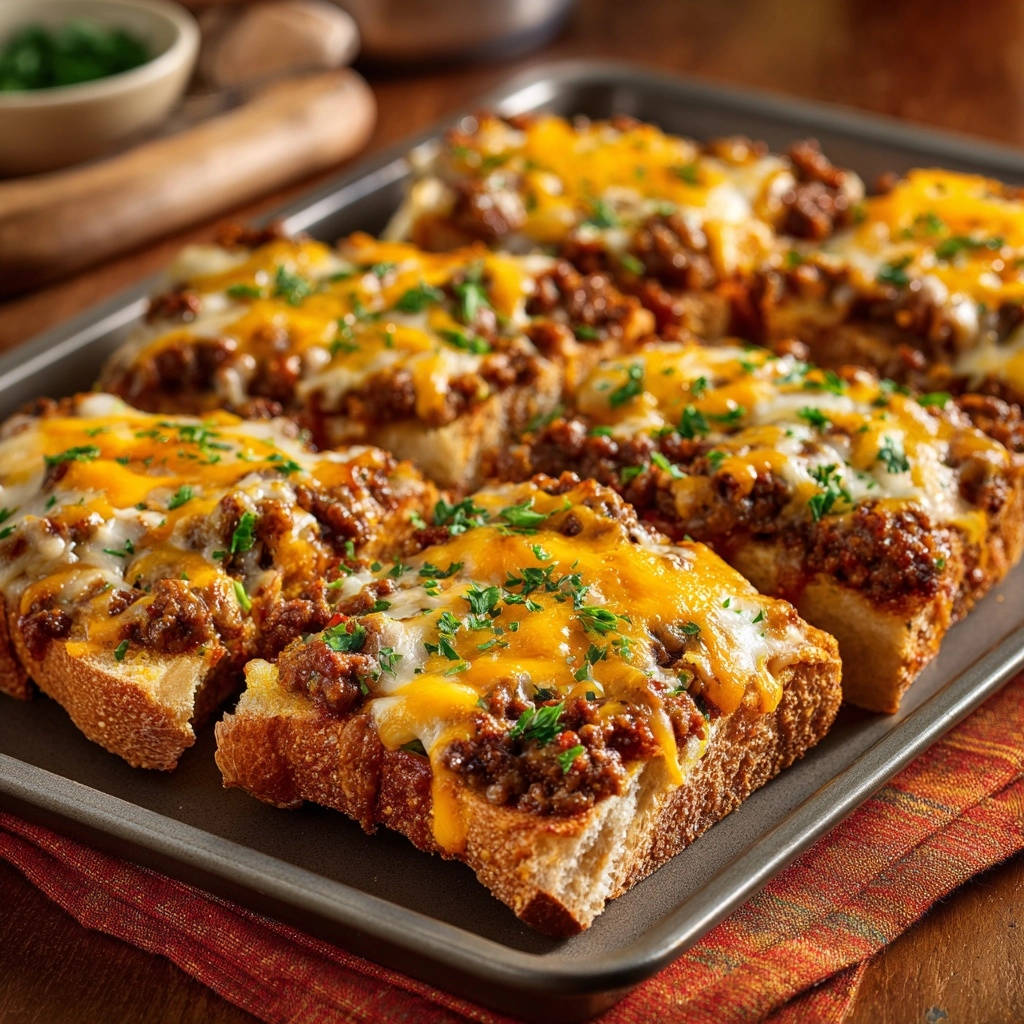
Once the bread is perfectly toasted, spoon a generous amount of the thickened beef mixture onto each slice. Spread the mixture evenly across the bread, ensuring good coverage.
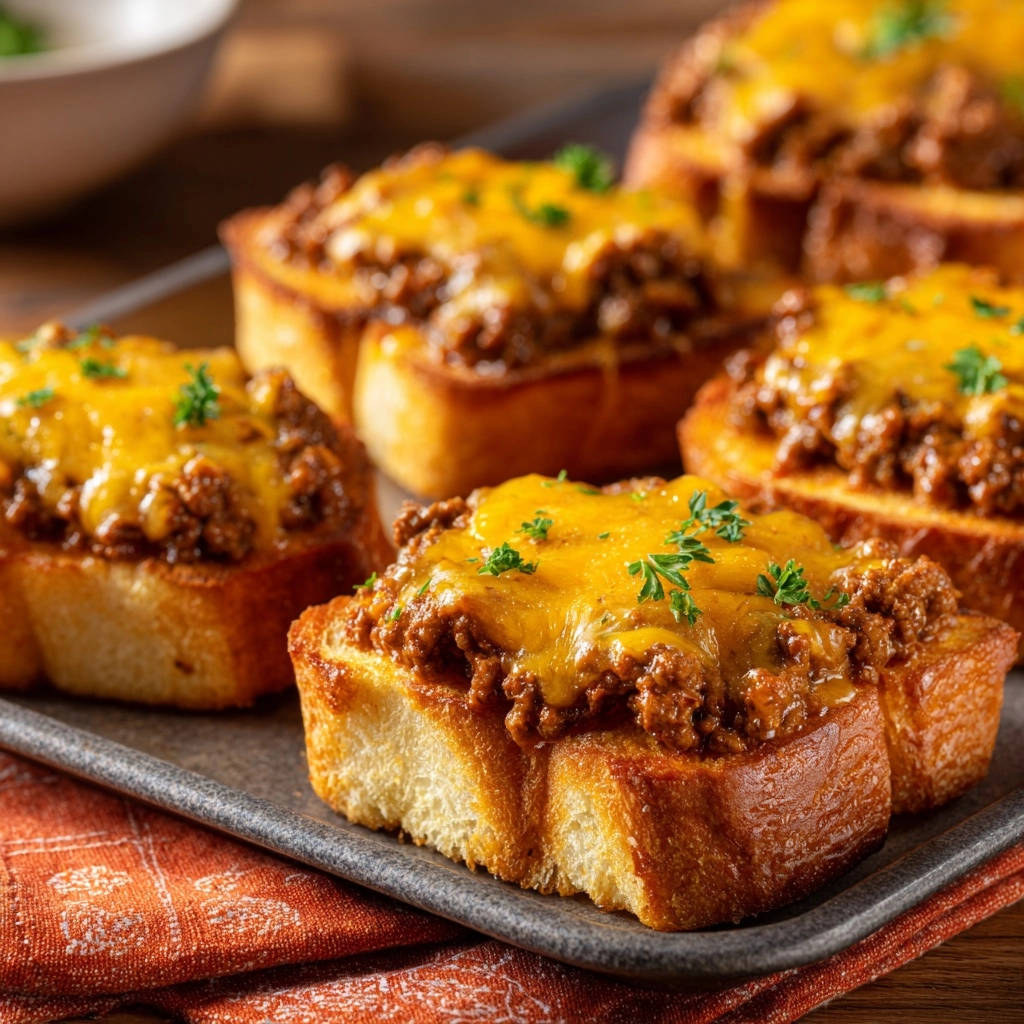
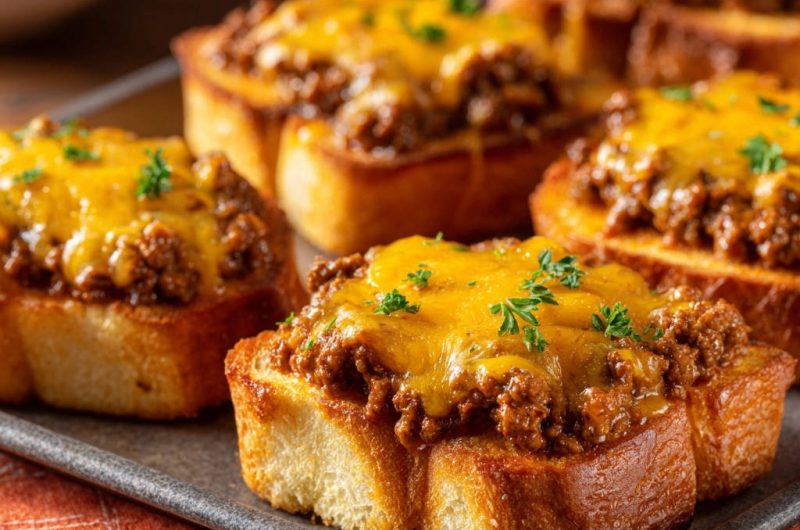
Then, top each beef-laden slice with a liberal layer of shredded sharp cheddar cheese. Don’t be shy here; the cheese is key to the “melt” in Cheesy Beef Melts.
-
Achieving Golden, Bubbly Cheese
Return the baking sheet with the assembled melts to the preheated oven. Bake for an additional 5-7 minutes, or until the cheese is beautifully melted, bubbly, and slightly golden at the edges.
For an extra-golden, slightly crisped cheese topping, you can briefly switch to the broiler for 1-2 minutes. Watch them continuously during broiling to prevent burning, as cheese can go from perfect to scorched very quickly.
-
Garnish and Serve Hot
Carefully remove the baking sheet from the oven. Garnish your freshly baked Classic Cheesy Beef Melts with a sprinkle of fresh chopped parsley.
Serve them immediately while the cheese is still wonderfully gooey and the bread remains crisp. Enjoy every single satisfying bite!
Elevate Your Melts: Expert Tips & Variations
Achieving Optimal Sauce Consistency
If your sauce appears too thin, simply continue to simmer it uncovered for a few extra minutes until it reduces and thickens to your liking. For a quicker fix, stir in a cornstarch slurry (1 tsp cornstarch mixed with 1 tbsp cold water) and simmer for one minute.
Should the sauce become too thick, add a small amount of water or beef broth, one tablespoon at a time, until the desired consistency is achieved. This ensures a rich, spreadable topping for your cheesy beef sandwiches.
Cheese Choices for the Perfect Melt
While sharp cheddar offers a classic, tangy flavor, other cheeses can also create a fantastic melt. Consider using Monterey Jack for a milder, creamier texture that melts beautifully.
Provolone or Swiss cheese can also add a distinct flavor profile, especially if you prefer a less sharp cheese. A blend of cheeses can introduce wonderful complexity to your Classic Cheesy Beef Melts.
Bread Alternatives and Upgrades
Beyond Texas toast, several sturdy bread options work wonderfully for these melts. Crusty sourdough slices offer a tangy contrast and excellent structural integrity.
Thick-cut ciabatta rolls, split and toasted, also provide a substantial and flavorful base. Even a sturdy artisan white loaf, sliced thickly, can stand up well to the rich topping.
Spice It Up or Make It Mild
To add a touch more heat, consider incorporating a pinch of cayenne pepper or a small dash of your favorite hot sauce into the beef mixture. Adjust to your preference, starting with a small amount.
If you prefer a milder flavor, simply reduce the amount of chili powder or omit it entirely. This flexibility allows everyone to enjoy their cheesy beef sandwiches just how they like them.
Flavor Boosters and Add-ins
Boost the vegetable content and flavor by sautéing finely diced bell peppers or mushrooms with the onions. This adds both texture and additional savory notes to your beef mixture.
A teaspoon of smoked paprika can lend a deep, smoky aroma, while a small amount of brown mustard can introduce a pleasant tang. These small additions truly elevate the taste of your sloppy joe style melts.
Common Questions About Classic Cheesy Beef Melts
Can I use different types of ground meat?
Absolutely! Ground turkey or ground chicken can be excellent leaner alternatives to ground beef. Ensure to cook them thoroughly until no pink remains.
You might need a little extra olive oil if using very lean poultry to prevent sticking, and potentially adjust seasonings slightly to complement the different meat flavor.
How do I store Classic Cheesy Beef Melts leftovers?
For best results, store the leftover beef mixture separately in an airtight container in the refrigerator for up to 3-4 days. The assembled melts can be stored, but the bread may lose some crispness.
If storing assembled melts, wrap them tightly in foil or place them in an airtight container in the fridge. Reheating instructions will vary to best preserve texture.
Can I freeze the beef mixture?
Yes, the cooked beef mixture freezes exceptionally well! Allow it to cool completely, then transfer it to a freezer-safe container or bag.
It can be stored in the freezer for up to 3 months. Thaw overnight in the refrigerator before reheating gently on the stovetop and assembling your fresh cheesy beef sandwiches.
What are the best side dishes to serve with Cheesy Beef Melts?
Classic Cheesy Beef Melts pair wonderfully with a variety of simple side dishes. A crisp green salad with a light vinaigrette provides a refreshing contrast to the richness.
Round Out Your Meal
Looking for more satisfying beef dishes or comforting bowls?
- For a warm start, try this Classic Meatball & Tomato Soup, featuring tender meatballs that complement the cheesy beef melts.
- If you enjoy slow-cooked beef, consider this Hearty Beef & Veggie Braise for a different take on tender beef.
French fries or crispy potato wedges are always a popular and satisfying choice. For a lighter option, consider serving with a fresh coleslaw or a cup of tomato soup.
Troubleshooting Your Cheesy Beef Melts
My bread is still getting soggy!
Double-check that you are buttering both sides of your thick-cut bread thoroughly. The butter creates a waterproof barrier, and skipping a side can lead to sogginess.
Ensure your bread is toasted to a golden-brown crispness before adding the beef mixture. If the beef sauce is too thin, simmer it longer to reduce moisture and thicken it.
The sauce is too thin/thick.
If your sauce is too thin, continue to simmer it uncovered over low heat, stirring occasionally, until it reaches your desired consistency. Evaporation will naturally thicken it.
For a sauce that’s too thick, simply stir in a tablespoon or two of water or beef broth until it’s perfectly spreadable. Adjusting sauce consistency ensures proper coating and prevents dryness.
The cheese isn’t melting properly or burning.
Ensure your oven is fully preheated to the specified temperature for even melting. Some cheeses melt better than others; freshly shredded cheese often melts more smoothly than pre-shredded.
If using the broiler for browning, stay vigilant. The intense heat can burn cheese very quickly, so watch it constantly and remove it as soon as it reaches golden perfection.
Serving, Storing, & Reheating Your Delicious Beef Melts
Creative Serving Ideas
Serve your Classic Cheesy Beef Melts open-faced on individual plates for a rustic, inviting presentation. A sprig of fresh parsley provides a vibrant finishing touch.
For a fun, family-style meal, arrange them on a large platter alongside a bowl of pickles or a simple green salad. These hearty open-faced sandwiches are always a hit.
Making Ahead: Tips for Batch Cooking
The beef mixture can be prepared entirely in advance and stored in the refrigerator for up to 3-4 days. This makes assembly quick and easy on busy evenings.
You can also pre-butter and pre-bake the bread, allowing it to cool completely before storing in an airtight container. This way, the final assembly and melt takes mere minutes.
Reheating for Optimal Crispness
To reheat assembled Classic Cheesy Beef Melts, place them on a baking sheet and warm in a preheated oven at 350°F (175°C) for 10-15 minutes.
This method helps to re-crisp the bread and melt the cheese evenly. Avoid microwaving, as it tends to make the bread soggy.
Ready to Delight? Share Your Cheesy Beef Melts!
You now hold the secret to perfectly crisp and incredibly flavorful Classic Cheesy Beef Melts, free from the disappointment of soggy bread. This recipe offers a quick, satisfying, and utterly delicious meal solution for any night of the week.
Don’t just take my word for it-whip up a batch of these amazing cheesy beef sandwiches tonight! I can’t wait to hear how this recipe transforms your mealtime. Please share your experiences and tell me what you think in the comments below!
Classic Cheesy Beef Melts
Course: Main CourseCuisine: American CuisineDifficulty: easy4
servings15
minutes40
minutes55
minutesAmerican Cuisine
Ingredients
1 pound lean ground beef
1 tablespoon olive oil
1 medium onion, finely chopped
2 cloves garlic, minced
1 (8 ounce) can tomato sauce
1/4 cup ketchup
1 tablespoon brown sugar (or granulated sugar)
1 tablespoon Worcestershire sauce
1 teaspoon chili powder
1/2 teaspoon salt
1/4 teaspoon black pepper
1/4 cup water or beef broth
4-6 slices thick-cut sturdy white bread (like Texas toast)
2 tablespoons butter, softened
1 1/2 cups shredded sharp cheddar cheese
Fresh parsley, chopped, for garnish
Directions
- Brown the beef: In a large skillet over medium-high heat, add the ground beef. Cook, breaking it up with a spoon, until fully browned. Drain off any excess fat. Remove beef from skillet and set aside.
- Build the sauce: Reduce heat to medium. Add olive oil to the same skillet. Add chopped onion and cook for 5-7 minutes, until softened and translucent. Add minced garlic and cook for another minute until fragrant.
- Combine and simmer: Stir the cooked ground beef back into the skillet with the onions and garlic. Add tomato sauce, ketchup, brown sugar, Worcestershire sauce, chili powder, salt, pepper, and water or beef broth. Stir well to combine. Bring to a simmer, then reduce heat to low and cook for 10-15 minutes, stirring occasionally, until the sauce has thickened and flavors have melded. The key here is a nice, thick consistency that won’t make your bread soggy.
- Prep the bread (The Anti-Soggy Secret!): While the sauce simmers, preheat your oven to 375F (190C). Spread a thin layer of softened butter on both sides of each slice of bread. Place the buttered bread slices directly on a baking sheet. Bake for 5-7 minutes, flipping once, until both sides are lightly golden brown and slightly firm. This creates a protective, crispy barrier for your topping.
- Assemble and melt: Spoon a generous amount of the beef mixture onto each toasted bread slice, spreading it evenly. Top each with a good layer of shredded cheddar cheese.
- Finish in the oven: Return the baking sheet to the oven and bake for 5-7 minutes, or until the cheese is beautifully melted and bubbly. For extra golden cheese, you can briefly switch to the broiler for 1-2 minutes, watching carefully to prevent burning.
- Serve immediately: Carefully remove from the oven. Garnish with fresh chopped parsley and serve hot. Enjoy your perfectly crunchy, flavor-packed cheesy beef melts, no soggy bread allowed!
Notes
- The key to non-soggy bread is toasting it with butter beforehand.