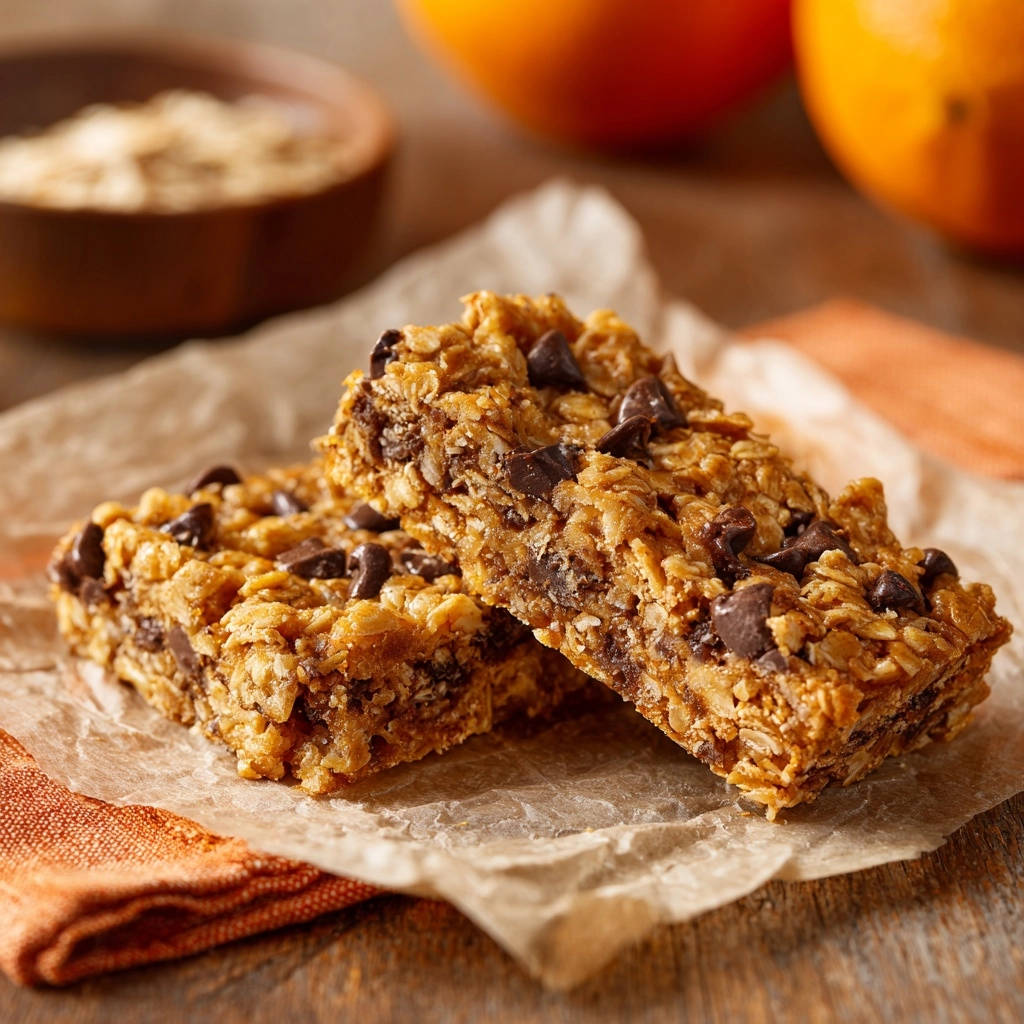
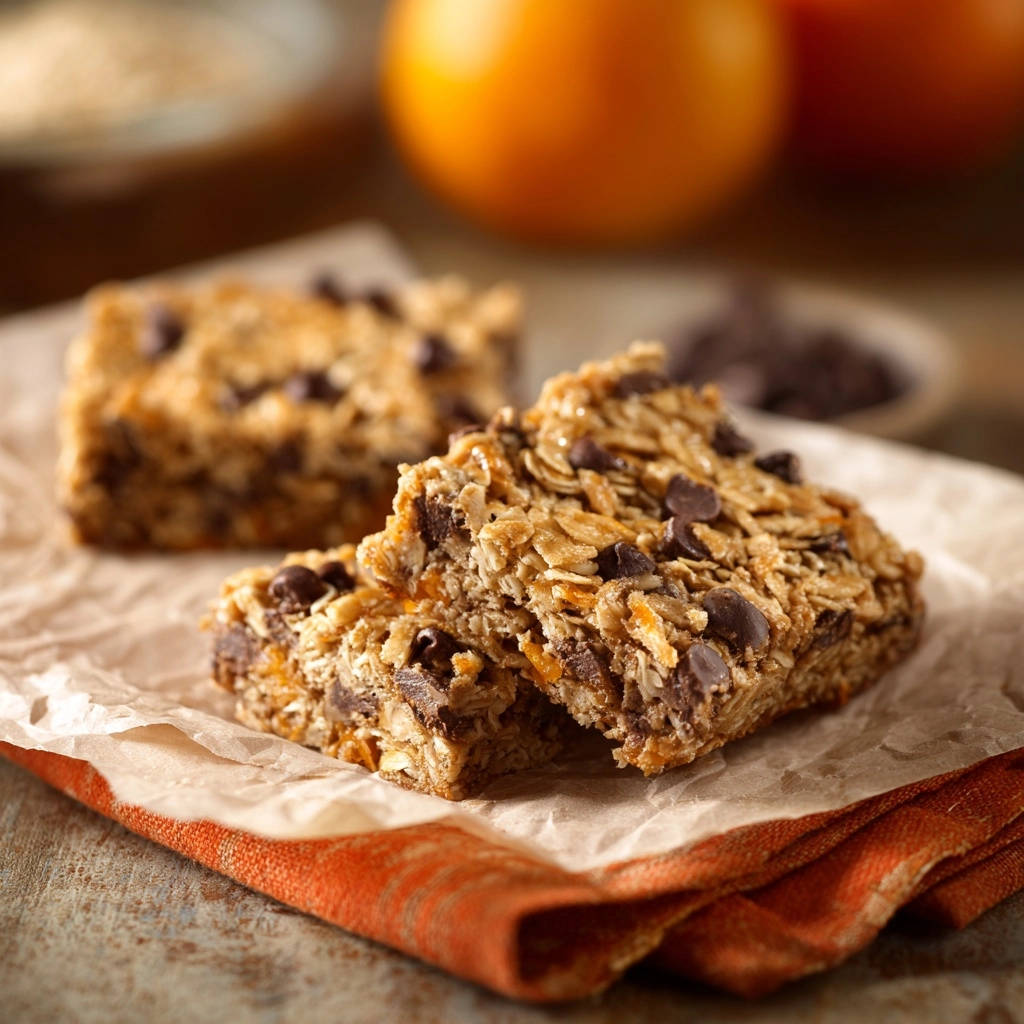
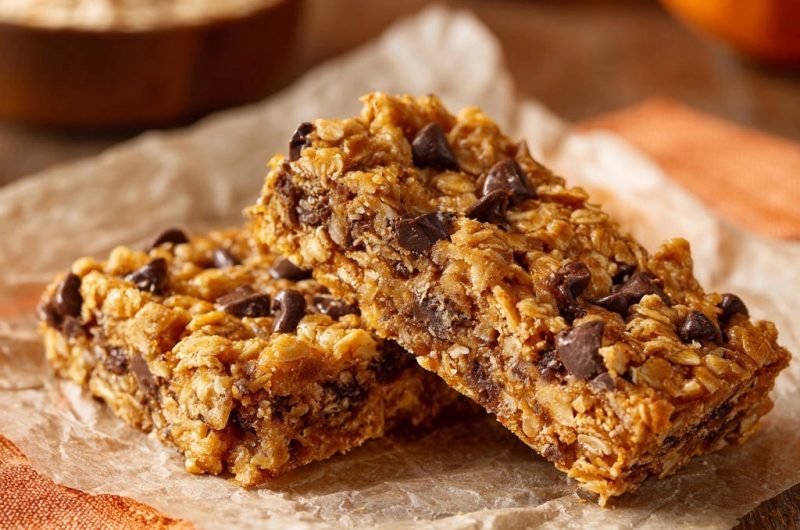
Chewy Chocolate Chip Oatmeal Bars: Hold-Together Perfection!
There’s nothing quite as disheartening as reaching for a homemade oatmeal bar, only for it to crumble into a messy pile before it even reaches your mouth. I’ve been there too, frustrated by beautiful bars that lacked structural integrity. This recipe for Chewy Chocolate Chip Oatmeal Bars is my definitive answer, specifically engineered to deliver perfectly cohesive, bakery-style treats that are guaranteed to hold together.
The No-Crumble Secret: Why Our Oatmeal Bars Stand Apart
Many recipes for homemade bars suffer from a common flaw: they fall apart. This often leads to wasted effort and a less-than-satisfying snacking experience. Our recipe for these Chewy Chocolate Chip Oatmeal Bars directly addresses and solves this frustrating problem.
The key to their unwavering stability lies in two simple yet critical steps: firm compaction of the dough before baking, and allowing for absolute, complete cooling afterward. These often-overlooked details are the “secret weapons” ensuring every bar stays intact.
Get Our Best Recipes Weekly!
Join thousands of food lovers and get delicious recipes delivered to your inbox.
What you get is a perfect balance of delightful chewiness with robust structural integrity. Each bite delivers that comforting oatmeal texture alongside generous pockets of melted chocolate, without any fear of disintegration.
These resilient bars are perfect for packing into lunchboxes, grabbing as a quick on-the-go snack, or proudly displaying at gatherings. Their reliable stability makes them an absolute game-changer for anyone who loves homemade treats that truly perform.
Gather Your Essentials: What You’ll Need for Baking Success
Essential Kitchen Tools
8×8 Inch Baking Pan: This specific size is crucial for achieving the perfect thickness in your Chewy Chocolate Chip Oatmeal Bars. Lining it with parchment paper, allowing for an overhang, is non-negotiable for effortless lifting and guaranteed non-stick release.
Large Mixing Bowls: You’ll need at least two bowls: one for combining the dry ingredients and another for whisking together the wet components. This ensures proper ingredient integration.
Whisk & Sturdy Spoon/Spatula: A whisk is ideal for smoothly blending wet ingredients and aerating dry ones. A robust spoon or spatula is essential for mixing the thick oatmeal dough, which will require some elbow grease.
Wire Cooling Rack: Absolutely critical for the final, and arguably most important, cooling phase. Air circulation underneath prevents sogginess and promotes even setting.
The Building Blocks of Flavor: Inside Your Chewy Chocolate Chip Oatmeal Bars
The Oat Foundation: Old Fashioned Rolled Oats
Old-fashioned rolled oats are the star of these Chewy Chocolate Chip Oatmeal Bars. Their hearty texture provides the signature chewiness and essential structure that helps the bars hold together. Quick oats, while convenient, would yield a gummier, less defined texture that doesn’t bind as effectively.
Sweetness & Structure: Sugars and Flour
All-purpose flour acts as a foundational binder, providing the necessary structure to create a cohesive bar. It works in conjunction with the oats to build a stable matrix.
A thoughtful blend of light brown sugar and granulated sugar is used to achieve both deep flavor and excellent chewiness. Brown sugar contributes moisture and a caramel-like note, while granulated sugar adds essential sweetness and helps with binding.
The Binding Agents: Melted Butter & Honey (or Maple Syrup)
Melted unsalted butter is key for its role in creating a chewy texture and acting as a primary binder for all the ingredients. It helps to evenly coat the dry components, promoting a uniform dough.
Honey or maple syrup is a critical component, functioning as an additional sticky binder. It adds moisture, natural sweetness, and helps to create that perfectly chewy consistency while ensuring the oatmeal bars don’t crumble.
Chocolatey Bliss: The Star Ingredient
Chocolate chips are, of course, a beloved inclusion, melting into delightful pockets of sweetness throughout the bars. You can choose your preference here: semi-sweet for classic appeal, milk chocolate for a sweeter profile, or dark chocolate for a richer experience.
Flavor Boosters & Leavening: Vanilla, Baking Soda, and Salt
Vanilla extract enhances all the other flavors, adding a warm, aromatic note that elevates the overall taste. It brings a subtle complexity.
Baking soda provides a small amount of lift, preventing the bars from being too dense. Salt is vital for balancing the sweetness and enhancing the flavors of the chocolate and oats, ensuring a well-rounded taste.
From Mixing Bowl to Masterpiece: A Guided Journey to Perfect Bars
-
Prepare Your Pan and Preheat: Begin by preheating your oven to a precise 350°F (175°C). This ensures the oven is at the correct temperature for even baking from the start.
Next, line an 8×8 inch baking pan with parchment paper, making sure to leave a generous overhang on two opposite sides. This parchment “sling” is crucial; it acts as a non-stick barrier and will allow you to easily lift the entire slab of Chewy Chocolate Chip Oatmeal Bars out of the pan after baking, guaranteeing a clean release and preventing any breakage.
-
Combine Dry Ingredients: In a large mixing bowl, measure out your old-fashioned rolled oats, all-purpose flour, baking soda, and salt. Use a whisk to combine these ingredients thoroughly.
This step ensures that the leavening agent (baking soda) and salt are evenly distributed throughout the dry mixture, leading to uniform texture and flavor in every bite of your Chewy Chocolate Chip Oatmeal Bars.
-
Mix Wet Ingredients: In a separate, medium-sized bowl, combine the melted unsalted butter, light brown sugar (packed), granulated sugar, honey (or maple syrup), and vanilla extract. Use a whisk to blend these ingredients until they are smooth and completely integrated.
Ensure there are no sugar lumps and the mixture is consistently combined; this even distribution of liquids and sugars is vital for the bars’ chewiness and binding properties.
-
Integrate Wet and Dry: Pour the whisked wet ingredients directly into the bowl containing your dry mixture. Using a sturdy spoon or a durable spatula, mix the ingredients thoroughly.
Continue mixing until all the oats and flour are evenly moistened and no dry pockets remain. The dough will be quite thick and sticky at this stage, which is exactly the texture you’re looking for to ensure cohesive bars.
-
Fold in Chocolate Chips: Add your chocolate chips to the thick dough. Gently fold them in until they are uniformly distributed throughout the mixture.
While semi-sweet are classic, feel free to experiment with milk or dark chocolate chips, or even add a handful of chopped nuts or dried cranberries for a personalized twist on these delectable Chewy Chocolate Chip Oatmeal Bars.
-
The Crucial Compaction Step: Transfer the entire, thick mixture into your prepared 8×8 inch baking pan. This is arguably the most critical step for ensuring your bars hold together beautifully.
Using the back of a sturdy spoon, a flat-bottomed glass, or even your lightly greased hands, press the mixture down very firmly and evenly into the pan. You want to create a dense, compact layer across the entire surface. Compacting it tightly forces all the ingredients to bind together under pressure, which is absolutely essential for creating a cohesive bar that won’t crumble upon cutting.
-
Bake to Golden Perfection: Place the pan in your preheated oven and bake for 25-30 minutes. Look for the edges to turn a beautiful golden brown, and the center should appear set when lightly touched.
Avoid overbaking, as this can lead to dry or hard bars rather than the desired chewy texture. The bars will continue to firm up slightly as they cool, so don’t wait for them to be rock-solid in the oven.
-
The Golden Rule: Cool Completely!
DO NOT CUT IMMEDIATELY! This step is your absolute secret weapon against crumbling and is as vital as the compaction. Once baked, remove the pan from the oven and let the bars cool completely in the pan on a wire rack for a minimum of 2 hours.
For even greater stability, once the bars are cool enough to handle, transfer the pan to the refrigerator for an additional 30 minutes to an hour. This complete cooling allows the sugars and fats to firm up and solidify, effectively binding all the ingredients into a perfectly sliceable, non-crumbly slab.
-
Slice and Savor: Once your Chewy Chocolate Chip Oatmeal Bars are fully cooled and firm, use the parchment paper overhang to gently lift the entire baked slab out of the pan. Transfer it to a cutting board.
Using a sharp knife, slice the slab into your desired bar size. Now, celebrate your success with perfectly intact, truly delicious, and satisfyingly chewy oatmeal bars!
Mastering Your Bars: Expert Tips for Chewiness and Cohesion
The Compaction Connection: Pressing for Perfect Bars
The importance of pressing the dough firmly into the pan cannot be overstated. Think of it like packing snow to make a dense snowball; the tighter you pack, the more solid the result. Ensure you use consistent, even pressure across the entire surface of the dough, particularly into the corners.
If using your hands, lightly greasing them prevents sticking and allows for better compaction. This step is the literal foundation of a non-crumbly bar, forcing all those delicious oats and chocolate chips to adhere to one another.
Patience is a Virtue: The Crucial Cooling Phase
Cooling is not just a suggestion; it’s a non-negotiable step for structurally sound bars. As the bars cool, the melted sugars and fats within the dough solidify. This process acts like culinary cement, firmly binding all the ingredients together.
Cutting warm or even slightly warm bars interrupts this setting process, leading to immediate crumbling. For best results, allow at least two hours at room temperature, or accelerate the final set in the refrigerator for 30-60 minutes once the initial heat has dissipated. Avoid placing warm bars directly into the fridge, as this can create condensation.
Customization Station: Flavorful Twists and Add-Ins
While these Chewy Chocolate Chip Oatmeal Bars are perfect as is, they’re also wonderfully adaptable. Consider stirring in half a cup of toasted chopped pecans or walnuts for a nutty crunch. Dried cranberries, raisins, or even chopped dried apricots can add a lovely tartness and chew.
A teaspoon of ground cinnamon or a pinch of nutmeg can deepen the warm, comforting flavors. If adding significant quantities of dense add-ins, note that baking time might slightly increase, or you might need to press them in more firmly.
Don’t Overbake! Achieving That Perfect Chewy Texture
Overbaking is the enemy of chewiness, transforming your bars into dry, hard bricks. Keep a close eye on your Chewy Chocolate Chip Oatmeal Bars during the last few minutes of baking.
Look for the edges to be lightly golden brown and the center to appear set, without being overly firm. Remember that the residual heat in the pan will continue to cook the bars for a short period after you remove them from the oven, so slightly underbaked is better than overbaked when aiming for that perfect chew.
Solved! Troubleshooting Your Chewy Chocolate Chip Oatmeal Bar Bake
Problem: My bars are crumbling and falling apart!
Solution: This is the most common issue and almost always points to two culprits: insufficient pressing of the dough into the pan, or not allowing the bars to cool completely. Ensure you press the mixture very firmly and evenly into the pan before baking. After baking, allow them ample time (at least 2 hours at room temperature, or 30-60 minutes in the refrigerator) to set before cutting. The sugars and fats need this time to firm up and bind all the ingredients effectively.
Problem: My bars are too dry or hard.
Solution: Overbaking is the primary reason for dry or hard bars. Keep a close eye on the oven; remove them as soon as the edges are golden brown and the center looks set. They will continue to firm up as they cool. Also, double-check your measurements for wet ingredients, particularly melted butter and honey/maple syrup, as these contribute significantly to the desired moisture and chewiness.
Problem: My bars are too soft or gooey.
Solution: This usually indicates that the bars are either underbaked or haven’t cooled for long enough. If the center still seems quite wet after baking, return them to the oven for an additional 5-10 minutes. If they appear fully baked but are still too soft, extended cooling in the refrigerator will work wonders in firming them up. It’s also a good idea to verify your oven temperature with a thermometer to ensure accuracy.
Problem: The chocolate chips sank to the bottom.
Solution: Sinking chocolate chips can occur if the batter is too warm or if the chips are heavier than the surrounding dough. A simple trick is to toss the chocolate chips in about a tablespoon of the all-purpose flour from the recipe before adding them to the batter. This light coating helps them adhere to the dough and prevents them from sinking, keeping them evenly suspended throughout your Chewy Chocolate Chip Oatmeal Bars.
Enjoying Your Creations: Serving, Storing, and Freezing
Ideal Serving Suggestions
These Chewy Chocolate Chip Oatmeal Bars are utterly delicious on their own, offering a satisfying bite of sweetness and texture. They pair wonderfully with a warm cup of coffee or tea, making for a delightful morning or afternoon treat. For an indulgent dessert, serve a bar slightly warmed with a scoop of vanilla bean ice cream.
Their inherent stability and robust nature make them perfect for grab-and-go snacks, lunchbox additions, or as a portable energy boost. They’re neat, tidy, and absolutely delicious wherever you choose to enjoy them.
Keeping Them Fresh: Storage Tips
To maintain their optimal chewiness and freshness, store your Chewy Chocolate Chip Oatmeal Bars in an airtight container at room temperature. They will remain delicious for 3-5 days. If stacking, place small pieces of parchment paper between layers to prevent sticking.
For extended freshness, especially in warmer climates, you can also store them in the refrigerator, where they will last for up to a week. Just be aware they might be a bit firmer straight from the fridge.
Make-Ahead Magic: Freezing for Later
These oatmeal bars freeze exceptionally well, making them perfect for meal prep or having a quick treat on hand. Once completely cooled, slice the bars and wrap individual portions tightly in plastic wrap, then place them in an airtight freezer-safe bag or container.
They can be frozen for up to 3 months. To enjoy, simply thaw them at room temperature for an hour or two, or pop them into the microwave for a few seconds for a warm, gooey bite. The texture remains remarkably consistent after thawing.
Your Chewy Chocolate Chip Oatmeal Bar Questions, Answered
Can I use quick oats instead of old-fashioned rolled oats?
While you technically can use quick oats, I strongly advise against it for this specific recipe. Quick oats are cut thinner and cook faster, resulting in a gummier, less substantial texture that won’t provide the same chewiness or structural integrity. Old-fashioned oats are crucial for achieving the “hold together” promise and the ideal texture of these Chewy Chocolate Chip Oatmeal Bars.
Can I make these Chewy Chocolate Chip Oatmeal Bars gluten-free?
Absolutely! Making these bars gluten-free is straightforward. Ensure you use certified gluten-free old-fashioned rolled oats. For the all-purpose flour, substitute it with a high-quality 1:1 gluten-free baking flour blend that contains xanthan gum. All other ingredients in the recipe are typically naturally gluten-free.
What if I don’t have parchment paper?
Parchment paper is highly recommended for its non-stick properties and the ease of lifting the whole slab. If you don’t have it, you can thoroughly grease and flour your baking pan. However, be aware that removing the fully set bars will be more challenging, and there’s a higher risk of them breaking. A heavily greased foil sling, with edges extending beyond the pan, could also serve as an alternative, but parchment remains superior.
How long do these Chewy Chocolate Chip Oatmeal Bars last?
When stored correctly in an airtight container at room temperature, these delicious Chewy Chocolate Chip Oatmeal Bars will stay fresh for 3-5 days. If refrigerated, they can extend their freshness for up to a week. For longer storage, they freeze beautifully for up to 3 months, making them perfect for stocking up.
Can I reduce the sugar content?
You can certainly experiment with a slight reduction in the granulated sugar if you prefer a less sweet bar, perhaps by a tablespoon or two. However, be cautious about cutting too much sugar. Sugar is not just for sweetness; it plays a vital role in the texture, chewiness, and binding properties of the bars. Significant reductions can negatively impact the “hold together” promise and result in a drier, less cohesive bar.
Ready to Impress? Share Your Chewy Chocolate Chip Oatmeal Bars Masterpiece!
There’s immense satisfaction in baking a treat that not only tastes incredible but also looks flawless and holds its shape perfectly. You’ve now mastered the art of creating Chewy Chocolate Chip Oatmeal Bars that are guaranteed to delight, thanks to those simple yet powerful techniques.
More Sweet Treats
If you enjoyed these chewy chocolate chip oatmeal bars, you might like these other chocolate-focused recipes.
- For a rich, gooey chocolate experience, try the Ultimate Marshmallow Drizzle Brownies, which offer a similar fudgy texture.
- If you’re in the mood for a classic chocolate layer cake, consider the Classic Yellow Cake with Chocolate Frosting for a comforting dessert.
Gone are the days of crumbly frustrations; you can confidently present these sturdy, delicious, and utterly irresistible bars. This recipe empowers you to achieve bakery-quality results right in your own kitchen.
So go ahead, bake a batch, enjoy every chewy, chocolatey bite, and proudly share your masterpiece with friends, family, or anyone who appreciates a truly great homemade snack. Happy baking!
Chewy Chocolate Chip Oatmeal Bars
Course: SnacksCuisine: AmericanDifficulty: easy4
12 bars15
minutes30
minutes350
kcal180
minutesTired of crumbly homemade bars? This recipe guarantees perfectly chewy, structurally sound Chewy Chocolate Chip Oatmeal Bars loaded with chocolate chips. A simple, overlooked step ensures they hold together every time, solving the frustrating problem of messy bars.
Ingredients
2 cups old fashioned rolled oats
1 cup all-purpose flour
1/2 teaspoon baking soda
1/4 teaspoon salt
1/2 cup unsalted butter, melted
1/2 cup packed light brown sugar
1/4 cup granulated sugar
1/4 cup honey or maple syrup
1 teaspoon vanilla extract
1 cup chocolate chips
Directions
- Preheat your oven to 350F (175C). Line an 8×8 inch baking pan with parchment paper, leaving an overhang on two sides to easily lift the bars later. This also helps with guaranteed pan release.
- In a large bowl, whisk together the oats, flour, baking soda, and salt.
- In a separate medium bowl, combine the melted butter, brown sugar, granulated sugar, honey (or maple syrup), and vanilla extract. Whisk until smooth and well combined.
- Pour the wet ingredients into the dry ingredients. Mix thoroughly with a sturdy spoon or spatula until all the oats and flour are evenly moistened. It will be thick.
- Stir in the chocolate chips until distributed throughout the mixture.
- Transfer the mixture to your prepared baking pan. Here’s the key for bars that hold together: Using the back of a spoon or your hands (lightly greased if needed), press the mixture down very firmly and evenly into the pan. Compacting it tightly is crucial for a cohesive bar.
- Bake for 25-30 minutes, or until the edges are golden brown and the center is set.
- DO NOT CUT IMMEDIATELY! This is your secret weapon against crumbling. Let the bars cool completely in the pan on a wire rack for at least 2 hours, or even better, transfer to the refrigerator for 30 minutes to an hour once cool enough to handle. Cooling completely allows the sugars to firm up and bind everything together.
- Once fully cooled and firm, use the parchment paper overhang to lift the entire slab out of the pan. Place on a cutting board and slice into bars. Enjoy your perfectly intact, delicious chewy oatmeal bars!
Notes
- Compacting firmly into the pan and cooling completely are crucial for bars that hold together without crumbling.