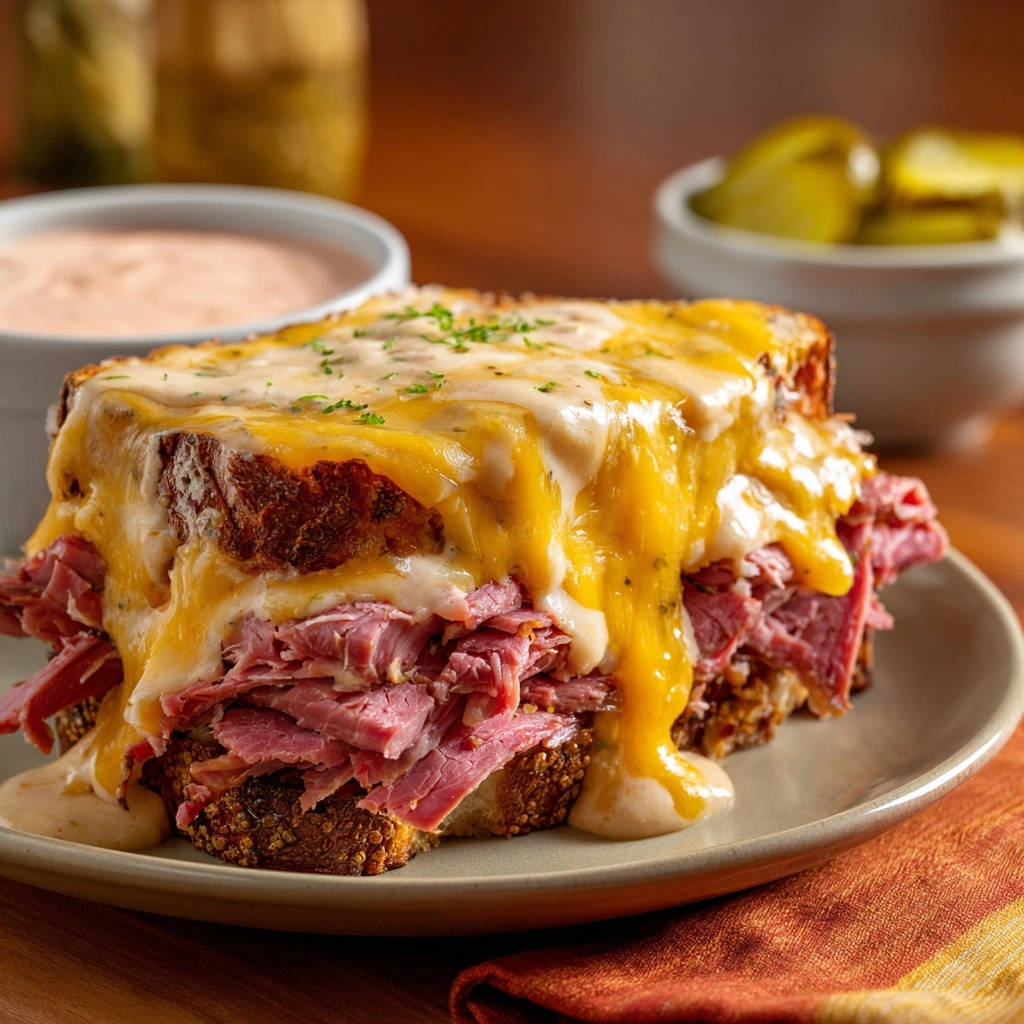
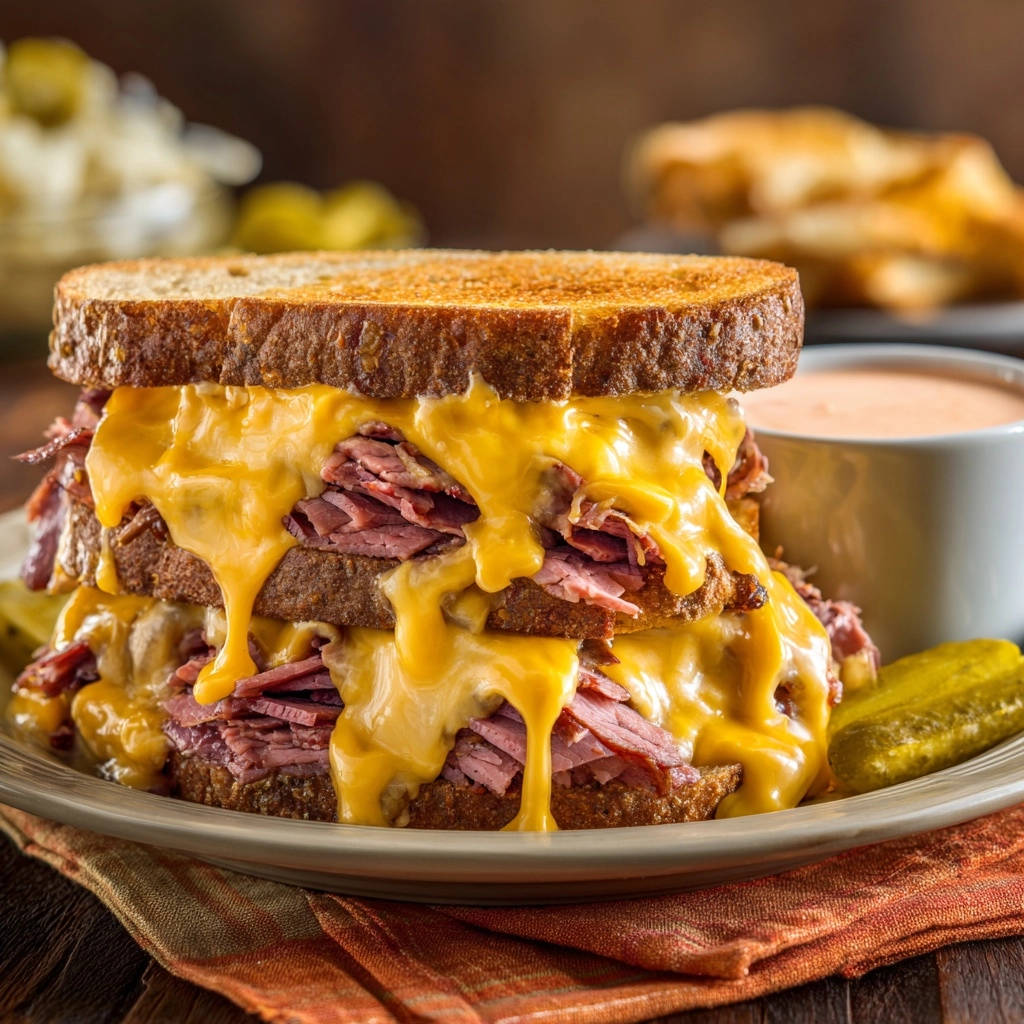
Cheesy Corned Beef Melt: Crispy, Never-Soggy Perfection
For years, I struggled with the classic hot sandwich dilemma: how to achieve that perfect Cheesy Corned Beef Melt without the inevitable soggy bread disaster. This recipe finally cracks the code, delivering all the juicy, savory corned beef and glorious melted cheese you crave, piled high on perfectly crisp, never-soggy bread. Get ready to experience the diner-style masterpiece you’ve always dreamed of, guaranteed to hold up to every single delicious bite.
The Secret to a Truly Crispy Cheesy Corned Beef Melt
The primary challenge with any hot, cheesy sandwich lies in preventing the bread from becoming a moisture-laden, flimsy mess. Traditional methods often result in a beautifully melted top, but a regrettably soggy bottom, detracting from the overall experience.
Our solution is remarkably simple yet transformative: we pre-broil the bread. This creates a crucial protective toasted barrier, sealing the surface before any wet ingredients like dressing or warmed corned beef are added.
Get Our Best Recipes Weekly!
Join thousands of food lovers and get delicious recipes delivered to your inbox.
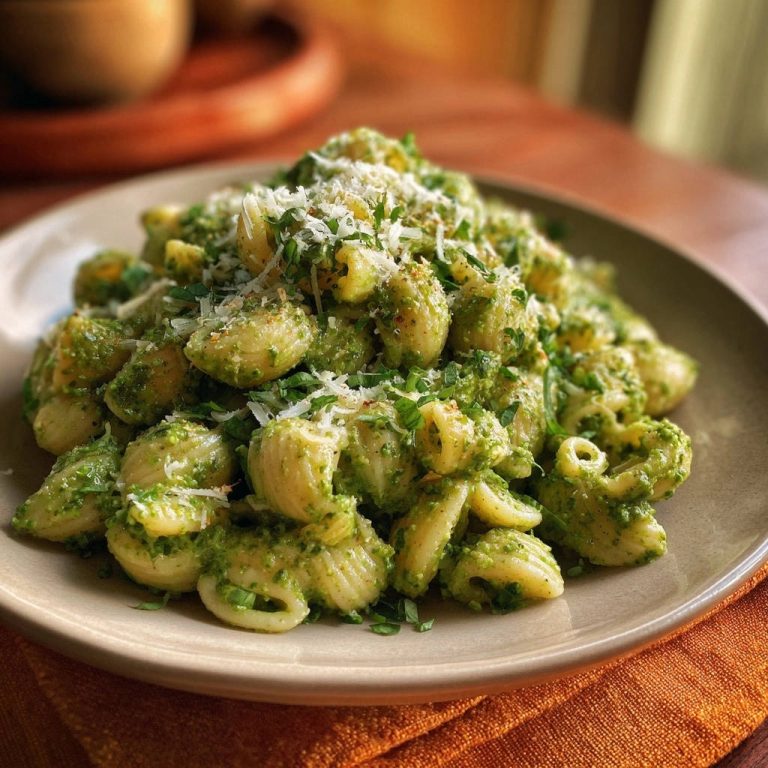
For more ideas on keeping your bread crisp, check out this guide to classic cheesy beef melts.
This initial toasting ensures the bread remains firm and crisp throughout the assembly and final melting stages. The result is that coveted diner-style perfection, where every layer contributes to a satisfying texture and flavor without compromise.
For a similar cheesy delight, explore shredded beef quesadillas.
Gathering Your Melt Masterpiece Ingredients
Crafting an exceptional Cheesy Corned Beef Melt begins with selecting quality ingredients. Each component plays a vital role in achieving that perfect balance of flavor and texture, so choose wisely for the best possible outcome.
The Foundation: Bread Choices for Ultimate Crunch
For this Cheesy Corned Beef Melt, sturdy rye or pumpernickel bread is paramount. These varieties offer a robust crumb and dense texture that can withstand the broiling process and hold up to the generous fillings without disintegrating.
Their inherent structure and flavor also complement the savory corned beef and tangy dressing beautifully. If rye or pumpernickel aren’t available, consider other hearty, thick-sliced artisan breads like sourdough, which also provides excellent structural integrity.
Savory Core: All About That Corned Beef
The heart of your melt is the corned beef, and its quality makes all the difference. Opt for thinly sliced corned beef, ideally from a good deli, as this ensures tenderness and even distribution of flavor in every bite.
Warming the corned beef gently beforehand is beneficial. This prevents it from cooling down the cheese and helps it integrate smoothly with the other warm ingredients, ensuring a consistently hot and satisfying Cheesy Corned Beef Melt.
Glorious Melt: Choosing Your Cheddar
Sharp cheddar cheese is our go-to for its bold flavor that stands up wonderfully to the corned beef and dressing. For the best melt and superior flavor, I always recommend shredding your own block of cheese.
Pre-shredded cheeses often contain anti-caking agents that can hinder smooth melting and sometimes impart a slightly powdery texture. Freshly shredded cheddar melts into a beautifully golden, gooey layer that truly enhances this savory sandwich.
The Tangy Kiss: Dressing Delights
Creamy Russian or Thousand Island dressing provides the essential tangy, sweet, and savory counterpoint to the rich corned beef and cheese. This dressing not only adds incredible flavor but also contributes a crucial moisture balance to the Cheesy Corned Beef Melt.
If you’re feeling ambitious, a homemade dressing offers unparalleled freshness and flavor control. Combine 1/4 cup mayonnaise, 1 tablespoon ketchup, 1 teaspoon finely minced onion, 1 teaspoon sweet pickle relish, and a pinch of salt and pepper for a delicious scratch-made version. Otherwise, a good quality store-bought dressing works perfectly for convenience.
Finishing Touches: Butter & Optional Garnish
Unsalted butter serves a simple yet critical purpose: creating that initial golden crisp on your bread during the pre-broiling stage. It adds flavor and helps form that protective barrier we discussed earlier.
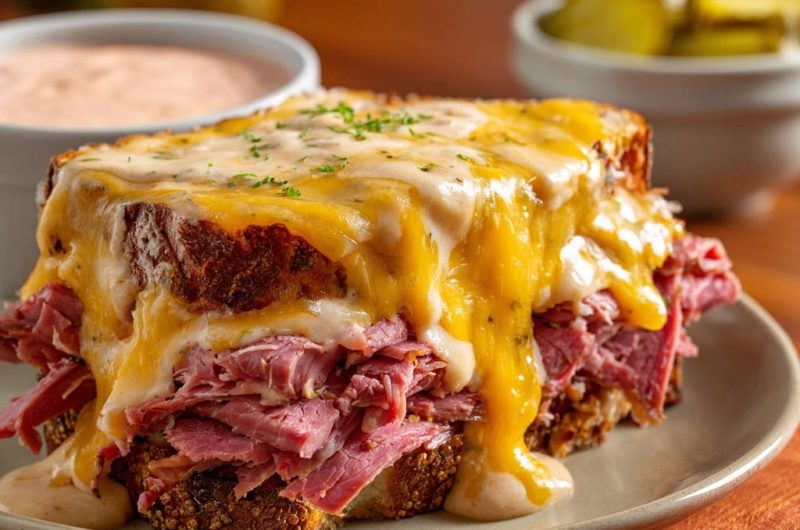
For a touch of freshness and visual appeal, a sprinkle of chopped fresh parsley or chives at the end is entirely optional but highly recommended. These garnishes add a subtle herbaceous note that brightens the rich flavors of your Cheesy Corned Beef Melt.
Essential Tools for Your Cheesy Corned Beef Melt Adventure
Having the right tools on hand streamlines the cooking process and helps ensure a successful outcome for your crispy Cheesy Corned Beef Melt.
Baking Sheet: Essential for broiling the bread and assembling the melts safely under high heat, providing a sturdy surface.
Broiler: The key to achieving both the crispy bread and the beautifully melted, bubbly cheese, delivering intense, direct heat.
Knife for Slicing: For uniform slicing of corned beef (if not pre-sliced) and garnishes, ensuring even pieces.
Measuring Cups & Spoons: For accurate ingredient proportions, especially if making homemade dressing, guaranteeing flavor balance.
Small Bowl & Whisk: If preparing the homemade Russian/Thousand Island dressing, for smooth, well-combined ingredients.
Crafting Your Crispy Cheesy Corned Beef Melt: Step-by-Step
Follow these detailed steps closely, paying special attention to the “no soggy bottom” secret, and you’ll be rewarded with a Cheesy Corned Beef Melt that’s perfectly crunchy, cheesy, and utterly delicious.
- Step 1: The Non-Soggy Secret Revealed (Broiling the Bread)
Preheat your broiler to high. Lightly butter one side of each slice of bread. Place the buttered sides down on a baking sheet, ensuring they are ready for direct heat.
Broil for 1-2 minutes, watching carefully, until lightly golden and crisp. This crucial step creates a protective toasted barrier, ensuring your bread stays perfectly firm and never soggy under the warm fillings.
Remove the toasted bread from the broiler immediately after achieving that ideal light crispness.
- Step 2: Expert Assembly for Even Flavor
Flip one slice of the toasted bread so the non-buttered side is up. Spread a thin, even layer of creamy dressing on this side, covering the surface completely.
Pile half of the warmed corned beef onto the dressed bread, distributing it evenly. Sprinkle with half of the shredded sharp cheddar cheese over the corned beef.
Repeat this process with the second slice of bread: spread dressing, pile remaining corned beef, then top with the remaining cheddar, creating two open-faced melts.
- Step 3: Achieving Golden, Bubbling Cheese Perfection
Return the assembled open-faced sandwiches to the baking sheet, placing them back under the preheated broiler.
Broil for another 2-4 minutes, or until the cheese is bubbling, golden, and beautifully melted. Keep a very close eye to prevent burning the cheese, as broilers can be intense. The pre-toasted bread will remain wonderfully crisp while the cheese melts perfectly.
- Step 4: The Grand Finale: Drizzle, Garnish, and Serve
Carefully remove the Cheesy Corned Beef Melts from the broiler using tongs or an oven mitt to avoid burns.
Drizzle generously with additional creamy dressing from the bowl, allowing it to cascade appealingly over the melted cheese. Garnish with fresh parsley or chives, if using, for a pop of color and freshness.
Serve immediately while hot, perhaps with a side of pickles if desired, and the remaining dressing for dipping. Enjoy your perfectly crunchy, cheesy, and utterly delicious creation!
Chef’s Secrets: Elevate Your Cheesy Corned Beef Melt Experience
Beyond the basic steps, a few expert tips can truly transform your Cheesy Corned Beef Melt from great to extraordinary.
Mastering the Broiler: Heat Management for Perfection
Every broiler is different; some run hotter than others. Get to know yours by doing a quick test run. Optimal rack placement is crucial: generally, placing your baking sheet on the middle rack helps prevent burning while still ensuring even melting.
Always stay nearby and watch continuously, as cheese can go from perfectly melted to burnt in mere seconds. If your broiler is very strong, consider using a slightly lower heat setting or a rack further from the element for more control.
Customizing Your Melt: Flavor Variations
While the classic Cheesy Corned Beef Melt is fantastic, don’t hesitate to personalize it. Try different cheeses like Swiss or provolone for a different flavor profile, or a blend for added complexity. Caramelized onions can add a deep, sweet counterpoint to the savory corned beef.
For a true Reuben twist, a touch of well-drained sauerkraut can be added with the corned beef, though be mindful of the moisture. You could even explore other savory meats like pastrami for a similar, delicious experience.
The Dressing Dilemma: Homemade vs. Store-Bought
The choice between homemade and store-bought dressing hinges on convenience versus flavor control. Store-bought Russian or Thousand Island dressing offers a quick, reliable option, perfect for busy weeknights without compromising too much on taste.
However, making your own dressing from scratch allows you to adjust sweetness, tang, and spice to your exact preference. It often yields a fresher, more vibrant flavor that can elevate your Cheesy Corned Beef Melt to new heights, making it worth the extra effort for special occasions.
Troubleshooting Common Cheesy Corned Beef Melt Challenges
Even with the best intentions, cooking can sometimes present unexpected hurdles. Here’s how to tackle common issues with your Cheesy Corned Beef Melt.
Problem: “My Bread is Still Soggy!”
This usually indicates insufficient pre-broiling. Ensure your bread is lightly golden and crisp before adding toppings. Don’t rush this initial crucial step, as it forms the essential moisture barrier.
Also, ensure you’re using sturdy bread; flimsy slices won’t hold up as well under the weight and warmth of the fillings, even with pre-toasting.
Problem: “The Cheese Burned Before Melting Evenly!”
Your broiler might be too high, or the sandwich too close to the heat source. Try a lower rack position or keep a very close eye, removing it as soon as the cheese is bubbly and golden, even if it’s slightly less melted than desired in some spots.
Consider loosely tenting with foil if the cheese is browning too quickly, though this isn’t usually necessary with proper broiler management.
Problem: “My Melt Tastes Bland!”
Ensure your corned beef is well-seasoned or that you’re generous with the dressing, which adds a lot of flavor. Sharp cheddar cheese is key for a robust taste, so avoid mild cheeses that might get lost in the mix.
A pinch of salt and pepper on the corned beef before assembly can also boost the overall flavor profile significantly, enhancing the savory notes.
Beyond the Plate: Serving, Storage, and Prep Tips
Maximizing your Cheesy Corned Beef Melt experience extends to how you serve, store, and even prep it.
What to Serve with Your Melt? Perfect Pairings
A classic Cheesy Corned Beef Melt pairs wonderfully with simple, complementary sides. Dill pickles offer a refreshing, tangy crunch that cuts through the richness, while potato chips provide an extra layer of crispy texture.
Round out your meal
If you’re enjoying this cheesy corned beef melt, consider these comforting dishes that bring out similar savory notes.
- For a warm and filling experience, pair your melt with a bowl of classic meatball and tomato soup, featuring tender meatballs in a rich tomato broth.
- Another satisfying option is this hearty beef and veggie braise, offering deeply flavored, tender beef that complements the richness of the corned beef melt.
For a lighter touch, a crisp coleslaw or a simple green salad dressed with a vinaigrette works beautifully. In colder weather, a warm bowl of classic tomato soup makes a comforting and nostalgic pairing.
Make-Ahead & Storage Solutions
While the ultimate Cheesy Corned Beef Melt is best enjoyed fresh off the broiler, some components can be prepped in advance. You can warm the corned beef, shred the cheese, and prepare the homemade dressing a day or two ahead.
Assembled melts don’t store well due to potential sogginess. If you have leftovers, store them in an airtight container in the refrigerator. Reheat by toasting in a dry skillet or air fryer until warmed through and crisp, avoiding the microwave if possible to maintain texture.
Cheesy Corned Beef Melt FAQs
Here are answers to some common questions about making the perfect Cheesy Corned Beef Melt.
Can I use different types of bread for this Cheesy Corned Beef Melt?
While rye or pumpernickel are traditional and highly recommended for their sturdiness and flavor, you can experiment with other robust breads like sourdough or a hearty artisan white. Avoid soft sandwich breads at all costs, as they are inherently prone to sogginess.
What’s the difference between Russian and Thousand Island dressing, and which should I use?
Both are creamy, tomato-based dressings often used in melts. Russian dressing typically has a sharper, spicier kick with ingredients like horseradish and chili sauce, while Thousand Island is generally sweeter, featuring pickle relish and sometimes finely chopped onion. Use whichever you prefer for your Cheesy Corned Beef Melt – both are absolutely delicious and complement the corned beef well.
Is this recipe suitable for meal prep?
Not ideally as a fully assembled meal prep, as the beauty of this Cheesy Corned Beef Melt is its fresh-broiled crispness. Reheating a fully assembled melt often compromises the bread’s texture. However, you can prep components like warming the corned beef, shredding the cheese, and making the dressing ahead of time. Assemble and broil just before serving for the best results.
Can I make this Cheesy Corned Beef Melt in an air fryer?
Yes, an air fryer can effectively mimic the broiler effect! Preheat your air fryer to 375°F (190°C). Follow the initial bread-broiling step, air frying for 2-3 minutes until lightly golden. Then assemble the Cheesy Corned Beef Melt and air fry for 3-5 minutes more, watching closely, until the cheese is beautifully bubbly and melted. This method works wonderfully for achieving crispness.
Ready to Indulge? Your Ultimate Cheesy Corned Beef Melt Awaits!
You now hold the secret to the ultimate Cheesy Corned Beef Melt – one that promises crispy, never-soggy perfection with every single bite. This recipe is more than just a meal; it’s a testament to simple techniques making a world of difference.
Go ahead, gather your ingredients, follow these expert steps, and prepare to delight your taste buds. I encourage you to try this recipe, share your delicious results, and let me know in the comments how this crispy Cheesy Corned Beef Melt transformed your hot sandwich game!
Cheesy Corned Beef Melt
Course: Main CourseCuisine: AmericanDifficulty: easy1
servings10
minutes5
minutes1050
kcal20
minutesCraving that epic, diner-style Cheesy Corned Beef Melt but dreading the usual soggy bread disaster? This recipe delivers all the juicy, savory corned beef and glorious melted cheese you dream of, piled high on perfectly crisp, never-soggy bread. Say goodbye to flimsy sandwiches and hello to a masterpiece that holds up to every delicious bite.
Ingredients
2 slices sturdy rye or pumpernickel bread
1 tablespoon unsalted butter, softened
6-8 ounces thinly sliced corned beef, warmed gently
1 cup shredded sharp cheddar cheese
1/2 cup creamy Russian or Thousand Island dressing (store-bought or homemade, see note)
1 tablespoon chopped fresh parsley or chives, for garnish (optional)
Note on homemade dressing: If making from scratch, combine 1/4 cup mayonnaise, 1 tablespoon ketchup, 1 teaspoon finely minced onion, 1 teaspoon sweet pickle relish, and a pinch of salt and pepper.
Directions
- Prep for Perfection (The Non-Soggy Secret!): Preheat your broiler to high. Lightly butter one side of each slice of bread. Place the buttered sides down on a baking sheet. Broil for 1-2 minutes, watching carefully, until lightly golden and crisp. This crucial step creates a protective toasted barrier, ensuring your bread stays perfectly firm and never soggy under the warm fillings. Remove from broiler.
- Assemble the Stack: Flip one slice of the toasted bread so the non-buttered side is up. Spread a thin layer of creamy dressing on this side. Pile half of the warmed corned beef onto the bread. Sprinkle with half of the shredded cheddar cheese. Repeat with the second slice of bread: spread dressing, pile remaining corned beef, top with remaining cheddar.
- Melt to Glory: Return the assembled open-faced sandwiches to the baking sheet. Broil for another 2-4 minutes, or until the cheese is bubbling, golden, and beautifully melted. Keep a close eye to prevent burning the cheese. The pre-toasted bread will remain crisp while the cheese melts perfectly.
- Finish and Serve: Carefully remove the sandwiches from the broiler. Drizzle generously with additional creamy dressing from the bowl, as pictured, allowing it to cascade over the melted cheese. Garnish with fresh parsley or chives, if using. Serve immediately with a side of pickles, if desired, and the remaining dressing for dipping. Enjoy your perfectly crunchy, cheesy, and utterly delicious Cheesy Corned Beef Melt!
Notes
- Homemade dressing option: Combine mayonnaise, ketchup, minced onion, sweet pickle relish, salt, and pepper.