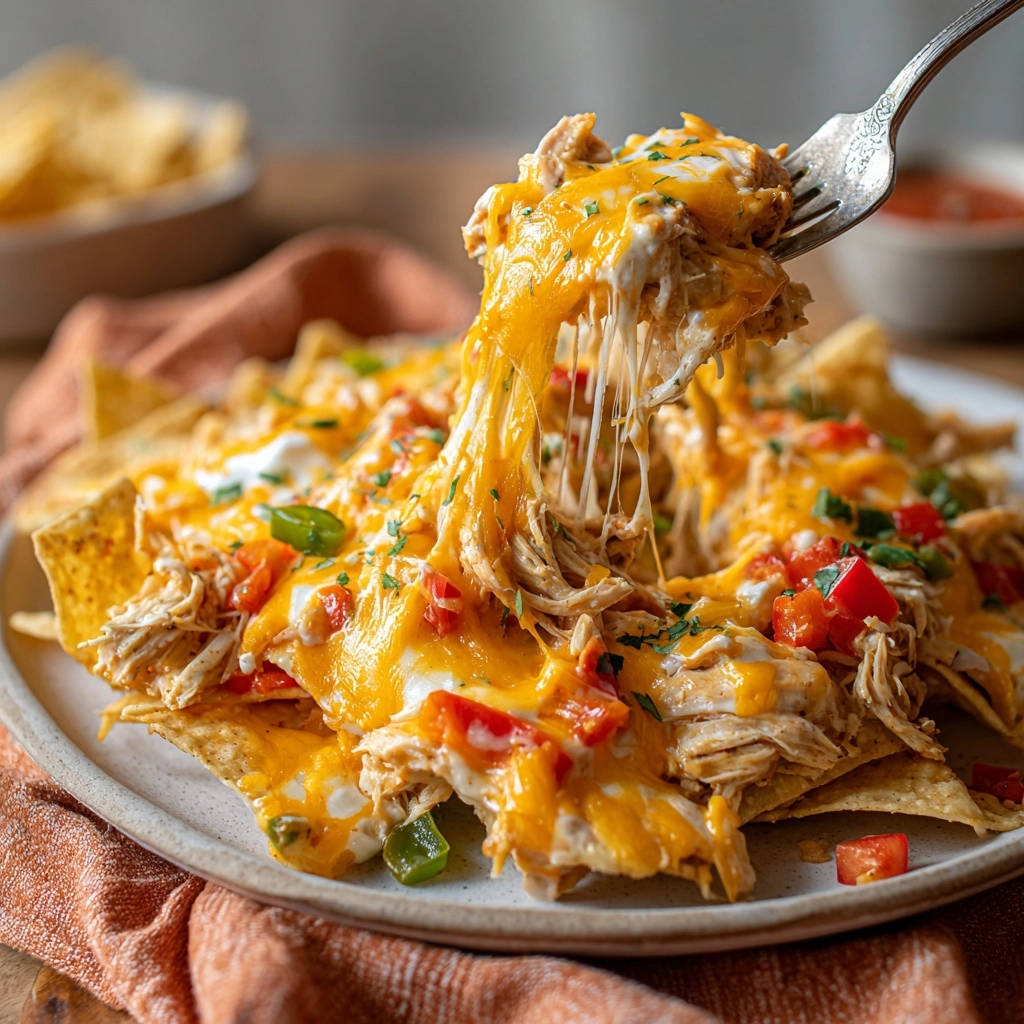
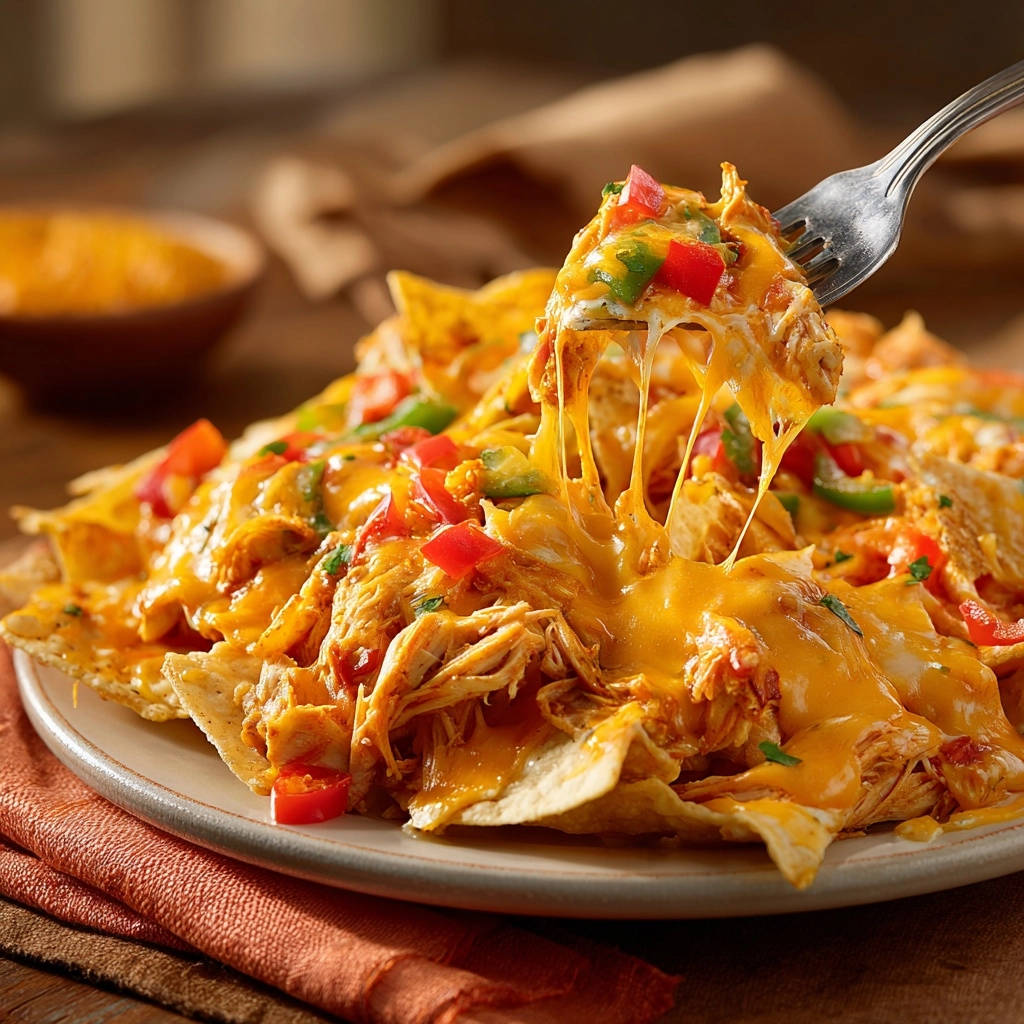
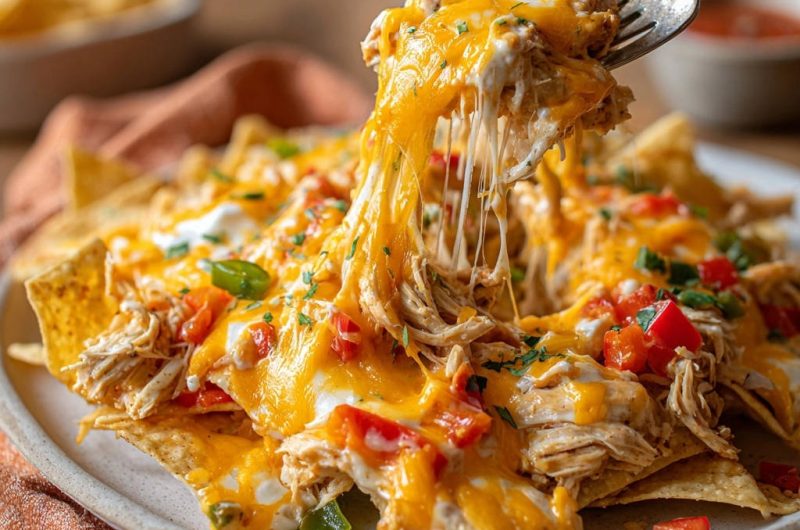
Cheesy Chicken Nachos: Perfectly Crisp, Never Soggy!
The struggle is real: you pile on delicious nacho toppings, bake them, and moments later, soggy chips sabotage your enjoyment. I’ve perfected a method for making truly exceptional Cheesy Chicken Nachos that stay gloriously crisp until the very last bite, transforming a common kitchen frustration into a triumphant, satisfying snack or meal for any occasion.
This recipe isn’t just about ingredients; it’s about technique, ensuring every layer contributes to an irresistible texture and flavor experience you’ll want to recreate again and again.
Unlock the Ultimate Crunch: Why This Nachos Recipe Works Wonders
Say goodbye to disappointing, soft nachos forever. This recipe tackles the notorious soggy chip dilemma head-on with a clever approach that guarantees a satisfying crunch in every forkful.
Get Our Best Recipes Weekly!
Join thousands of food lovers and get delicious recipes delivered to your inbox.
For more perfectly crisp, never soggy options, check out ultimate loaded nachos.
Our strategic layering and unique two-stage baking method are the secret weapons. This process builds a protective, crispy foundation before adding the final burst of cheesy chicken and fresh toppings.
The result is a perfect balance of textures: robustly crisp chips, tender shredded chicken, generously melted cheese, and vibrant fresh garnishes. It’s an easy-to-prepare dish, perfect for feeding a hungry crowd or enjoying a quick, flavorful family meal.
This method ensures the nachos are not only incredibly delicious but also maintain their integrity, delivering that coveted crunch and rich flavor in every bite.
The Flavor Foundation: Essential Ingredients for Perfect Nachos
Every great dish begins with quality ingredients. For the ultimate Cheesy Chicken Nachos, selecting the right components is key to achieving both incredible flavor and that coveted crispy texture.
Core Components: Chips, Chicken, and Cheese
Choosing the right foundation is paramount. Sturdy tortilla chips are non-negotiable, providing the necessary backbone to hold up to the heat and all those delectable toppings without crumbling or becoming saturated.
Opt for thick, restaurant-style chips for the best results, as thin chips often become soggy or break too easily under the weight of the cheese and chicken.
Shredded cooked chicken offers convenience and ideal texture. It distributes evenly and heats quickly, ensuring every bite gets a savory protein boost. Rotisserie chicken is a fantastic shortcut, or you can easily poach and shred chicken breasts, making sure it’s well-seasoned for maximum flavor.
A good quality shredded cheddar cheese blend is essential for a beautiful melt and classic nacho flavor. Cheddar provides richness, while a blend often includes other good melting cheeses like Monterey Jack, which enhances creaminess and stretch.
Fresh Finishes: Vibrant Toppings for Flavor & Zest
Diced ripe tomatoes and fresh jalapeño (or green bell pepper for less heat) add crucial freshness and a delightful textural contrast. These high-moisture ingredients are added after baking to prevent them from steaming the chips and causing sogginess.
Cool, creamy sour cream offers a tangy counterpoint to the richness of the cheese and chicken. A generous sprinkle of fresh cilantro provides a bright, herbaceous finish that ties all the flavors together.
For a similar creamy experience, check out this Cheesy Chicken & Rice Bake.
Optional Extras to Elevate Your Experience
Salsa is best served on the side as a dipping accompaniment, allowing diners to add moisture as they wish without compromising the nachos’ crispness. Offering it separately keeps the main dish perfectly crunchy.
Consider adding other optional toppings to customize your Cheesy Chicken Nachos. Sliced black olives, thinly sliced green onions, or creamy avocado can introduce additional layers of flavor and texture, transforming them into your personal masterpiece.
Tools for Success: Your Nacho-Making Essentials
Creating these incredible Cheesy Chicken Nachos doesn’t require a gourmet kitchen setup. A few simple tools will ensure a smooth and efficient cooking process, leading to perfect results every time.
Large Baking Sheet: This is absolutely essential for spreading chips in a single, even layer, which promotes even crisping and melting.
Oven Mitts: For safe handling of the hot baking sheet, especially during the crucial two-stage baking process.
Spatula or Tongs: Ideal for serving generous portions of loaded nachos from the sheet to individual plates.
Small Bowls: Handy for organizing and pre-prepping all your fresh toppings, making the final assembly quick and effortless.
Mastering the Method: Step-by-Step Cheesy Chicken Nachos
Follow these precise steps to achieve perfectly crisp, loaded Cheesy Chicken Nachos that will impress everyone. The technique is key to preventing soggy chips and maximizing flavor.
- Preheat Your Oven:
Preheat your oven to 400 degrees Fahrenheit (200°C). Achieving this precise initial temperature is the first crucial step in preventing soggy chips, as it ensures immediate crisping upon contact with the hot oven.
- First Layer of Chips:
Spread about half of your sturdy tortilla chips in a single, slightly overlapping layer on a large baking sheet. This foundational layer is critical for establishing base crispness, providing a strong structure for the subsequent toppings.
- Add Half the Toppings:
Evenly sprinkle half of the shredded cooked chicken over the chips, followed by half of the shredded cheddar cheese blend. Distributing the toppings strategically ensures every initial bite is flavorful and helps create a stable, delicious structure.
- Initial Bake for Crispness:
Place the baking sheet in the preheated oven for 4-5 minutes, or just until the cheese begins to melt and the chips are visibly warm and crisp. This quick bake forms a protective, crispy base, effectively sealing the chips from moisture.
- Second Layer of Goodness:
Remove the baking sheet from the oven. Carefully add the remaining tortilla chips on top, then the rest of the shredded chicken, and finally the remaining shredded cheese. This second layer further builds up the nachos, adding volume and flavor while maintaining the integrity of the bottom chips.
- Final Bake for Golden Perfection:
Return the baking sheet to the oven for another 5-7 minutes, or until all the cheese is fully melted, bubbly, and the edges of some chips are lightly golden. Keep a close eye on them to prevent burning; this controlled baking with multiple layers prevents steaming and maintains chip integrity for ultimate nacho crunch.
- Prepare for Fresh Toppings:
Once the nachos are perfectly melted and crispy, remove them from the oven. This is the precise moment to add your fresh, cool toppings, ensuring they don’t introduce moisture that would lead to sogginess during baking.
- Garnish and Serve:
Dollop the sour cream over the hot nachos, then scatter the diced tomatoes, diced jalapeño (or bell pepper), and fresh cilantro. Serve immediately with salsa on the side, if desired, to ensure maximum crispness and enjoyment. Dig in fast for that ultimate cheesy, crunchy bite!
Beyond the Recipe: Pro Tips for Unstoppable Nacho Crunch
Achieving truly perfect Cheesy Chicken Nachos consistently goes beyond just following the steps. These expert tips will elevate your sheet pan nachos to legendary status, ensuring that coveted crunch every time.
The Magic of the Two-Stage Bake: Our unique method is the ultimate secret weapon against soggy nachos. The initial bake crisps the first chip layer, creating an essential moisture barrier and providing structural integrity. Never skip this foundational step!
Choosing the Right Tortilla Chips: Not all chips are created equal for nachos. Always opt for thick, sturdy, restaurant-style tortilla chips that can confidently hold up to heat and abundant toppings without crumbling or becoming saturated.
Perfectly Cooked Chicken for Nachos: Ensure your shredded chicken is well-seasoned for maximum flavor and cooked through, but not overly wet. If your chicken seems excessively moist, gently pat it dry with paper towels before layering to prevent moisture transfer.
Timing is Everything: When to Add Fresh Toppings: Always add fresh, high-moisture toppings like diced tomatoes, sour cream, guacamole, and salsa after the nachos come out of the oven. This critical timing prevents these ingredients from steaming the chips during the baking process.
Don’t Overcrowd the Pan: Give your nachos ample room to breathe and crisp up! Using a large baking sheet and avoiding overly thick layers allows for optimal air circulation, even heat distribution, and superior crisping results.
Maximize Your Nacho Enjoyment: Serving, Storing, & Making Ahead
Once you’ve mastered the ultimate Cheesy Chicken Nachos, knowing how to serve them creatively and manage any leftovers ensures every experience is a delight.
Round Out Your Meal
These recipes pair well with your cheesy chicken nachos, offering complementary flavors and textures.
- For a hearty and warming addition, consider making this creamy southwest chicken chili, packed with similar savory notes.
- If you’re in the mood for something comforting and smooth, try this loaded potato soup, which offers a different kind of richness.
Creative Serving Ideas & Accompaniments
These loaded chicken nachos are fantastic served directly on the baking sheet for a casual, communal feel, allowing everyone to dig in family-style. For a more structured approach, transfer generous portions to individual plates, ensuring everyone gets a perfect mix of ingredients.
Complement the rich flavors with additional fresh sides. Creamy guacamole, extra salsa, or a side of savory refried beans can add wonderful depth. A crisp green salad provides a refreshing counterpoint, balancing the richness of the cheesy goodness.
Can You Make Nachos Ahead? (Sort Of!)
Fully assembled nachos are truly at their best eaten immediately, preserving that irresistible crispness. The secret to great nachos is their fresh, hot state. However, you can significantly reduce prep time by preparing components in advance.
Shred your chicken up to 2-3 days ahead of time. Dice your tomatoes and jalapeños, and chop your cilantro a day in advance, storing each component separately in airtight containers in the refrigerator. This advance prep makes assembly a breeze when hunger strikes.
Storing Leftover Nachos (If There Are Any!)
Storing fully loaded nachos is generally not recommended as they will inevitably lose their crispness once cooled, as the chips absorb moisture from the toppings and cheese. The texture will significantly change.
If you find yourself with a small amount of leftover assembled nachos, the best attempt at reheating is in a toaster oven or conventional oven at 300°F (150°C) for a few minutes, just until warmed through and slightly re-crisped. Be prepared for some loss of the original crunch, but it’s better than microwaving which will result in complete sogginess.
Nacho Rescue: Common Problems and Quick Fixes
Even expert cooks encounter challenges sometimes. Here are solutions to common Cheesy Chicken Nachos dilemmas, ensuring your batch is always a success.
“My chips are still soggy!”
First, double-check your chip choice; ensure they are sturdy, thick-cut tortilla chips. Re-evaluate your layering technique: were the layers too thick, trapping steam? Most importantly, did you bake them long enough in the first stage to create that crucial protective, crispy base? This initial bake is vital.
“The cheese isn’t melting properly.”
Make absolutely certain your oven is fully preheated to the specified temperature before you put the nachos in. Use a good quality shredded cheese blend that is known to melt well. Spreading the cheese evenly and not too thickly also helps it melt consistently and creates those irresistible bubbly edges.
“My nachos are bland/too spicy.”
For blandness, ensure your shredded chicken is well-seasoned with salt, pepper, and perhaps a pinch of chili powder or cumin before adding it to the chips. For too much spice, use green bell pepper instead of jalapeño, or remove all the seeds and membranes from the jalapeño for a milder kick. Adding extra cooling sour cream can also help balance the heat.
Your Top Cheesy Chicken Nachos Questions Answered
Here are answers to some of the most common questions about crafting these incredible Cheesy Chicken Nachos.
What’s the best chicken to use for nachos?
Any cooked, shredded chicken works wonderfully for this recipe. A store-bought rotisserie chicken is a fantastic shortcut, offering tender, flavorful meat with minimal effort. Alternatively, you can easily boil or bake chicken breasts and then shred them yourself, ensuring they are well-seasoned for maximum flavor in your nachos.
Can I use different types of cheese?
Absolutely! While a cheddar blend provides that classic nacho flavor and excellent melt, feel free to experiment with other cheeses. Monterey Jack adds a creamy, mild flavor, Colby Jack offers a similar profile, or even a sprinkle of queso fresco can introduce a fresh, tangy note. A mix of cheeses often yields the most complex and satisfying flavor.
How do I make this recipe spicier or milder?
To amp up the heat, simply leave the seeds and membranes in your fresh jalapeño, as these contain most of the capsaicin. For an even greater kick, consider adding a pinch of cayenne pepper to your chicken seasoning. For a milder version, omit the jalapeño entirely or substitute it with diced green bell pepper.
Can I prepare components in advance?
Yes, strategic prep is a fantastic way to make assembly even quicker! You can cook and shred your chicken up to 2-3 days ahead of time. Dice your tomatoes and jalapeños, and chop your cilantro a day in advance, storing each component in separate airtight containers in the fridge. This makes fresh, hot nachos a breeze on demand!
The Final Bite: A Crunchy, Cheesy Triumph!
You now hold the secret to the ultimate Cheesy Chicken Nachos: a recipe that promises and delivers perfectly crisp chips, gooey melted cheese, and robust flavor in every bite. No more sad, soggy moments – just pure nacho bliss.
I encourage you to try this foolproof method and experience the difference for yourself. Share your creations, experiment with your favorite toppings, and most importantly, savor every satisfying crunch.
Get ready to make these your go-to game day snack, party appetizer, or effortless weeknight meal. Happy nacho making!
Cheesy Chicken Nachos
Course: Main CourseCuisine: MexicanDifficulty: easy4
servings15
minutes12
minutes550
kcal27
minutesNo more soggy chips! This recipe provides the secret to perfectly crisp, loaded chicken nachos every single time. Enjoy a cheesy, satisfying bite that stays crunchy until the last chip!
Ingredients
1 bag (about 13 ounces) sturdy tortilla chips
2 cups shredded cooked chicken
2 cups shredded cheddar cheese blend
1/2 cup diced ripe tomatoes
1/4 cup diced fresh jalapeno (or green bell pepper for less heat)
1/4 cup sour cream
2 tablespoons fresh cilantro, chopped
Salt and pepper to taste (for chicken)
Optional: salsa for serving
Directions
- Preheat your oven to 400 degrees Fahrenheit. The key to preventing soggy chips starts here with strategic layering and heat.
- Spread about half of your tortilla chips in a single, slightly overlapping layer on a large baking sheet. This initial layer is crucial for foundational crispness.
- Sprinkle half of the shredded cooked chicken evenly over the chips, followed by half of the shredded cheese.
- Place the baking sheet in the preheated oven for 4-5 minutes, or just until the cheese begins to melt and the chips are visibly warm and crisp. This quick bake creates a protective, crispy base.
- Remove the baking sheet from the oven. Carefully add the remaining tortilla chips on top, then the rest of the shredded chicken, and finally the remaining shredded cheese.
- Return the baking sheet to the oven for another 5-7 minutes, or until all the cheese is fully melted, bubbly, and the edges of some chips are lightly golden. Keep a close eye on them to prevent burning. The multiple layers and controlled baking prevent steaming and maintain chip integrity.
- Once the nachos are perfectly melted and crispy, remove them from the oven. This is where we add the fresh toppings to avoid introducing moisture that leads to sogginess during baking.
- Dollop the sour cream over the hot nachos, then scatter the diced tomatoes, diced jalapeno, and fresh cilantro.
- Serve immediately with salsa on the side, if desired, to ensure maximum crispness and enjoyment. Dig in fast for that ultimate cheesy, crunchy bite!
Notes
- Key technique prevents soggy chips by layering and baking in stages for ultimate crispness.