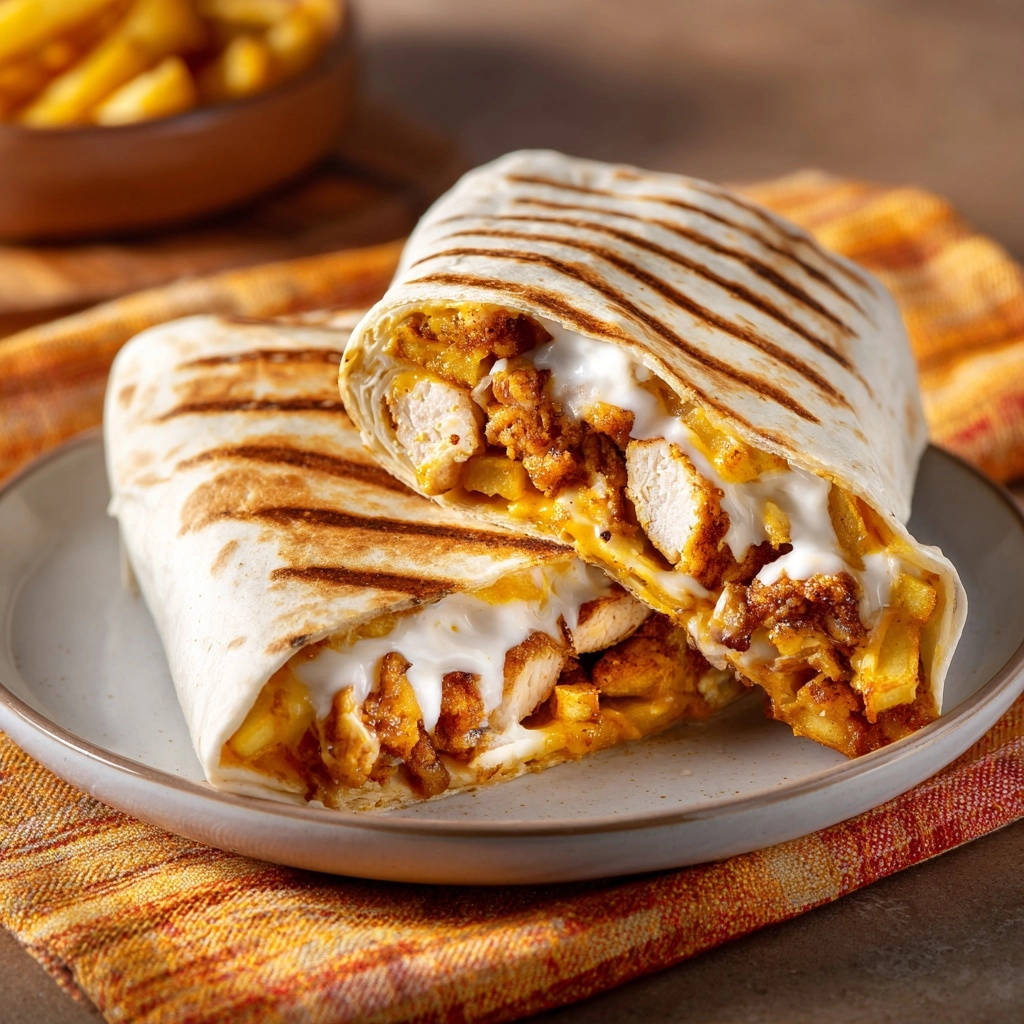
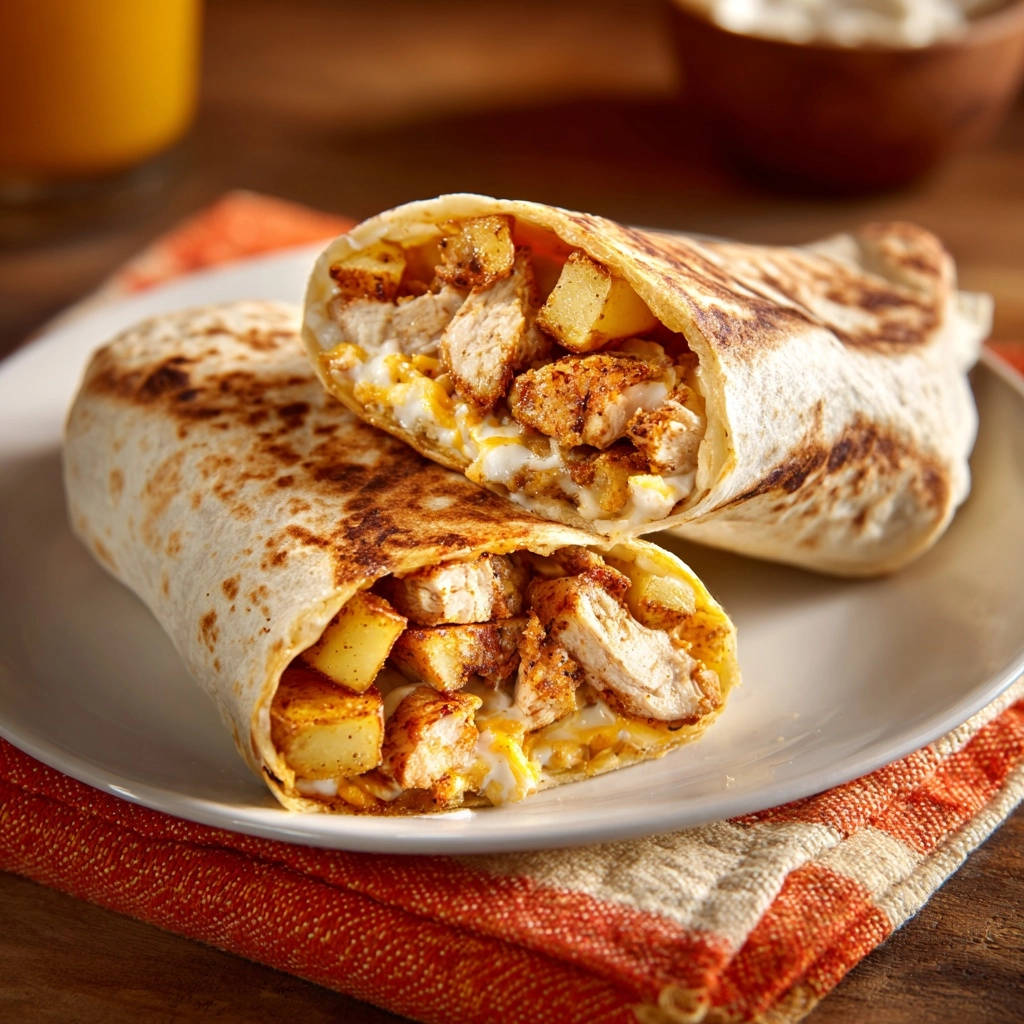
Loaded Chicken & Fry Press: Say Goodbye to Soggy Fries!
There’s a universally acknowledged heartbreak in the world of wraps: the moment perfectly golden fries turn into a limp, soggy disappointment inside your otherwise delicious creation. I’ve been there countless times, yearning for that ultimate texture combination, and that’s precisely why I developed this game-changing Loaded Chicken & Fry Press recipe.
It’s the ultimate solution, ensuring every single fry remains gloriously crisp, nestled among layers of savory chicken and creamy sauce, all hugged by a beautifully pressed, golden tortilla.
Why This Loaded Chicken & Fry Press Will Revolutionize Your Wraps
The Crispy Fry Breakthrough: Your Answer to Soggy Disappointment
The secret to avoiding soggy fries in this loaded chicken wrap lies in a strategic layering technique and precise timing. By placing the freshly cooked, piping hot fries as the final layer before folding, we create a barrier that protects their delicate crispness.
Get Our Best Recipes Weekly!
Join thousands of food lovers and get delicious recipes delivered to your inbox.
Furthermore, the high heat of the pressing step helps to seal everything in, while also giving the fries a final burst of heat that maintains their crunch rather than steaming them soft.
Layers of Flavor: A Culinary Journey in Every Bite
This recipe isn’t just about crispy fries; it’s a symphony of tastes. We combine succulent diced chicken, seasoned with aromatic spices, with a punchy, spicy ground chicken crumble.
These savory chicken elements are perfectly complemented by a bright, zesty creamy garlic sauce, all brought together with melted cheese inside a toasted tortilla.
Beyond Basic: A Satisfying Meal for Any Occasion
The Loaded Chicken & Fry Press is far more than a simple sandwich; it’s a hearty, satisfying meal that truly hits the spot. It’s robust enough for a weeknight dinner, impressive for a casual get-together, and makes for an exciting lunch option.
Its vibrant flavors and irresistible textures make it a crowd-pleaser that you’ll want to revisit again and again.
Gather Your Flavor Arsenal: Key Ingredients for the Press
The Foundation: Tortillas & Cheese
Large flour tortillas are essential here for wrapping all the generous fillings without tearing. Their pliability makes them easy to fold into a neat, press-ready packet.
Shredded cheddar or Monterey Jack cheese melts beautifully, adding a creamy, savory layer that also helps bind the other ingredients together.
Double the Chicken, Double the Deliciousness: Diced & Ground
Using both diced chicken breast and ground chicken adds incredible depth and textural variety. The diced chicken offers tender, juicy bites, while the ground chicken creates a flavorful, spicy crumble.
This dual approach ensures a more complex and engaging eating experience in every bite of your `Loaded Chicken & Fry Press`.
Aromatic Spices: Crafting the Perfect Blend
Smoked paprika brings a beautiful color and a smoky depth, while chili powder adds warmth without overwhelming heat. Cumin contributes an earthy, slightly nutty note, and garlic powder rounds out the savory profile.
These spices are carefully balanced to enhance, not mask, the natural flavors of the chicken and other ingredients.
More Chicken Comforts
If you’re craving more satisfying chicken dishes, explore these recipes.
- For a different take on chicken comfort, consider the Homestyle Chicken & Dumplings, known for its fluffy dumplings.
- To enjoy another hearty chicken preparation, try the Creamy Chicken Stew for a rich and satisfying meal.
The Star: Achieving Crispy French Fry Perfection
The choice of frozen French fries is critical for ease and consistency. Shoestring or regular cut fries work best, as their surface area allows for maximum crispness.
The initial crisp cooking of these fries is paramount; they need to be extra golden and crunchy even before they meet the wrap.
Creamy Garlic Dream: The Essential Sauce
Our homemade creamy garlic sauce is the binding element that ties all the robust flavors together. Mayonnaise forms a rich, smooth base, while fresh lemon juice adds a crucial zing that cuts through the richness.
Minced garlic provides an aromatic punch, and a touch of water or milk helps achieve the perfect drizzle-able consistency, ensuring even distribution of flavor.
Essential Gear for Your Loaded Chicken & Fry Press Adventure
Cookware & Appliances
Having the right tools makes the cooking process smooth and enjoyable. These items are fundamental for achieving the perfect `Loaded Chicken & Fry Press`.
Large Non-Stick Skillet: Ideal for cooking both types of chicken evenly and preventing sticking.
Grill Pan or Heavy Non-Stick Skillet: Essential for pressing the wraps, giving them beautiful grill marks and a crispy exterior.
Oven or Air Fryer: Crucial for cooking the French fries to their optimal, extra-crispy state before assembly.
Mixing & Prepping Utensils
These smaller tools ensure you can prepare each component efficiently and effectively.
Mixing Bowls: For seasoning chicken and whisking the creamy garlic sauce.
Spatulas: Handy for stirring chicken, flipping wraps, and general handling.
Whisk: To ensure your creamy garlic sauce is perfectly smooth and lump-free.
Measuring Spoons and Cups: For accurate ingredient ratios, especially with spices and sauce components.
Crafting Your Masterpiece: Step-by-Step Loaded Chicken & Fry Press Guide
Prepare Your Proteins: Diced & Crumbled Chicken
Start by tossing the diced chicken breast with 1/2 tbsp cooking oil, 1/2 tsp smoked paprika, 1/4 tsp chili powder, a pinch of cumin, garlic powder, salt, and pepper until every piece is coated. Heat a large non-stick skillet over medium-high heat, then add the seasoned diced chicken.
Cook for 5-7 minutes, stirring often, until the chicken is thoroughly cooked through and lightly browned, then remove it from the skillet and set aside. In the same skillet, add the remaining 1/2 tbsp cooking oil and the ground chicken, breaking it apart as it cooks until nicely browned, about 5 minutes.
Drain any excess fat from the ground chicken, then stir in the remaining 1/2 tsp smoked paprika, 1/4 tsp chili powder, a pinch of cayenne (if you like a little heat), salt, and pepper. Continue to cook for another 2-3 minutes, allowing the spices to become fragrant and well combined before removing and setting aside.
Whip Up the Creamy Garlic Sauce
In a small bowl, combine the mayonnaise, fresh lemon juice, minced garlic (or garlic powder), a tablespoon of water or milk, and a pinch of salt. Whisk vigorously until the mixture is completely smooth and creamy.
If the sauce is too thick for drizzling, gradually add a few more drops of water or milk until it reaches your desired consistency, ensuring it’s easy to spread but not watery.
The Golden Rule: Perfectly Crispy Fries
This step is absolutely critical for the success of your `Loaded Chicken & Fry Press`. Preheat your oven or air fryer exactly according to your French fry package directions, making sure it’s at the optimal temperature for crisping.
Cook the fries until they are not just golden brown, but extra crispy-this means they should have a satisfying crunch when tested. It is paramount that these fries are piping hot and cooked immediately before assembly; letting them cool even slightly will invite sogginess into your wrap.
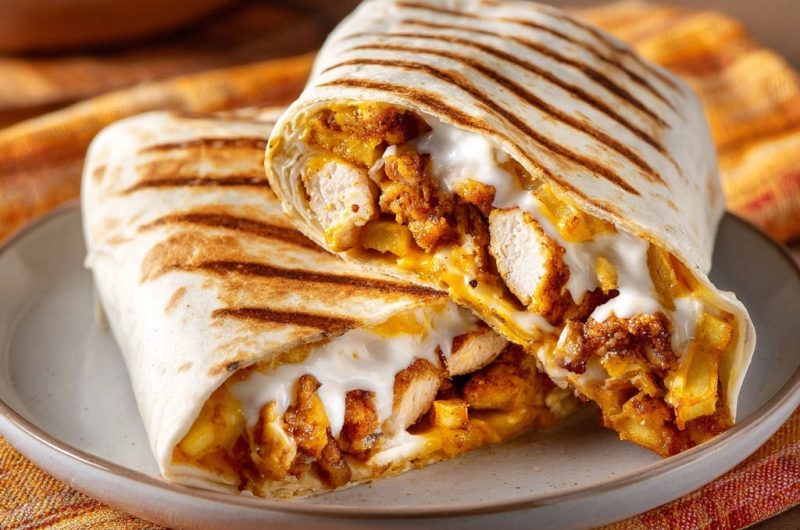
Strategic Assembly: Layering for Success
Lay one large flour tortilla flat on your work surface. Begin by sprinkling a quarter of the shredded cheese evenly across the center of the tortilla, forming the initial base. Next, layer a quarter of the cooked diced chicken on top of the cheese.
Follow with a quarter of the spicy chicken crumble, distributing it evenly. Now, drizzle a generous quarter of your creamy garlic sauce over both chicken layers. Finally, and crucially, add a substantial layer of your freshly cooked, hot, and extra crispy French fries directly on top of the sauced fillings.
This final placement of the fries is key to protecting their crispness, as they won’t be exposed to steam from other ingredients.
The Art of the Fold & Press
To create a sturdy packet, first fold the bottom and top edges of the tortilla inward, overlapping them slightly over the fillings. Then, fold in the sides, one at a time, pulling them tightly to create a neat, rectangular package.
Heat a grill pan or a heavy non-stick skillet over medium heat. Once hot, place the folded wrap seam-side down onto the pan. Gently press down on the wrap with a spatula or another heavy object, like a cast iron skillet.
Cook for 3-4 minutes per side, or until the tortilla is beautifully golden brown, wonderfully crispy, and boasts enticing grill marks. This pressing step not only creates an irresistible texture on the outside but also seals the wrap and reheats the fillings, further safeguarding the fries’ crispness.
Serve Hot & Savor Every Bite
Once pressed to golden perfection, remove the `Loaded Chicken & Fry Press` from the pan. Using a sharp knife, carefully cut the pressed wrap in half, showcasing all the delicious layers within.
Serve immediately while everything is still hot and the fries are at their peak crispness, allowing everyone to enjoy the incredible blend of textures and flavors.
Chef’s Secrets: Elevating Your Loaded Chicken & Fry Press
Maximizing Fry Crispness (Even After Pressing!)
Always opt for good quality, pre-cut frozen fries designed for crisping, like crinkle or shoestring varieties. Ensure your oven or air fryer is fully preheated before adding fries, and avoid overcrowding the basket or tray, as this leads to steaming rather than crisping.
Crucially, time your fries to be ready precisely when you’re assembling; their heat and fresh crispness are your best defense against sogginess. The pressing step in the pan also helps to re-crisp any slight softening.
Flavor Boosters & Customization
Don’t hesitate to add a touch of acid like a squeeze of fresh lime juice to the chicken crumble for brightness. For an extra kick, finely chopped pickled jalapeños or a dash of your favorite hot sauce can be folded into the chicken or drizzled over the top.
Experiment with different shredded cheeses, such as pepper jack for heat or provolone for a sharper, meltier finish, to personalize your `Loaded Chicken & Fry Press`.
Mastering the Press: Technique Tips
For even pressing, use a heavy, flat object like a cast iron pan or a sturdy brick wrapped in foil. Apply firm, consistent pressure without crushing the wrap, which could cause tearing or filling expulsion.
Listen for the sizzle and watch for golden brown spots and developing grill marks as your cues for when to flip. Aim for a beautiful, uniformly toasted exterior on both sides.
Troubleshooting Your Loaded Chicken & Fry Press: Quick Fixes
Problem: My Fries Aren’t Crispy Anymore!
Ensure your fries are cooked to an extra-crispy state immediately before assembly; any cooling time makes them vulnerable to moisture. Avoid overcrowding your cooking appliance, allowing sufficient space for hot air to circulate and crisp each fry.
Using a good quality frozen fry, perhaps even one advertised as “extra crispy,” can also make a significant difference in their ability to retain crunch.
Problem: My Wrap Falls Apart During Pressing
The key to a successful press is a tightly folded wrap that isn’t overfilled. Practice folding the bottom and top edges inward first, then the sides, pulling them snugly to create a compact package.
Always start by placing the wrap seam-side down on the hot pan; this allows the heat to immediately seal the seam, preventing it from unraveling during the pressing process.
Problem: Bland Chicken Filling
If your chicken tastes a bit lackluster, check the freshness of your spices; old spices lose their potency. Don’t be shy with salt and pepper, tasting and adjusting as you go.
A final squeeze of fresh lemon or lime juice over the cooked chicken can remarkably brighten and enhance all the flavors, making it pop.
Beyond the Basic: Customizing & Enjoying Your Press
Creative Variations & Add-Ins
Elevate your `Loaded Chicken & Fry Press` with diverse additions. Try sautéed bell peppers and onions for extra veggies, or a sprinkle of finely chopped fresh cilantro for a burst of freshness.
Experiment with different sauces; a smoky BBQ drizzle or a tangy buffalo sauce can completely transform the flavor profile. For cheese lovers, a blend of different cheeses like provolone and mozzarella adds another layer of gooey goodness.
Perfect Pairings: What to Serve With Your Press
This hearty dish pairs wonderfully with lighter, fresh accompaniments. A simple green salad with a vinaigrette dressing offers a refreshing contrast to the richness of the press.
Coleslaw or a side of fresh cut vegetable sticks can also balance the meal beautifully. For drinks, a cold soda, iced tea, or even a crisp apple juice would be a delightful match.
Storing & Reheating for Maximum Freshness
While best enjoyed fresh, you can store leftover `Loaded Chicken & Fry Press` wraps. Allow them to cool completely, then wrap tightly in plastic wrap or foil and refrigerate for up to 2 days.
To reheat, the best method is an air fryer or a toaster oven set to about 350°F (175°C) for 8-12 minutes, or until heated through and the tortilla re-crisps. This method helps restore the exterior crispness and prevents the fries from becoming overly soft.
Your Loaded Chicken & Fry Press Questions Answered
Can I use pre-cooked chicken?
Yes, you can definitely use pre-cooked chicken to save time! If using diced pre-cooked chicken, simply toss it with the spices and heat through in the skillet for 2-3 minutes to absorb the flavors.
For ground chicken, you’d still want to cook it fresh as specified to achieve the spicy crumble texture and flavor development.
What if I don’t have a grill pan?
No grill pan? No problem! A regular heavy-bottomed skillet, such as a cast iron pan or a good quality non-stick pan, will work just as effectively for pressing your wrap.
You can use another heavy pan or a sturdy, foil-wrapped brick to apply even pressure, achieving that beautiful golden crust and sealed finish.
Can I make this gluten-free?
Absolutely! Most of the ingredients are naturally gluten-free. Simply substitute large gluten-free tortillas for the regular flour tortillas.
Always double-check the ingredient list on your frozen French fries to ensure they are certified gluten-free, as some brands may contain wheat-based coatings.
Is it freezer-friendly?
While the wrap itself can be frozen (wrapped tightly and stored for up to 1 month), the French fries are likely to lose their texture upon freezing and reheating. For best results, it’s recommended to prepare the chicken fillings and sauce in advance and freeze those components.
Then, cook the fries fresh and assemble the `Loaded Chicken & Fry Press` right before serving for optimal crispness and flavor.
Ready to Impress? Share Your Loaded Chicken & Fry Press Masterpiece!
Now that you’re armed with all the insider tips and tricks, it’s time to create your own ultimate Loaded Chicken & Fry Press. Get ready to experience the joy of biting into a perfectly crispy wrap, where every fry maintains its glorious crunch.
Don’t let soggy fries be a distant memory-make this recipe your go-to and share your magnificent, crispy creations with us!
Loaded Chicken & Fry Press
Course: Main CourseCuisine: American CuisineDifficulty: easy4
servings20
minutes45
minutes60
minutesAmerican Cuisine
Ingredients
4 large flour tortillas (burrito size)
1 lb boneless, skinless chicken breast, diced into 1/2-inch pieces
1/2 lb ground chicken (for the spicy crumble)
1 tbsp cooking oil, divided
1 tsp smoked paprika, divided
1/2 tsp chili powder, divided
1/4 tsp cumin
1/4 tsp garlic powder
Salt and black pepper to taste
1 cup shredded cheddar or Monterey Jack cheese
1 lb frozen French fries (shoestring or regular cut)
For the Creamy Garlic Sauce:
1/2 cup mayonnaise
1 tbsp lemon juice
1 small garlic clove, minced (or 1/2 tsp garlic powder)
1 tbsp water or milk (for desired consistency)
Pinch of salt
Pinch of cayenne pepper (optional, for spicy crumble)
Directions
- Prep & Cook Diced Chicken: In a bowl, toss diced chicken with 1/2 tbsp cooking oil, 1/2 tsp smoked paprika, 1/4 tsp chili powder, 1/8 tsp cumin, 1/8 tsp garlic powder, salt, and pepper until evenly coated. Heat a large non-stick skillet over medium-high heat. Add the seasoned diced chicken and cook for 5-7 minutes, stirring occasionally, until cooked through and lightly browned. Remove from skillet and set aside.
- Make Spicy Chicken Crumble: In the same skillet, add the remaining 1/2 tbsp cooking oil. Add the ground chicken and break it apart with a spoon. Cook until browned, about 5 minutes. Drain any excess fat. Stir in the remaining 1/2 tsp smoked paprika, 1/4 tsp chili powder, a pinch of cayenne pepper (if using), salt, and black pepper. Cook for another 2-3 minutes until well combined and fragrant. Remove and set aside.
- Make the Creamy Garlic Sauce: In a small bowl, whisk together the mayonnaise, lemon juice, minced garlic (or garlic powder), water or milk, and a pinch of salt until smooth and creamy. Adjust consistency with more water or milk if needed.
- Cook the Fries (Key Step for Crispy Perfection!): Preheat your oven or air fryer according to the French fry package directions. Cook the fries until they are golden brown and extra crispy. This is crucial for preventing sogginess in your wrap! Ensure they are piping hot and fresh right before assembly. Do not let them sit and cool.
- Assemble the Wraps (Work Fast!): Lay a tortilla flat. Sprinkle a quarter of the shredded cheese across the center. Top with a quarter of the cooked diced chicken. Next, add a quarter of the spicy chicken crumble. Drizzle a quarter of the creamy garlic sauce evenly over the chicken and crumble. Then, add a generous layer of freshly cooked, hot French fries right on top of the sauced fillings. Ensure the fries are the top layer before folding to maximize their crispness.
- Fold and Press: Fold the bottom and top edges of the tortilla inward, then fold the sides over, creating a tight, rectangular packet.
- Grill the Wraps: Heat a grill pan or large non-stick skillet over medium heat. Place the folded wrap seam-side down on the hot pan. Press down gently with a spatula or another heavy pan (like a cast iron skillet). Cook for 3-4 minutes per side, or until golden brown, crispy, and beautiful grill marks appear. This step not only adds fantastic texture to the tortilla but also helps to seal the wrap and keep the fillings warm, further protecting your fries from getting soggy.
- Serve Immediately: Cut the pressed wrap in half and serve hot. Get ready to enjoy that perfect crispy crunch from every element!
Notes
- Ensure fries are extra crispy and hot right before assembly to prevent sogginess. Work fast during assembly.