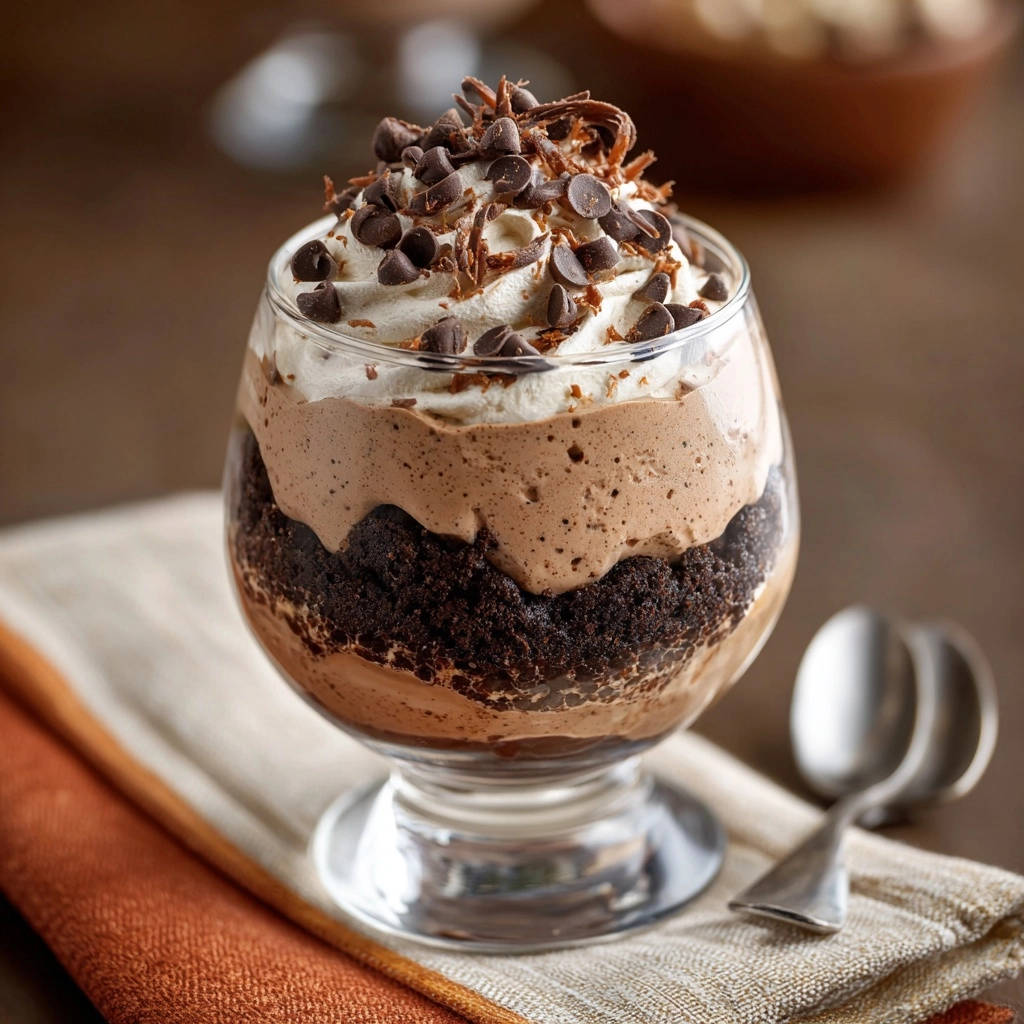
Chocolate Dream Parfait: Fluffy Mousse Perfection Awaits!
There’s nothing quite like the disappointment of a deflated mousse, turning a promising decadent dessert into a soupy mess. I’ve been there, and that’s precisely why I perfected this Chocolate Dream Parfait recipe.
For a similar fluffy texture, check out this easy chocolate mousse recipe.
This isn’t just another layered parfait; it’s a testament to achieving truly light, airy, and stable chocolate mousse every single time, transforming simple ingredients into an elegant, show-stopping treat that guarantees fluffy bliss.
Get Our Best Recipes Weekly!
Join thousands of food lovers and get delicious recipes delivered to your inbox.
Beyond Basic: What Makes Our Chocolate Dream Parfait Truly Special?
The “Never Dense” Promise: Guaranteed Fluffy Mousse
The secret to this exceptional dessert lies in a specific, gentle folding technique. We carefully lighten the melted chocolate before incorporating it into the whipped cream, ensuring no air is lost.
This meticulous approach prevents the mousse from becoming heavy or dense, delivering that coveted cloud-like texture that truly sets this Chocolate Dream Parfait apart.
Elegance Made Easy: A Sophisticated Dessert for Any Occasion
Despite its luxurious appearance, this recipe is surprisingly straightforward to execute. You can impress guests with minimal effort, making it ideal for dinner parties, celebrations, or a special weekend indulgence.
The layered parfait presentation offers a sophisticated touch without requiring advanced pastry skills, proving that elegance doesn’t have to be complicated.
Flexible & Forgiving: Customizing Your Sweet Creation
One of the joys of this layered parfait is its adaptability. Whether you have leftover brownies or prefer store-bought cake, the base layers are easily adjusted.
Customize your Chocolate Dream Parfait with various chocolate types, sprinkles, or fresh berries to match your taste or the occasion.
Your Kitchen Arsenal: Tools for Perfect Parfaits
-
Electric Mixer: This is crucial for whipping both the chocolate mousse base and the whipped cream topping to the perfect, airy consistency. Hand whisking is possible but much more strenuous!
-
Large Chilled Bowls: Keeping your mixing bowls very cold is essential for whipping cream to stiff peaks quickly and efficiently. This ensures a stable and fluffy mousse.
-
Rubber Spatula: Indispensable for gently folding ingredients, especially when combining the chocolate mixture with the whipped cream. Its flexibility helps maintain the airy texture.
-
Microwave-Safe Bowl: For melting the semi-sweet chocolate smoothly and evenly without scorching.
-
Serving Glasses: Opt for clear glasses or ramekins to showcase the beautiful layers of your Chocolate Dream Parfait. Stemmed glasses add an extra touch of sophistication.
The Building Blocks of Bliss: Key Ingredients for Your Chocolate Dream Parfait
For the Cloud-Like Chocolate Mousse
Heavy Cream: Always start with very cold heavy cream for optimal whipping results. The higher fat content (at least 36%) is key to achieving stiff, stable peaks.
Quality Semi-Sweet Chocolate: Choose a good quality chocolate with around 50-60% cocoa solids. This provides a rich, balanced flavor that isn’t overly bitter or sweet, making it a truly decadent dessert.
Powdered Sugar: Unlike granulated sugar, powdered sugar dissolves instantly, preventing a gritty texture in your mousse and whipped cream.
Vanilla Extract: A touch of pure vanilla extract enhances the chocolate flavor, adding a warm, aromatic depth to the mousse.
Crafting the Silken Whipped Cream Topping
Heavy Cream: Again, very cold heavy cream is non-negotiable for a perfectly light and firm whipped topping.
Powdered Sugar: Sweetens the cream subtly while ensuring a smooth, delightful consistency.
Vanilla Extract: Just enough to complement the chocolate and add a classic dessert aroma.
The Perfect Parfait Layers and Finishing Touches
Crumbled Chocolate Cake or Brownies: This forms the foundational layer, adding texture and extra chocolatey goodness. Using store-bought or leftover cake makes this easy dessert recipe even quicker.
Chocolate Chips: Provide delightful pockets of melty chocolate and a pleasant textural contrast within the parfait.
Chocolate Shavings: Ideal for a beautiful garnish, adding a refined, professional finish to your homemade dessert. Extra chocolate chips work well if shavings aren’t on hand.
Whip Up Wonders: Your Step-by-Step Chocolate Dream Parfait Guide
-
Step 1: Melting Chocolate to Perfection
Melt the Chocolate: Place the chopped semi-sweet chocolate in a microwave-safe bowl. Microwave it in short 30-second intervals, stirring thoroughly after each burst, until the chocolate is fully melted and completely smooth.
Cool Slightly: Allow the melted chocolate to cool to room temperature, which usually takes about 10-15 minutes. Stir it occasionally during this time. It needs to remain liquid but should not feel warm or hot to the touch, as heat can deflate your whipped cream later.
-
Step 2: The Fluffy Secret Unleashed – Whipping the Mousse Cream
Prepare to Whip: In a large, impeccably clean and chilled bowl, combine 1 1/2 cups of very cold heavy cream, 2 tablespoons of powdered sugar, and 1 teaspoon of vanilla extract.
Whip to Stiff Peaks: Using an electric mixer on medium-high speed, beat the mixture until stiff peaks form. This means when you lift the beaters, the cream should hold its shape firmly and stand straight up. This crucial step ensures the stability and airy texture of your fluffy mousse.
-
Step 3: Gentle Folding for Unrivaled Airiness
Lighten the Chocolate: Take approximately 1/4 of the whipped cream from Step 2 and gently fold it into the cooled, melted chocolate using a rubber spatula. This crucial step lightens the chocolate mixture significantly, making it easier to incorporate without deflating the remaining whipped cream.
Combine with Care: Carefully pour this lightened chocolate mixture back into the bowl with the remaining whipped cream. Using your spatula, gently fold until just combined, ensuring no white streaks of cream are visible. The key here is to fold with a light hand to preserve all the air you’ve whipped into the cream, guaranteeing that coveted fluffy texture for your Chocolate Dream Parfait.
-
Step 4: Preparing Your Decadent Whipped Cream Topping
Whip the Topping: In a separate, clean, and chilled bowl, combine 1 cup of very cold heavy cream, 2 tablespoons of powdered sugar, and 1/2 teaspoon of vanilla extract.
Achieve Firm Peaks: Beat with an electric mixer until firm peaks form. This whipped cream will serve as a beautiful, contrasting topping for your layered parfait. Set it aside.
-
Step 5: Assembling Your Edible Art
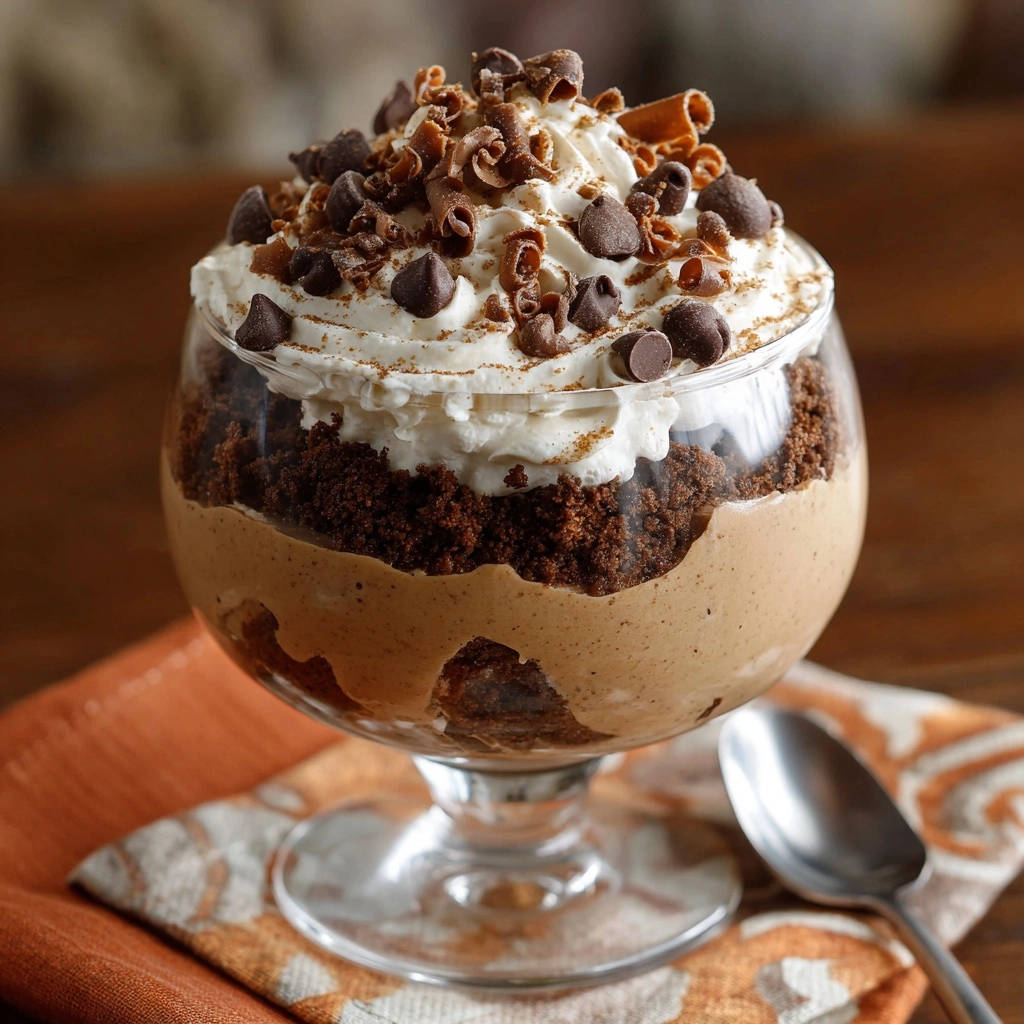
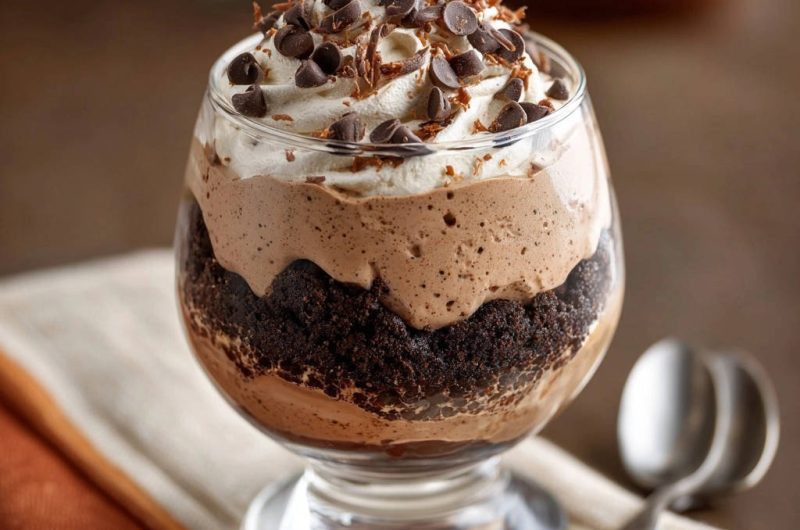
Layer the Base: Grab two elegant serving glasses. Start by layering about 1/2 cup of your crumbled chocolate cake or brownies into the bottom of each glass, pressing down gently to form an even base.
Add Mousse: Spoon half of the prepared chocolate mousse evenly over the cake crumbles in each glass.
Top with Cream: Follow with a generous dollop of the prepared whipped cream topping over the mousse layer.
Garnish and Serve: Finish your beautiful Chocolate Dream Parfait by sprinkling chocolate chips and chocolate shavings over the whipped cream. Serve immediately for an instant treat, or chill for a truly refreshing dessert experience.
Beyond the Recipe: Expert Tips for Parfait Mastery
The Importance of Quality Ingredients
Investing in high-quality semi-sweet chocolate makes a noticeable difference in the richness and depth of flavor of your mousse. It elevates the entire homemade dessert.
Similarly, using fresh heavy cream with adequate fat content ensures optimal whipping and a truly luxurious texture in your Chocolate Dream Parfait.
The Magic of Chilled Bowls and Cream
Always use very cold heavy cream and chill your mixing bowls and beaters for at least 15-20 minutes before whipping. Cold conditions help the fat globules in the cream stiffen more quickly and hold their structure, leading to perfectly stable peaks.
Mastering the Fold: Preserving Airiness
When folding, use a gentle ‘cut and fold’ motion with your spatula, bringing ingredients from the bottom up and over. Avoid vigorous stirring or beating, which can quickly deflate the air you’ve worked so hard to incorporate.
The goal is to combine just until no streaks remain, ensuring your airy chocolate mousse stays light.
Presentation Pointers for a Showstopper Dessert
For pristine layers in your Chocolate Dream Parfait, consider using a piping bag without a tip for the mousse and whipped cream. This allows for clean, distinct lines against the glass.
Choose clear glasses to highlight the beautiful contrast of the dark cake, rich mousse, and fluffy white cream. Garnish with a sprig of mint or a fresh berry for an extra pop of color.
When to Serve: Optimal Enjoyment
While delicious immediately, chilling your parfaits for at least 30 minutes allows the flavors to meld and the mousse to set further, enhancing its texture. A short chill makes for a firmer, more refreshing dessert experience.
Sweet Solutions: Troubleshooting Common Parfait Pitfalls
Problem: My Mousse is Liquid or Too Soft!
Solution: This often indicates that your heavy cream was not whipped to sufficiently stiff peaks, or the melted chocolate was too warm when incorporated. Ensure your cream is very cold and beaten until it holds its shape firmly before folding.
If the chocolate was too hot, it could melt the whipped cream. Gently re-whip the cream if it was under-whipped, or chill the chocolate mixture thoroughly before combining if it was warm.
Problem: My Whipped Cream Won’t Form Stiff Peaks!
Solution: The most common culprits are cream that isn’t cold enough or has a lower fat content. Ensure your cream is straight from the fridge and your bowl and beaters are chilled.
Also, avoid over-whipping, as cream can quickly turn into butter. Stop beating as soon as firm peaks are achieved.
Problem: My Layers Look Messy or Undefined!
Solution: For cleaner layers, use a spoon or a small cookie scoop to carefully place the cake crumbles and mousse.
For precise whipped cream layers, a piping bag is invaluable. Chilling your parfaits briefly (10-15 minutes) between layers can also help them set and prevent bleeding, resulting in a beautifully defined Chocolate Dream Parfait.
Enjoying Your Creation: Serving, Storing, & Making Ahead
How to Serve for Maximum Impact
Serve your Chocolate Dream Parfait chilled for the best texture and refreshing flavor. A final sprinkle of cocoa powder or a few fresh raspberries just before serving can elevate its visual appeal and add a delightful tart counterpoint to the rich chocolate.
Keeping Your Parfaits Fresh: Storage Tips
Cover individual parfaits tightly with plastic wrap and store them in the refrigerator for up to 2-3 days. The mousse will maintain its texture well, making it a convenient make-ahead option.
The Art of Preparing Ahead
You can prepare the chocolate mousse and whipped cream topping up to 24 hours in advance, storing them in separate airtight containers in the refrigerator. Assemble the parfaits closer to serving time to ensure the cake layers remain distinct and the whipped cream topping stays fresh and fluffy.
Your Chocolate Dream Parfait Questions Answered
What’s the best type of chocolate for the mousse?
Semi-sweet chocolate (typically 50-60% cocoa) is highly recommended for this recipe. It strikes a perfect balance between sweetness and rich chocolate flavor, creating a classic and crowd-pleasing airy chocolate mousse.
You could also use dark chocolate for a more intense flavor or milk chocolate for a sweeter, milder profile, adjusting sugar content if necessary.
Can I substitute the cake crumbles?
Absolutely! Get creative with your Chocolate Dream Parfait layers. Crushed Oreo cookies, graham cracker crumbs, or even broken shortbread cookies make excellent alternatives.
For a different flavor profile, consider vanilla cake crumbles or crushed chocolate wafer cookies.
Are there variations for different dietary needs?
For a dairy-free version, use full-fat canned coconut cream (chilled overnight, scoop out the thick cream) for whipping, and ensure your chocolate is dairy-free. For gluten-free, use gluten-free chocolate cake or brownie crumbles.
How far in advance can I make these parfaits?
For optimal freshness and presentation, assemble the parfaits no more than 4-6 hours before serving. While they can be stored longer, the cake layer might soften considerably after prolonged refrigeration.
Components can be made a day ahead, as mentioned, and then assembled closer to serving.
Ready to Indulge? Share Your Chocolate Dream Parfait!
You now have all the tools and expertise to create the most incredible Chocolate Dream Parfait, guaranteed to impress and delight.
More Chocolate Delights
If you’re still craving more chocolate goodness after this parfait, consider these sweet treats.
- For a delightful twist on crepes, try these Chocolate Banana Crepe Roll-Ups, perfect for a fun dessert.
- If you’re after a chewy texture with your chocolate, these Chewy Chocolate Chip Oatmeal Bars are a great choice.
Dive into this easy dessert recipe, embrace the fluffiness, and savor every spoonful of this truly special chocolate treat. Don’t forget to share your creations with us online – we can’t wait to see your edible masterpieces!
Chocolate Dream Parfait
Course: DessertCuisine: American CuisineDifficulty: easy2
servings30
minutes45
minutesAmerican Cuisine
Ingredients
For the Chocolate Mousse:
1 1/2 cups heavy cream, very cold
4 ounces quality semi-sweet chocolate, chopped
2 tablespoons powdered sugar
1 teaspoon vanilla extract
For the Whipped Cream:
1 cup heavy cream, very cold
2 tablespoons powdered sugar
1/2 teaspoon vanilla extract
For the Parfait Layers:
1 1/2 cups crumbled chocolate cake or brownies (store-bought or leftover works great)
1/4 cup chocolate chips
1 tablespoon chocolate shavings (or extra chocolate chips for topping)
Directions
- Prepare the Chocolate Mousse Base: Place the chopped semi-sweet chocolate in a microwave-safe bowl. Microwave in 30-second intervals, stirring well after each, until the chocolate is fully melted and smooth. Let it cool slightly to room temperature, about 10-15 minutes, stirring occasionally. It should still be liquid but not hot.
- Whip the Mousse Cream (The Fluffy Secret!): In a large, chilled bowl, combine 1 1/2 cups very cold heavy cream, 2 tablespoons powdered sugar, and 1 teaspoon vanilla extract. Using an electric mixer on medium-high speed, beat until stiff peaks form. This is crucial for a stable, fluffy mousse. The cream should hold its shape firmly.
- Combine for Fluffy Mousse: Take about 1/4 of the whipped cream and gently fold it into the cooled, melted chocolate using a spatula. This lightens the chocolate mixture and makes it easier to incorporate. Then, carefully pour the lightened chocolate mixture back into the remaining whipped cream. Gently fold until just combined and no streaks of white cream remain. Be careful not to deflate the mixture. This gentle folding technique is the key to maintaining that guaranteed fluffy texture.
- Prepare the Whipped Cream Topping: In another chilled bowl, combine 1 cup very cold heavy cream, 2 tablespoons powdered sugar, and 1/2 teaspoon vanilla extract. Beat with an electric mixer until firm peaks form. Set aside.
- Assemble Your Parfaits: Grab two serving glasses. Start by layering about 1/2 cup of crumbled chocolate cake or brownies into the bottom of each glass.
- Spoon half of the chocolate mousse over the cake crumbles in each glass.
- Top the mousse with a generous dollop of the prepared whipped cream.
- Finish by sprinkling the chocolate chips and chocolate shavings over the whipped cream. Serve immediately or chill for a truly refreshing dessert. Enjoy your perfectly fluffy, show-stopping chocolate parfait!
Notes
- Serve immediately or chill for a truly refreshing dessert.