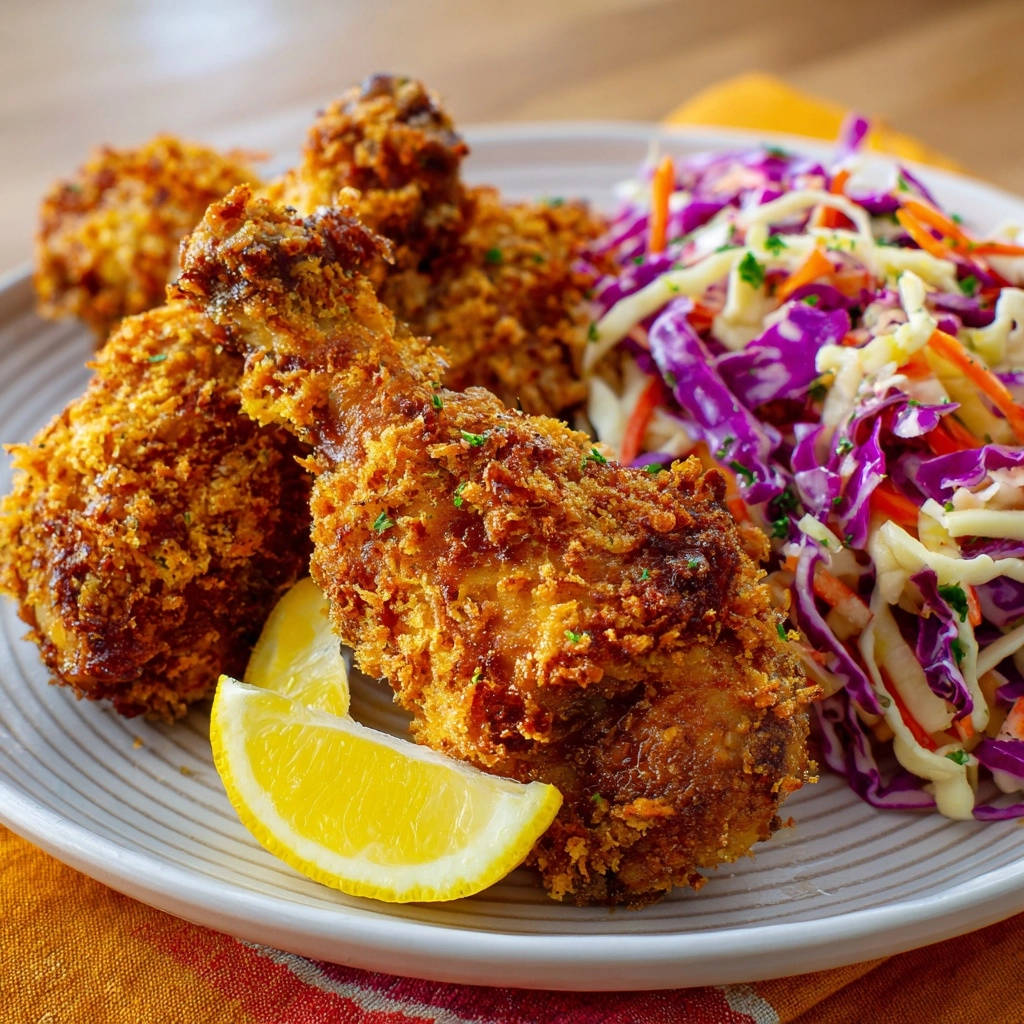
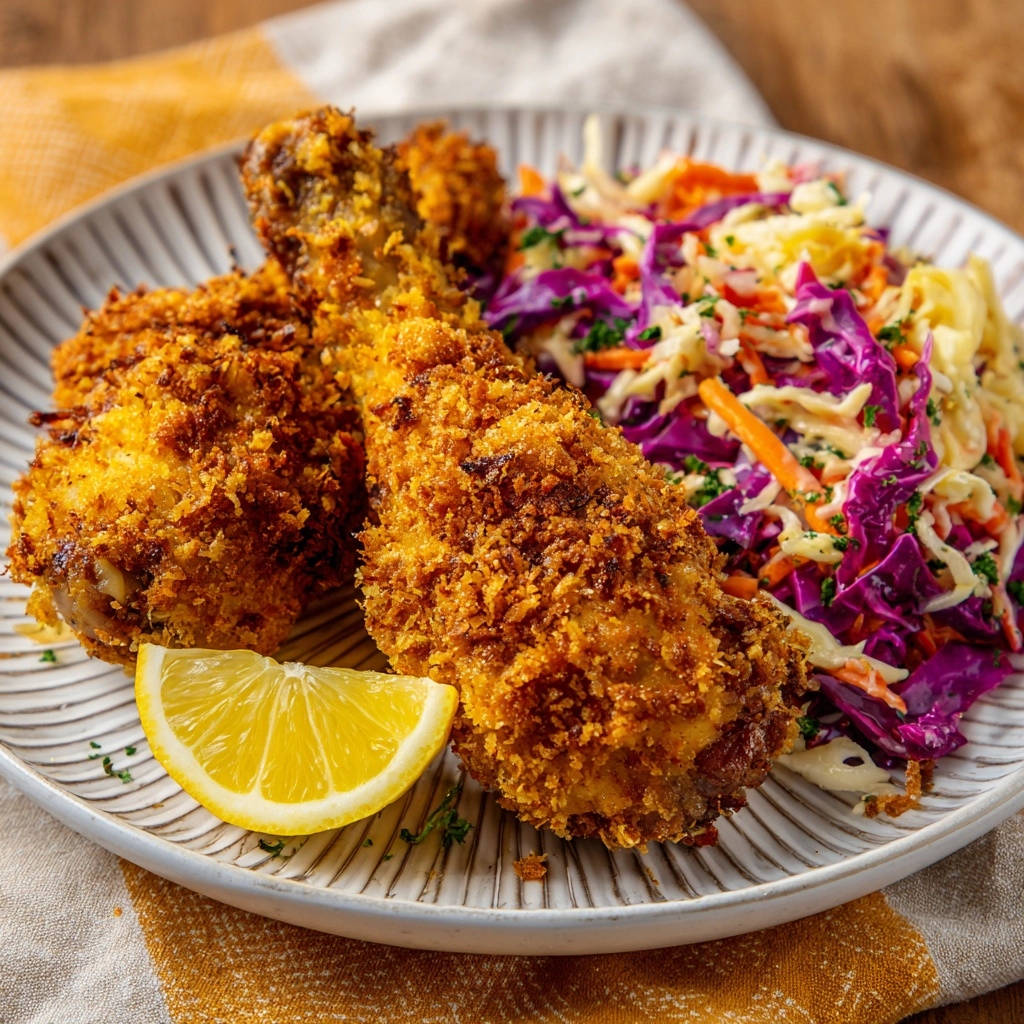
Crispy Oven-Baked Chicken Drumsticks: Juicy, Easy, & Never Dry!
Ever tried to make chicken drumsticks crispy in the oven, only to find them dry and disappointing inside? That was my struggle for years until I cracked the code! This recipe for Crispy Oven-Baked Chicken Drumsticks delivers an unbelievably juicy interior paired with a shatteringly golden, crunchy crust every single time. It’s my go-to for a perfect family meal, guaranteeing “no more dry meat” and rave reviews.
Beyond the Basics: Why THIS Crispy Drumstick Recipe Is a Game Changer
Say Goodbye to Dry Chicken: The Secret to Unbeatable Moisture
The number one complaint with oven-baked chicken is often dryness. This recipe tackles that head-on with a simple, yet incredibly effective, buttermilk soak. This crucial step works wonders by gently tenderizing the meat and locking in moisture.
The result is consistently tender, moist chicken drumsticks that stay juicy from the first bite to the last, even when reheated.
Get Our Best Recipes Weekly!
Join thousands of food lovers and get delicious recipes delivered to your inbox.
Achieving That Golden, Shattering Crisp Without the Fryer Fuss
Many believe true crispiness only comes from deep frying. This recipe proves otherwise, creating an exceptional, golden-brown crunch using specific oven techniques. Panko breadcrumbs, a wire rack, and a strategic drizzle of olive oil work together.
You’ll get all the satisfying crisp texture without the mess, unhealthy oil, or cleanup associated with deep frying.
Effortless & Family-Friendly: A Weeknight Winner
Life is busy, but delicious, wholesome meals don’t have to be complicated. This recipe streamlines the process for maximum flavor with minimal fuss. It uses common pantry ingredients and straightforward steps.
Chicken drumsticks are universally loved, making this a reliable and satisfying meal that even picky eaters will devour, perfect for any weeknight.
Gather Your Arsenal: Essential Tools for Perfect Drumsticks
Key Kitchen Equipment You’ll Need
Large Bowl: This is essential for both the initial buttermilk soak and for setting up your breading station. Its size ensures full chicken submersion and easy dredging.
Shallow Dishes: Having three distinct, shallow dishes makes the breading process organized and efficient. They are perfect for flour, eggs, and Panko.
Large Baking Sheet & Wire Rack: These are CRITICAL for achieving an all-over crisp. The wire rack elevates the chicken, allowing hot air to circulate completely around each drumstick, preventing a soggy bottom.
Meat Thermometer: This is your ultimate tool for food safety and ensuring perfect doneness without overcooking. It guarantees the chicken reaches the ideal internal temperature of 165°F (74°C).
Tongs: Useful for hygienic handling of the raw chicken during the soaking and dredging processes, and for safely transferring the hot drumsticks after baking.
The Building Blocks of Flavor: Ingredients for Irresistible Drumsticks
The Heart of the Meal: Chicken Drumsticks
Choose fresh, plump chicken drumsticks for the best results. Bone-in, skin-on drumsticks provide rich flavor and retain moisture exceptionally well during baking.
A quantity of 6-8 drumsticks is ideal for a standard family meal, ensuring even cooking on a single baking sheet.
The Moisture Master: Buttermilk (or its Speedy Substitute)
Buttermilk is the hero ingredient, providing an acidic soak that tenderizes the chicken’s proteins without breaking them down too much. This gentle action locks in moisture, resulting in incredibly juicy meat.
If you don’t have buttermilk, a simple mixture of milk and white vinegar creates a quick, effective substitute, curdling slightly to mimic buttermilk’s properties.
Crafting the Crispy Shell: Flour, Eggs, and Panko Breadcrumbs
All-purpose flour forms the first layer, creating a dry surface for the egg wash to adhere to. The beaten eggs then act as the crucial “glue” that binds the Panko breadcrumbs.
Panko breadcrumbs are paramount for that signature shattering crispness. Their larger, flakier texture absorbs less oil and stays crispier than traditional breadcrumbs.
Seasonings That Sing: Garlic, Onion, Salt, and Pepper
A balanced blend of salt and black pepper provides fundamental flavor. Garlic powder and onion powder elevate the savory profile, infusing the breading with aromatic depth.
These seasonings ensure every bite of the crispy coating is delicious and complements the chicken’s natural taste.
The Finishing Touch: Olive Oil for Golden Perfection
A light drizzle of olive oil before baking is key to achieving that beautiful golden-brown color and enhancing the crispiness of the Panko. It helps the breading fry slightly in the oven.
Other high-heat cooking oils like avocado or grapeseed oil can also be used if olive oil is not preferred.
A Vibrant Companion: Coleslaw Ingredients Demystified
Shredded green and purple cabbage along with carrots provide a refreshing crunch and vibrant color. Mayonnaise forms the creamy base of the dressing, delivering richness.
Apple cider vinegar, sugar, salt, and pepper balance the dressing with a tangy, sweet, and savory profile, perfectly cutting through the richness of the chicken.
Your Journey to Crispy Oven-Baked Chicken Drumsticks: A Detailed Guide
-
Prep for Juiciness (The Secret Soak!):
Place 6-8 chicken drumsticks in a large bowl. Pour 1.5 cups of buttermilk over them, ensuring they are fully submerged. If using the milk and vinegar substitute (1.5 cups milk + 1.5 tbsp white vinegar), mix it and let it sit for 5 minutes before adding the chicken.
Cover the bowl and refrigerate for at least 1 hour, or preferably 4 hours. This initial soak is KEY to tender, moist chicken, allowing the lactic acid to gently tenderize the meat and lock in moisture.
-
Preheat Oven and Prep Pan for Even Cooking:
Preheat your oven to 400°F (200°C).
Line a large baking sheet with parchment paper or foil, then place a wire rack on top. Lightly spray the wire rack with cooking spray or brush with a little olive oil to prevent the drumsticks from sticking and ensure easy release.
-
Set Up Your Efficient Dredging Station:
Prepare three shallow dishes side-by-side. In the first dish, combine 1 cup all-purpose flour, 1 teaspoon salt, 0.5 teaspoon black pepper, 0.5 teaspoon garlic powder, and 0.5 teaspoon onion powder. Whisk them together until thoroughly mixed.
Complementary Dishes
Round out your chicken dinner with these comforting dishes.
- If you’re craving more chicken goodness, try this Homestyle Chicken & Dumplings for fluffy, satisfying bites.
- For a hearty and warming meal, consider this Creamy Chicken Stew, packed with familiar flavors.
In the second dish, place 2 large beaten eggs. In the third dish, add 2 cups Panko breadcrumbs.
-
Master the Coating Process:
Remove drumsticks from the buttermilk, letting any excess drip off naturally; do NOT pat them dry. The residual buttermilk helps the coating adhere perfectly.
First, dredge each drumstick generously in the seasoned flour, shaking off any excess. Next, dip it into the beaten egg, ensuring full coverage. Finally, press firmly into the Panko breadcrumbs, making sure the entire drumstick is generously and evenly coated for maximum crispness.
-
Bake for Crispy Perfection and Internal Doneness:
Arrange the coated drumsticks in a single layer on the prepared wire rack, ensuring ample space between each one for even air circulation. Drizzle each drumstick with a little olive oil (about 2 tablespoons total)-this helps achieve that incredible golden-brown crisp!
Bake for 35-45 minutes, or until the internal temperature of the chicken reaches 165°F (74°C) when tested with a meat thermometer at the thickest part, avoiding the bone. For extra crispiness, you can briefly broil for the last 2-3 minutes, watching carefully to prevent burning.
-
The All-Important Rest: Preserving Juiciness:
Once cooked, remove the chicken from the oven and transfer it to a cutting board.
Loosely tent with foil and let it rest for 5-10 minutes. This resting period is critical for the juices to redistribute throughout the meat, guaranteeing every bite is incredibly moist and flavorful.
-
Whip Up the Vibrant Coleslaw Companion:
While the chicken bakes, combine 3 cups shredded green cabbage, 1 cup shredded purple cabbage, and 0.5 cup shredded carrots in a large bowl.
In a separate small bowl, whisk together 0.5 cup mayonnaise, 2 tablespoons apple cider vinegar, 1 tablespoon sugar, 0.25 teaspoon salt, and a pinch of black pepper until smooth. Pour the dressing over the cabbage mixture and toss well to combine. Refrigerate until ready to serve to allow flavors to meld.
-
Serve Your Masterpiece:
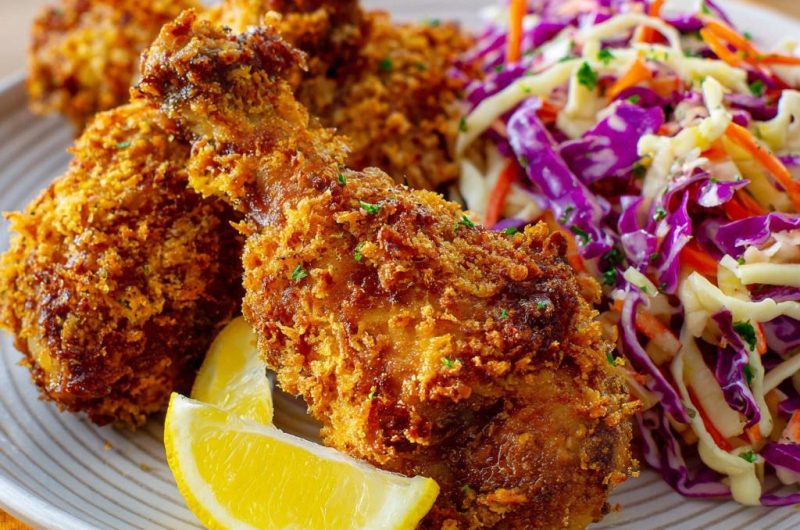
Garnish the chicken with fresh chopped parsley (optional) and serve immediately with bright lemon wedges and the vibrant coleslaw on the side. Enjoy your perfectly crispy, unbelievably juicy chicken!
Chef’s Secrets: Elevate Your Crispy Drumsticks Experience
Maximizing the Buttermilk Soak: For truly exceptional moisture and flavor, aim for the full 4-hour soak. If short on time, even 1 hour makes a significant difference compared to no soak at all, so don’t skip it entirely.
The “No Pat Dry” Rule: Resisting the urge to pat the chicken dry after the buttermilk soak is crucial. The residual moisture creates the perfect tacky surface for the flour to adhere, which in turn helps the egg and Panko stick securely.
Firm Panko Press: Don’t just roll the drumsticks in Panko. Gently but firmly press the breadcrumbs onto every surface. A thick, even coat is key to that ultimate crunch and ensures comprehensive coverage.
Don’t Crowd the Pan: Ensuring ample space between each drumstick on the wire rack allows hot air to circulate freely around them, preventing steaming and promoting an even, all-over crisp. Cook in batches if necessary to avoid moisture buildup.
Broiler Watch: If using the broiler for extra crisp, position the rack about 6 inches from the heat source and stay right there, actively monitoring. Broilers work fast, and chicken can go from perfectly golden to burnt in a matter of seconds.
Flavor Variations for Your Breading: Feel free to customize your flour seasoning. Add smoked paprika for depth, a pinch of cayenne for a subtle heat, or dried thyme and rosemary for an herbaceous twist. Italian seasoning also works beautifully for a different profile.
Troubleshooting Common Oven-Baked Chicken Challenges
Problem: My Drumsticks Aren’t as Crispy as I Hoped
Solution: Several factors can affect crispiness. Ensure you used Panko breadcrumbs, which are designed for superior crunch compared to regular breadcrumbs. Verify your oven temperature with an oven thermometer, as an inaccurate oven can significantly impact results. Always use a wire rack for proper air circulation, and crucially, do not overcrowd the pan. A final, brief broil at the very end can also help achieve that desired crisp if needed.
Problem: The Meat is Still Dry Despite the Buttermilk Soak
Solution: The most common reason for dry chicken, even with a buttermilk soak, is over-baking. Always use a reliable meat thermometer and remove the chicken promptly once it reaches an internal temperature of 165°F (74°C). Additionally, ensure you rested the chicken for 5-10 minutes after baking; this critical step allows juices to redistribute throughout the meat, preventing dryness.
Problem: My Coating Fell Off During Baking
Solution: For the coating to adhere well, the buttermilk soak is paramount as it creates a tacky surface. Ensure you didn’t pat the drumsticks dry after the soak, allowing the natural tackiness to bond with the flour. When coating, press the Panko breadcrumbs firmly onto the chicken to create a solid layer. Overcrowding the baking sheet can also create steam, which can loosen the coating, so always bake in a single layer with sufficient space between each drumstick.
Beyond the Plate: Serving, Storage, and Prep Tips
Perfect Pairings: What to Serve Alongside Your Crispy Drumsticks
While the vibrant coleslaw is an excellent complement, these Crispy Oven-Baked Chicken Drumsticks also pair beautifully with other beloved sides. Consider roasted root vegetables like carrots and potatoes, creamy mashed potatoes, or a simple fresh garden salad for a lighter option. For a heartier meal, a side of mac and cheese, corn on the cob, or baked beans make wonderful additions.
Storing Leftovers for Future Enjoyment
To store leftover Crispy Oven-Baked Chicken Drumsticks, allow them to cool completely at room temperature first. Then, place them in an airtight container in the refrigerator, where they will keep well for up to 3-4 days. For best reheating results that aim to preserve crispiness, use an oven or an air fryer rather than a microwave, which can make the coating soggy.
Make-Ahead Magic: Prepping Your Drumsticks in Advance
The buttermilk soak is an ideal make-ahead step; you can soak the drumsticks for up to 24 hours in the refrigerator, truly enhancing their moisture and flavor. While it’s generally best to coat and bake immediately for optimal crispness, you can dredge and coat the drumsticks up to an hour before baking, storing them loosely covered in the fridge on your prepared wire rack.
Your Burning Questions Answered: Crispy Drumsticks FAQ
What if I don’t have buttermilk for the soak?
No problem at all! You can easily make a homemade substitute that works beautifully. For 1.5 cups of buttermilk, simply combine 1.5 cups of regular milk (any fat percentage) with 1.5 tablespoons of white vinegar or fresh lemon juice. Stir it gently and let it sit for 5-10 minutes until it slightly curdles and thickens. Then, proceed with the recipe as directed, adding your chicken.
Can I use different chicken cuts, like thighs or breasts?
Yes, you can absolutely adapt this recipe for other chicken cuts, but you’ll need to adjust the cooking times and monitor the internal temperature carefully. Bone-in, skin-on chicken thighs might cook similarly to drumsticks but still require temperature checks. Boneless, skinless chicken breasts tend to cook faster and dry out more easily, so keep a very close eye on them to reach 165°F (74°C) without overcooking.
How do I know my chicken is cooked through and safe to eat?
The only truly reliable way to ensure your chicken is cooked through and safe to eat is to use a meat thermometer. Insert the thermometer into the thickest part of the drumstick, making sure it doesn’t touch the bone. The chicken is perfectly cooked, safe, and still juicy when it reaches an internal temperature of 165°F (74°C).
Can I air fry these Crispy Oven-Baked Chicken Drumsticks instead of baking?
Absolutely! Air frying is a fantastic alternative for achieving incredibly crispy results, often even crispier than traditional oven baking. To air fry, preheat your air fryer to 375°F (190°C). Place the coated drumsticks in a single layer in the air fryer basket, ensuring they aren’t overcrowded to allow proper air circulation. Cook for 20-25 minutes, flipping them halfway through, until they reach an internal temperature of 165°F (74°C). Cooking times may vary slightly depending on your specific air fryer model.
The Final Bite: A Meal That Delights Every Time
Mastering these Crispy Oven-Baked Chicken Drumsticks means you’ll always have a reliable, crowd-pleasing meal in your repertoire. It’s the perfect balance of juicy, tender meat and a satisfying, golden crunch, proving that incredible flavor doesn’t have to be complicated.
Don’t just take my word for it-give this recipe a try and witness the magic firsthand. I can’t wait for you to experience the joy of serving truly perfect chicken drumsticks. Share your culinary triumphs and tag me in your photos!
Crispy Oven-Baked Chicken Drumsticks
Course: Main CourseCuisine: American CuisineDifficulty: easy6
drumsticks, 4 servings20
minutes35
minutes120
minutesAmerican Cuisine
Ingredients
6-8 chicken drumsticks
1.5 cups buttermilk (or 1.5 cups milk + 1.5 tablespoons white vinegar, let sit 5 mins)
1 cup all-purpose flour
2 large eggs, beaten
2 cups Panko breadcrumbs
1 teaspoon salt
0.5 teaspoon black pepper
0.5 teaspoon garlic powder
0.5 teaspoon onion powder
2 tablespoons olive oil (or other high-heat cooking oil)
Fresh parsley, chopped, for garnish (optional)
Lemon wedges, for serving
For the Coleslaw:
3 cups shredded green cabbage
1 cup shredded purple cabbage
0.5 cup shredded carrots
0.5 cup mayonnaise
2 tablespoons apple cider vinegar
1 tablespoon sugar
0.25 teaspoon salt
Pinch of black pepper
Directions
- Prep for Juiciness (The Secret Soak!): Place the chicken drumsticks in a large bowl. Pour the buttermilk over them, ensuring they are fully submerged. Cover the bowl and refrigerate for at least 1 hour, or preferably 4 hours. This step is KEY to tender, moist chicken! If using the milk and vinegar substitute, mix and let it sit before adding the chicken.
- Preheat Oven and Prep Pan: Preheat your oven to 400F (200C). Line a large baking sheet with parchment paper or foil, then place a wire rack on top. Lightly spray the wire rack with cooking spray or brush with a little olive oil to prevent sticking.
- Set Up Dredging Station: Prepare three shallow dishes. In the first, combine flour, salt, pepper, garlic powder, and onion powder. In the second, place the beaten eggs. In the third, add the Panko breadcrumbs.
- Coat the Chicken: Remove drumsticks from the buttermilk, letting excess drip off. Do NOT pat dry. First, dredge each drumstick in the seasoned flour, shaking off any excess. Next, dip into the beaten egg, ensuring full coverage. Finally, press firmly into the Panko breadcrumbs, making sure the entire drumstick is generously coated. The buttermilk helps the coating adhere perfectly!
- Bake for Crispy Perfection: Arrange the coated drumsticks in a single layer on the prepared wire rack, ensuring space between each one for even air circulation. Drizzle each drumstick with a little olive oil (this helps achieve that incredible crisp!). Bake for 35-45 minutes, or until the internal temperature of the chicken reaches 165F (74C) when tested with a meat thermometer at the thickest part, avoiding the bone. For extra crispiness, you can briefly broil for the last 2-3 minutes, watching carefully to prevent burning.
- The All-Important Rest: Once cooked, remove the chicken from the oven and transfer it to a cutting board. Loosely tent with foil and let it rest for 5-10 minutes. This resting period is critical for the juices to redistribute throughout the meat, guaranteeing every bite is incredibly moist.
- Make the Coleslaw: While the chicken bakes, combine shredded cabbages and carrots in a large bowl. In a separate small bowl, whisk together mayonnaise, apple cider vinegar, sugar, salt, and pepper until smooth. Pour the dressing over the cabbage mixture and toss well to combine. Refrigerate until ready to serve.
- Serve: Garnish the chicken with fresh chopped parsley and serve immediately with lemon wedges and the vibrant coleslaw on the side. Enjoy your perfectly crispy, unbelievably juicy chicken!
Notes
- The buttermilk soak is crucial for tender, moist results. Don’t skip the resting period!