Classic Pot Roast: Fall-Apart Tender Every Time!
For years, I chased that elusive, truly fall-apart tender Classic Pot Roast, only to sometimes end up with something disappointingly dry. My culinary journey led me to perfect this recipe, a guaranteed method that transforms an affordable cut of beef into a melt-in-your-mouth masterpiece.
This isn’t just a meal; it’s a comforting experience, promising juicy, flavorful beef with minimal effort, making it the ultimate solution for a reliable and incredible Classic Pot Roast.
Why This Classic Pot Roast Recipe Will Become Your Family’s Favorite
The Secret to Unbelievably Tender, Shreddable Beef
The magic behind truly tender beef lies in the braising technique. By cooking low and slow in a tightly covered Dutch oven at a consistent 300°F, we allow the beef’s tough connective tissues to slowly break down.
Get Our Best Recipes Weekly!
Join thousands of food lovers and get delicious recipes delivered to your inbox.
This transformation converts tough collagen into rich, silky gelatin, resulting in that coveted fork-tender texture that effortlessly shreds.
Layers of Rich, Savory Flavor in Every Bite
This recipe builds flavor from the very first step. A deep sear on the beef creates the Maillard reaction, introducing rich, complex notes.
Deglazing the pot captures every bit of browned ‘fond,’ which then infuses the braising liquid with unparalleled savory depth.
Combining aromatic vegetables and fresh herbs further layers the taste, creating a harmonious and unforgettable Classic Pot Roast sauce.
A Comforting Meal, Simplified for Home Cooks
Achieving restaurant-quality results doesn’t have to be complicated. This Classic Pot Roast recipe breaks down each step with clear instructions and helpful cues.
With a little initial prep, your oven does most of the heavy lifting, making this impressive dish surprisingly approachable and consistently reliable for any home chef.
The Essential Ingredients for a Memorable Pot Roast
Selecting the right ingredients is the first step to an extraordinary Classic Pot Roast. Quality matters, but so does understanding the role each component plays.
Choosing Your Cut: The Perfect Chuck Roast
Beef chuck roast is the undisputed champion for pot roast. Its generous marbling and abundant connective tissue are precisely what we need for that fall-apart tender result.
Look for a 3-4 pound cut with good fat marbling throughout. This ensures juiciness and flavor as it slowly braises.
Building the Flavor Base: Aromatics & Liquids
These ingredients are crucial for the depth and aroma of your Classic Pot Roast.
-
Olive Oil: Essential for achieving a beautiful, flavorful sear on the beef.
-
Pearl Onions & Carrots: These root vegetables add natural sweetness and a comforting texture. Small white onions, halved, are an excellent substitute for pearl onions.
-
Beef Broth: The primary braising liquid, it becomes the foundation of your rich sauce. Opt for a good quality, low-sodium beef broth to control seasoning.
-
Fresh Thyme: Its earthy, slightly floral notes complement the beef beautifully. Fresh sprigs infuse a deeper, more nuanced flavor than dried herbs.
Essential Seasonings: Salt & Black Pepper
Don’t underestimate the power of generous seasoning. Salt and freshly cracked black pepper are fundamental.
They penetrate the meat, enhancing its natural flavor and creating a well-balanced profile throughout the entire dish.
Equip Your Kitchen: Tools for Pot Roast Success
Having the right equipment ensures a smooth and successful cooking experience. These tools are indispensable for creating a truly exceptional Classic Pot Roast.
The Indispensable Dutch Oven (or Heavy Oven-Safe Pot)
A heavy-bottomed, tightly-lidded Dutch oven is paramount for this recipe. Its cast iron construction provides superior heat retention and even distribution, critical for consistent braising.
The tight-fitting lid traps steam, creating the perfect moist environment for the beef to become incredibly tender without drying out.
Beyond the Pot: Other Helpful Gear
While the Dutch oven is the star, a few other items will make your process seamless.
-
Paper Towels: Crucial for thoroughly drying the beef before searing, which is key for a deep, flavorful crust.
-
Tongs: Ideal for safely handling and turning the hot chuck roast during searing.
-
Wooden Spoon: Perfect for scraping up those flavorful browned bits (fond) from the bottom of the pot without scratching the surface.
-
Cutting Board: Essential for resting the cooked roast and for easy shredding or slicing.
Your Journey to Fall-Apart Tender Pot Roast: A Detailed Guide
Follow these steps closely, and you’ll achieve a Classic Pot Roast that’s truly fall-apart tender every time.
- Prepare the Beef for Maximum Flavor:
Start by patting your beef chuck roast completely dry with paper towels. This step is crucial; a dry surface allows for a superior sear, which locks in moisture and develops incredible flavor.
Season the roast generously all over with salt and freshly cracked black pepper. Don’t be shy; this builds the foundational flavor.
- Achieve the Golden Crust: Searing for Unrivaled Depth:
Heat the olive oil in your large, heavy-bottomed Dutch oven over medium-high heat until it shimmers. This indicates it’s hot enough for proper searing.
Carefully place the seasoned beef roast into the hot pot and sear undisturbed for 4-5 minutes per side. You’re looking for a deep, rich brown crust to form, signaling the Maillard reaction has occurred, creating immense flavor depth.
Remove the beautifully seared roast from the pot and set it aside; it will return later.
- Building Layers with Aromatics: Sauté the Vegetables:
Add the pearl onions and carrots to the same pot, utilizing the residual oil and beef drippings. Cook, stirring occasionally, for about 5-7 minutes.
The goal is for them to slightly soften and develop a light brown color, contributing another layer of flavor and texture to your dish.
- Deglaze for Depth: Unlocking Hidden Flavors:
Pour in the beef broth, immediately using a wooden spoon to scrape up any browned bits stuck to the bottom of the pot. These flavorful particles are called ‘fond’.
Fond is packed with concentrated savory goodness, and deglazing ensures all that delicious flavor becomes part of your rich braising liquid.
- Assemble for Braising: The Low & Slow Setup:
Gently return the seared beef roast to the pot, nestling it comfortably among the softened vegetables. Add the fresh thyme sprigs.
Ensure the liquid comes about two-thirds of the way up the sides of the roast. This provides ample moisture for the braising process without fully submerging the meat.
- The Low & Slow Transformation: Braising to Perfection:
Bring the liquid in the pot to a gentle simmer on the stovetop. Then, cover the Dutch oven tightly with its lid.
This is the critical step for guaranteeing tenderness: Transfer the covered pot to a preheated oven at a low temperature of 300°F (150°C). Braise for 3 to 3.5 hours, or until the beef is incredibly fork-tender and easily pulls apart.
The low, slow heat allows the tough connective tissues in the beef to slowly break down into gelatin, resulting in that unbelievably moist, fall-apart texture we all crave for a perfect Classic Pot Roast.
For an even more tender experience, see how to make the ultimate pot roast.
- Rest & Skim: The Final Touches Before Serving:
Once the braising is complete, carefully remove the pot from the oven. Transfer the beef to a cutting board and let it rest for 10-15 minutes before shredding or slicing.
This resting period allows the juices to redistribute, ensuring a moist and flavorful result. If desired, skim any excess fat from the surface of the rich sauce.
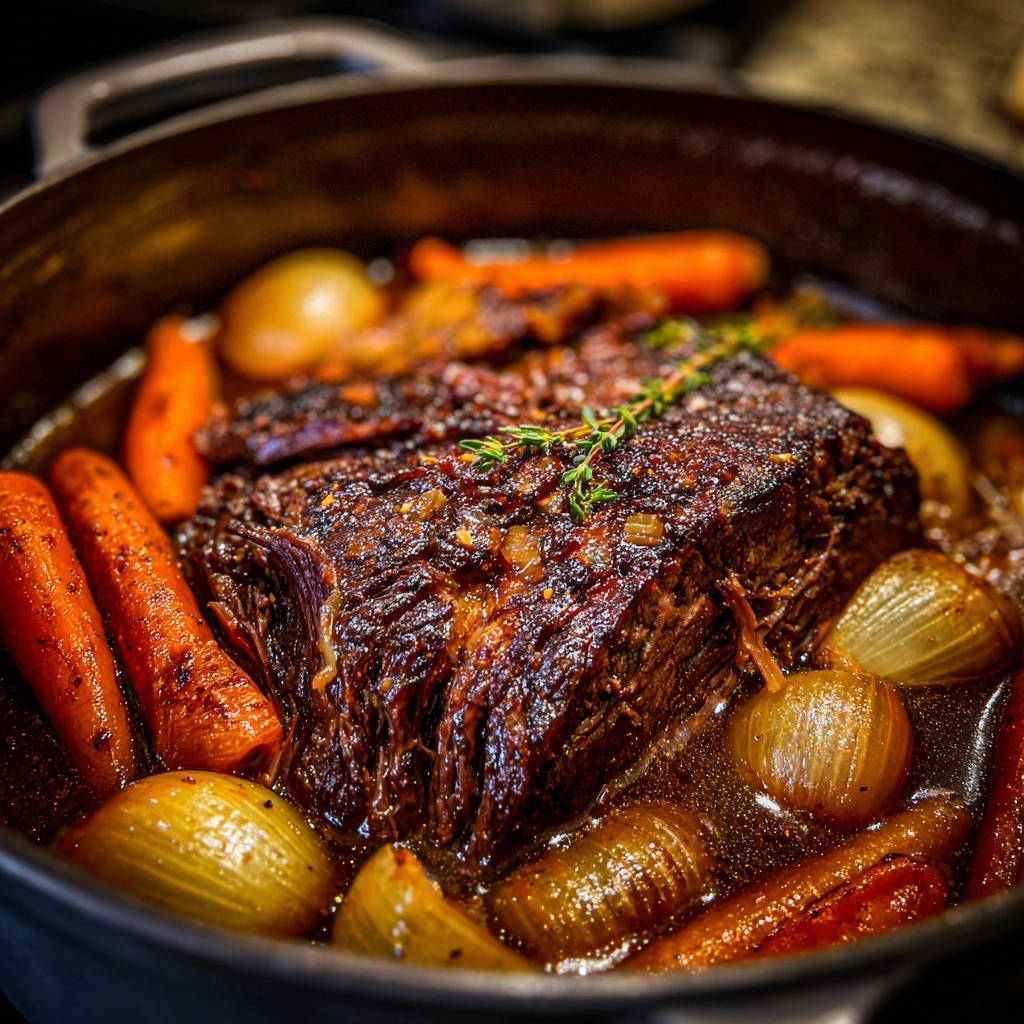
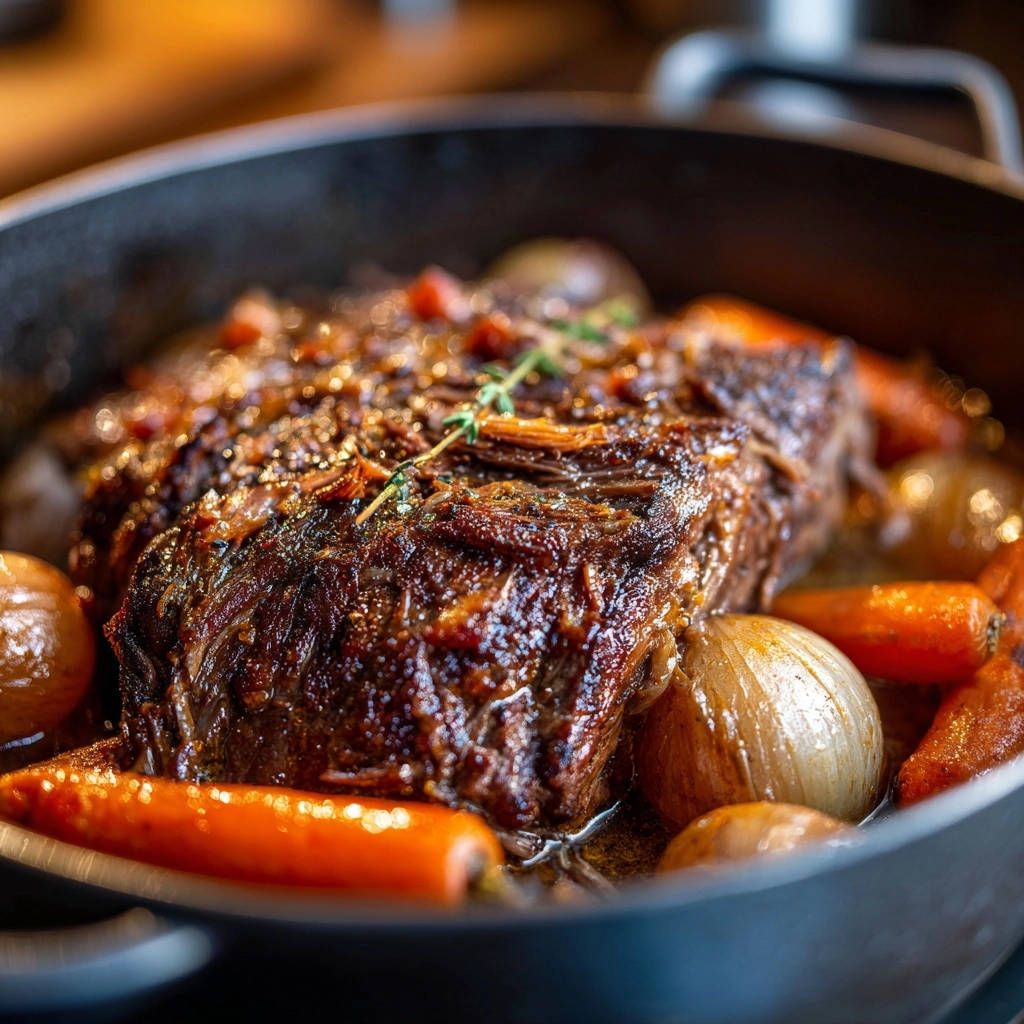
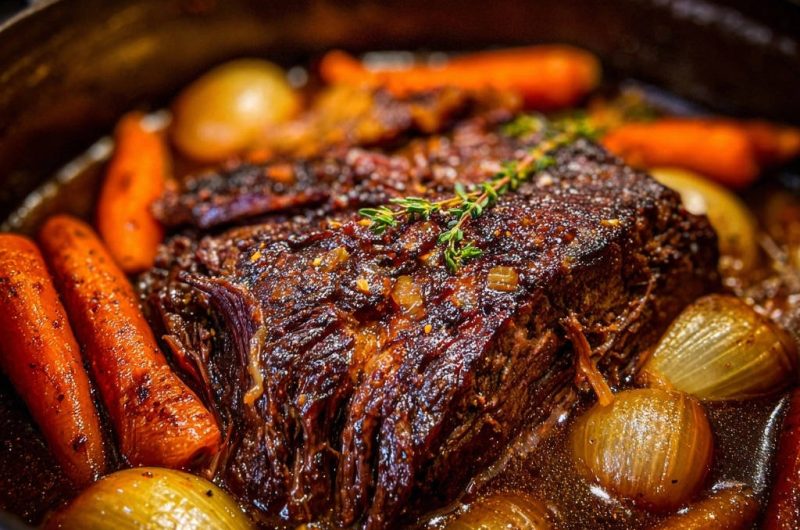
- Serve with Pride: Your Fall-Apart Masterpiece Awaits:
Serve the tender pot roast with the rich, savory sauce, along with the perfectly cooked carrots and onions.
Prepare for applause; you’ve just created an unforgettable Classic Pot Roast.
Chef’s Secrets: Elevating Your Pot Roast from Great to Unforgettable
These expert tips go beyond the basic instructions, ensuring your Classic Pot Roast achieves legendary status.
For more ideas on achieving incredible results, explore this Classic Pot Roast Dinner.
Mastering the Sear: A truly deep, dark crust on your chuck roast is non-negotiable for flavor. This Maillard reaction adds incredible savory depth.
Avoid overcrowding the pot; if necessary, sear the roast in batches to maintain high heat and achieve that perfect crust.
Don’t Skip Deglazing: Those browned bits at the bottom of the pot, known as “fond,” are pure flavor gold. Deglazing with broth scrapes them up, infusing your sauce with intense umami.
Missing this step means sacrificing a significant layer of the dish’s overall richness.
Patience with Low & Slow: The biggest mistake with pot roast is rushing the braising. Tough meat is almost always a sign it simply needed more time.
Trust the process; the low, steady heat of the oven is what breaks down the collagen, leading to truly fork-tender beef.
The Crucial Resting Period: After braising, resist the urge to immediately shred or slice the beef. Resting allows the muscle fibers to relax and reabsorb their juices.
This ensures a wonderfully moist and tender Classic Pot Roast, rather than one where all the delicious juices run out onto the board.
Customizing Your Vegetables: Feel free to add other root vegetables like cut potatoes, parsnips, or celery.
For best results, add denser vegetables like potatoes about 1.5 to 2 hours into the braising time to prevent them from becoming mushy, while ensuring they cook through.
Perfecting the Gravy: If your sauce isn’t as thick as you’d like after skimming the fat, you have options. Create a cornstarch slurry (1 tbsp cornstarch mixed with 1 tbsp cold water) and whisk it into the simmering sauce until thickened.
Alternatively, simmer the sauce on the stovetop over medium heat to reduce it further, concentrating its flavors for a richer consistency.
Troubleshooting Your Pot Roast: Common Issues Solved
Even expert cooks encounter questions. Here are solutions to common pot roast dilemmas, ensuring your Classic Pot Roast is always a success.
“Why is my pot roast still tough?”
The most common reason for tough pot roast is insufficient cooking time. The magic of braising relies on low, slow heat to break down tough connective tissues.
If your beef isn’t fork-tender, simply continue braising it, checking every 30 minutes, until it easily pulls apart.
“My gravy isn’t flavorful enough or is too thin.”
Ensure you achieve a good, dark sear on the beef and thoroughly deglaze the pot, as the ‘fond’ is key to flavor. If the gravy is thin, you can reduce it by simmering on the stovetop until thickened.
Alternatively, whisk in a cornstarch slurry (1 tbsp cornstarch mixed with 1 tbsp cold water) to thicken it to your desired consistency.
“The vegetables are mushy or undercooked.”
Timing and size are key for vegetables. If they are mushy, they might have been added too early or cut too small, causing them to overcook.
If undercooked, they may need more braising time or could have been cut too large. Adjust next time by cutting denser vegetables smaller or adding them later in the process.
“My pot roast tastes bland.”
Review your seasoning steps. Did you generously season the beef before searing? A deep sear contributes significantly to flavor.
Consider adding a touch more salt, a pinch of dried herbs, or a splash of Worcestershire sauce to the braising liquid for an extra boost of umami.
Beyond the Pot: Creative Serving Ideas for Your Classic Pot Roast
While delicious on its own, your Classic Pot Roast truly shines when paired with the right accompaniments or given a new lease on life.
Round Out Your Meal
Consider these other comforting dishes to enjoy alongside your pot roast.
- For a warming starter, try this Classic Meatball & Tomato Soup, featuring tender meatballs that echo the comforting feel of your main course.
- Expand your braised beef experience with a Hearty Beef & Veggie Braise, offering a similar slow-cooked tenderness.
Classic Comfort Pairings
For a traditional, comforting meal, consider these beloved pairings.
-
Creamy Mashed Potatoes: The ultimate sponge for that rich, savory sauce.
-
Egg Noodles or Polenta: Simple yet satisfying, perfect for soaking up every drop of gravy.
-
Crusty Bread: Ideal for sopping up the delicious juices, ensuring no flavor is left behind.
Elevating Leftovers with New Life
Leftover pot roast is a treasure, easily transformed into exciting new meals.
-
Shredded Beef Sandwiches: Pile the tender meat onto toasted buns with extra sauce and perhaps some melted cheese.
-
Hearty Tacos or Quesadillas: Shred the beef, warm it up, and use it as a flavorful filling with your favorite toppings.
-
Shepherd’s Pie: Combine shredded pot roast and vegetables with the rich gravy, top with mashed potatoes, and bake until bubbly and golden.
Maximize Your Masterpiece: Storage & Make-Ahead Tips
Planning ahead or enjoying leftovers is easy with these simple storage and reheating guidelines.
Proper Storage for Optimal Freshness
To keep your Classic Pot Roast fresh, store leftover beef, vegetables, and sauce together in an airtight container.
It will keep beautifully in the refrigerator for 3-4 days, or you can freeze it for up to 3 months for a quick future meal.
Reheating for Optimal Flavor and Texture
Gentle reheating is key to maintaining the pot roast’s tenderness and preventing it from drying out. For best results, reheat leftovers slowly.
Warm it on the stovetop over low heat, covered, adding a splash of broth if needed, or in the oven at 300°F (150°C), covered, until heated through.
Can I prepare this pot roast in advance?
Absolutely! Pot roast is one of those dishes that often tastes even better the next day, as the flavors have more time to meld and deepen.
Prepare it fully, let it cool, then store and reheat as described above. It’s an ideal make-ahead meal for entertaining or busy weeknights.
Your Top Questions About Classic Pot Roast, Answered
Addressing common queries helps demystify the process and ensures your success with this beloved dish.
What’s the best type of beef for pot roast?
Without a doubt, beef chuck roast is the top recommendation. Its excellent marbling and high collagen content are perfect for low, slow cooking, breaking down into succulent, fork-tender beef.
Can I make this Classic Pot Roast in a slow cooker instead of an oven?
Yes, you can certainly adapt this recipe for a slow cooker. Follow the searing and deglazing steps on the stovetop first, then transfer everything to your slow cooker.
Cook on low for 6-8 hours or on high for 3-4 hours, reducing the amount of beef broth slightly as there’s less evaporation in a slow cooker.
How do I know when my pot roast is truly “fall-apart tender”?
Texture is your best indicator. A truly fall-apart tender pot roast should shred effortlessly with two forks, offering very little resistance. A meat thermometer is not the primary guide here; focus on that melt-in-your-mouth feel.
What if I don’t have fresh thyme? Can I use dried?
Yes, you can substitute dried thyme for fresh. As a general rule, use about one-third the amount of dried herbs compared to fresh. For this recipe, about 2/3 of a teaspoon of dried thyme would be sufficient.
Add dried herbs earlier in the cooking process, typically with the vegetables, to allow their flavors to fully bloom.
Can I add potatoes directly to the pot during braising?
You can! If adding potatoes, cut them into large, roughly 1.5-inch chunks to prevent them from turning mushy. I recommend adding them about 1.5 to 2 hours into the braising process, ensuring they cook through without over-softening.
Ready to Create Your Own Fall-Apart Tender Pot Roast?
There’s immense satisfaction in pulling a beautifully cooked, fall-apart tender Classic Pot Roast from the oven, filling your home with an irresistible aroma. This recipe is your steadfast guide to achieving that culinary triumph.
I encourage you to try this foolproof method and discover the joy of serving a truly memorable meal. Share your experiences and tag your creations; I can’t wait to see your perfect pot roast!
Classic Pot Roast
Course: Main CourseCuisine: American CuisineDifficulty: easy6
servings20
minutes3
hours240
minutesAmerican Cuisine
Ingredients
1 (3-4 pound) beef chuck roast
2 tablespoons olive oil
1 teaspoon salt
1/2 teaspoon black pepper
1 pound whole peeled pearl onions (or small white onions, halved)
1 pound carrots, peeled and cut into large chunks
4 cups beef broth
2 sprigs fresh thyme
Directions
- Pat the beef chuck roast completely dry with paper towels. This is crucial for achieving a deep, flavorful sear, which locks in moisture and starts the tenderizing process. Season generously all over with salt and pepper.
- Heat the olive oil in a large, heavy-bottomed Dutch oven or oven-safe pot over medium-high heat until shimmering. Carefully place the beef roast into the hot pot and sear undisturbed for 4-5 minutes per side until a deep, rich brown crust forms. This browning step adds incredible flavor depth to your final dish. Remove the roast from the pot and set aside.
- Add the pearl onions and carrots to the same pot. Cook, stirring occasionally, for about 5-7 minutes until slightly softened and lightly browned.
- Pour in the beef broth, scraping up any browned bits from the bottom of the pot with a wooden spoon. These browned bits are called fond, and they are packed with amazing flavor that will infuse your sauce.
- Return the seared beef roast to the pot, nestling it among the vegetables. Add the fresh thyme sprigs. Ensure the liquid comes about two-thirds of the way up the sides of the roast.
- Bring the liquid to a gentle simmer, then cover the Dutch oven tightly with its lid. This is the game-changing step for guaranteed tenderness: Transfer the covered pot to a preheated oven at a low temperature of 300°F (150°C). Braise for 3 to 3.5 hours, or until the beef is incredibly fork-tender and easily pulls apart. The low, slow heat allows the connective tissues in the beef to slowly break down into gelatin, resulting in that unbelievably moist, fall-apart texture we all crave. No more dry or tough meat!
- Once done, carefully remove the pot from the oven. Remove the beef and let it rest on a cutting board for 10-15 minutes before shredding or slicing. Skim any excess fat from the surface of the sauce if desired.
- Serve the tender pot roast with the rich sauce, carrots, and onions. Get ready for applause!
Notes
- Ensure the beef is patted dry for a good sear. Low and slow oven braising is the secret to fork-tender results.