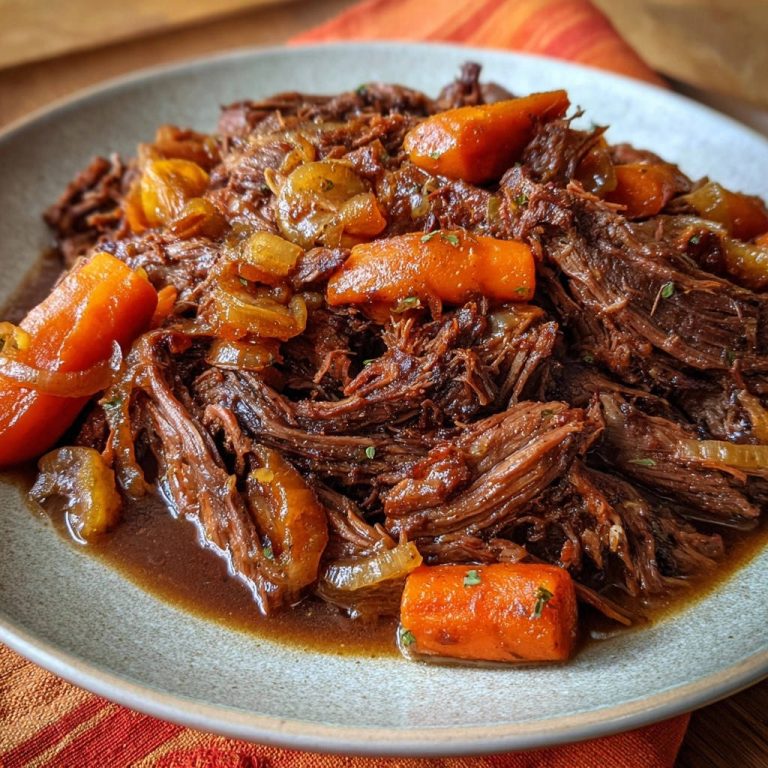
Classic Pot Roast Dinner: Melt-in-Your-Mouth Tenderness
I remember years of struggling to achieve that perfect, fall-apart pot roast, only to end up with tough, dry meat. This recipe for a truly classic pot roast dinner is my secret weapon for guaranteed success, transforming a humble cut of beef into an unbelievably tender, juicy masterpiece.
You’re about to discover a method that locks in moisture, infuses every bite with deep, savory flavor, and promises a comforting meal that practically melts in your mouth.
Why This Classic Pot Roast Dinner Is Your New Go-To Recipe
This isn’t just another pot roast recipe. It’s a meticulously crafted guide designed to eliminate common pitfalls and deliver an exceptional dining experience every time.
Get Our Best Recipes Weekly!
Join thousands of food lovers and get delicious recipes delivered to your inbox.
The Secret to Unrivaled Juiciness and Tenderness
Our method focuses on two crucial techniques: a deep, dark sear and a prolonged rest. These steps are engineered to create a protective crust that seals in juices and allows them to redistribute for unparalleled tenderness.
Say goodbye to dry, stringy meat; this recipe ensures every shred is succulent and bursting with flavor.
For even more tender results, explore our guide on making an ultimate pot roast.
A Complete One-Pot Comfort Meal with Ease
Imagine a hearty, wholesome meal that practically cooks itself. This recipe brings together tender beef, perfectly cooked potatoes, and vibrant peas, all in a single pot.
The minimal cleanup makes it ideal for cozy family dinners and special occasions alike.
Foolproof Steps for Consistent Success Every Time
From novice cooks to seasoned chefs, our detailed instructions guide you through each stage with clarity and confidence.
Every step, from prepping the beef to crafting the silky gravy, is explained for consistent, mouthwatering results.
Gathering Your Flavor Foundation: Essential Ingredients
The foundation of an outstanding classic pot roast dinner lies in selecting quality ingredients and understanding their role.
The Star of the Show: Beef Chuck Roast Explained
Beef chuck roast is the ultimate choice for pot roast. Its generous marbling and connective tissues break down beautifully during slow cooking, yielding that desirable fall-apart tenderness and rich flavor.
For even more tender results, check out this fall-apart tender pot roast.
Look for a cut with good marbling throughout, as this fat renders into incredible juiciness.
Aromatic Anchors: Onion, Garlic, and Herbs
These humble ingredients are critical for building the deep, savory base of our pot roast.
Yellow onion caramelizes to add sweetness, while fresh garlic provides a pungent, aromatic depth. Dried parsley introduces a fresh, herbaceous note that brightens the entire dish.
Hearty Companions: Potatoes and Peas
Russet potatoes are ideal for this dish, offering a creamy, starchy texture that soaks up the savory braising liquid beautifully.
Frozen green peas are added at the very end to maintain their vibrant color and fresh, slightly sweet pop, complementing the richness of the beef.
Crafting the Rich Braising Liquid and Silky Gravy
High-quality beef broth is essential for a robust braising liquid that infuses the meat with umami.
Unsalted butter and all-purpose flour form a classic roux, which expertly thickens the flavorful cooking liquid into a luxurious, smooth gravy that ties the entire meal together.
Complete Ingredient List for Your Classic Pot Roast Dinner
- 3 lb Beef Chuck Roast
- 2 tbsp Olive Oil
- 1 tsp Salt (plus more to taste)
- 1/2 tsp Black Pepper (plus more to taste)
- 4 cups Beef Broth
- 1 large Yellow Onion, roughly chopped
- 4 cloves Garlic, minced
- 2 lbs Russet Potatoes, scrubbed and cut into 1-inch wedges
- 1 tbsp Dried Parsley, divided
- 16 oz Frozen Green Peas
- 2 tbsp Unsalted Butter
- 2 tbsp All-Purpose Flour
Your Culinary Arsenal: Essential Tools for Pot Roast Perfection
Having the right equipment makes preparing this classic pot roast dinner a seamless and enjoyable process.
The Indispensable Dutch Oven (or Oven-Safe Pot)
A heavy-bottomed Dutch oven or an oven-safe pot with a tight-fitting lid is your best friend for this recipe.
Its ability to conduct and retain heat evenly is crucial for achieving a deep sear and facilitating long, slow braising in the oven, ensuring consistent tenderness.
Everyday Kitchen Essentials
You’ll also need standard kitchen tools.
This includes a sturdy cutting board and a sharp knife for preparing ingredients, a whisk for your gravy, measuring cups and spoons, and a fine-mesh strainer to ensure a smooth, lump-free sauce.
Mastering the Method: A Step-by-Step Guide to Tender Pot Roast
- Step 1: Prep the Roast for Maximum Moisture Lock-In!
Start by patting your beef chuck roast completely dry with paper towels. This seemingly simple step is absolutely crucial for developing a deep, caramelized crust during searing, which is key for incredible flavor.
Generously season the beef all over with 1 teaspoon of salt and 1/2 teaspoon of black pepper. In a large Dutch oven or oven-safe pot, heat 1 tablespoon of olive oil over medium-high heat until shimmering.
Sear the beef on all sides until it’s deeply browned, about 3-4 minutes per side. This browning not only builds a rich foundational flavor but also helps create a “crust” that locks in the meat’s natural juices during the long braising process. Remove the seared beef from the pot and set it aside.
- Step 2: Building Your Flavor Base with Aromatics and Broth
Return the pot to medium heat and add the remaining 1 tablespoon of olive oil. Add the roughly chopped yellow onion and cook, stirring occasionally, until it softens and becomes translucent, which usually takes about 5 minutes.
Stir in the minced garlic and cook for just 1 minute more, until it becomes wonderfully fragrant. Be careful not to burn the garlic, as this can make it bitter.
Pour in the 4 cups of beef broth, making sure to scrape up all the delicious browned bits from the bottom of the pot with a wooden spoon. These “fond” bits are packed with concentrated flavor, essential for a rich sauce.
Bring the broth to a gentle simmer.
- Step 3: Beginning the Low and Slow Tenderness Transformation
Carefully return the seared beef roast to the pot, ensuring it is mostly submerged in the simmering beef broth. The liquid should come up at least two-thirds of the way up the sides of the roast.
Cover the pot tightly with a lid. Transfer the covered pot to a preheated oven at 300°F (150°C) and let it braise for 2.5 hours. This low and slow cooking process gradually breaks down the tough connective tissues in the chuck roast, making it incredibly tender.
- Step 4: Incorporating Your Hearty Root Vegetables
After the initial 2.5 hours, carefully remove the pot from the oven and lift the lid. Add the 1-inch potato wedges around the beef in the pot. Sprinkle them with 1/2 tablespoon of dried parsley for added flavor.
Re-cover the pot tightly to ensure steam and heat are trapped, then return it to the oven. Continue braising for another 45-60 minutes, or until the beef is absolutely fork-tender and the potatoes are easily pierced with a fork.
The timing of adding the potatoes later prevents them from becoming mushy and ensures they cook perfectly alongside the roast.
- Step 5: Adding the Freshness of Green Peas
During the last 10-15 minutes of the total cooking time (once the beef and potatoes are nearly done), add the 16 ounces of frozen green peas to the pot.
Stir them gently into the braising liquid and around the other ingredients. Re-cover the pot and return it to the oven for the remaining time.
Adding the peas at this stage keeps them vibrant green and prevents them from becoming overcooked and dull in color and texture.
- Step 6: The Crucial Rest: Guaranteeing Ultimate Juiciness
Once the beef, potatoes, and peas are tender, carefully remove the beef from the pot and place it on a clean cutting board. Tent it loosely with foil and let it rest for at least 15-20 minutes. Do NOT skip this step!
Resting allows the muscle fibers to relax and the juices, which have migrated to the center during cooking, to redistribute evenly throughout the entire piece of meat. This guarantees a moist, incredibly flavorful roast when you slice it.
While the beef rests, use a slotted spoon to carefully transfer the cooked potatoes and peas to a serving bowl. Tent them with foil to keep them warm.
- Step 7: Crafting the Silky, Savory Gravy
While the beef rests, carefully strain the rich braising liquid from the pot into a clean saucepan. Discard any cooked onion and garlic solids caught in the strainer to ensure a smooth gravy.
In the now-empty Dutch oven (or a separate saucepan), melt 2 tablespoons of unsalted butter over medium heat. Whisk in 2 tablespoons of all-purpose flour and cook for 1 minute, whisking constantly, to form a pale golden roux. This roux is your thickening agent.
Gradually whisk in the strained braising liquid, a little at a time, until the gravy is smooth and thickens to your desired consistency. Season with additional salt and pepper to taste, adjusting until it’s perfectly balanced.
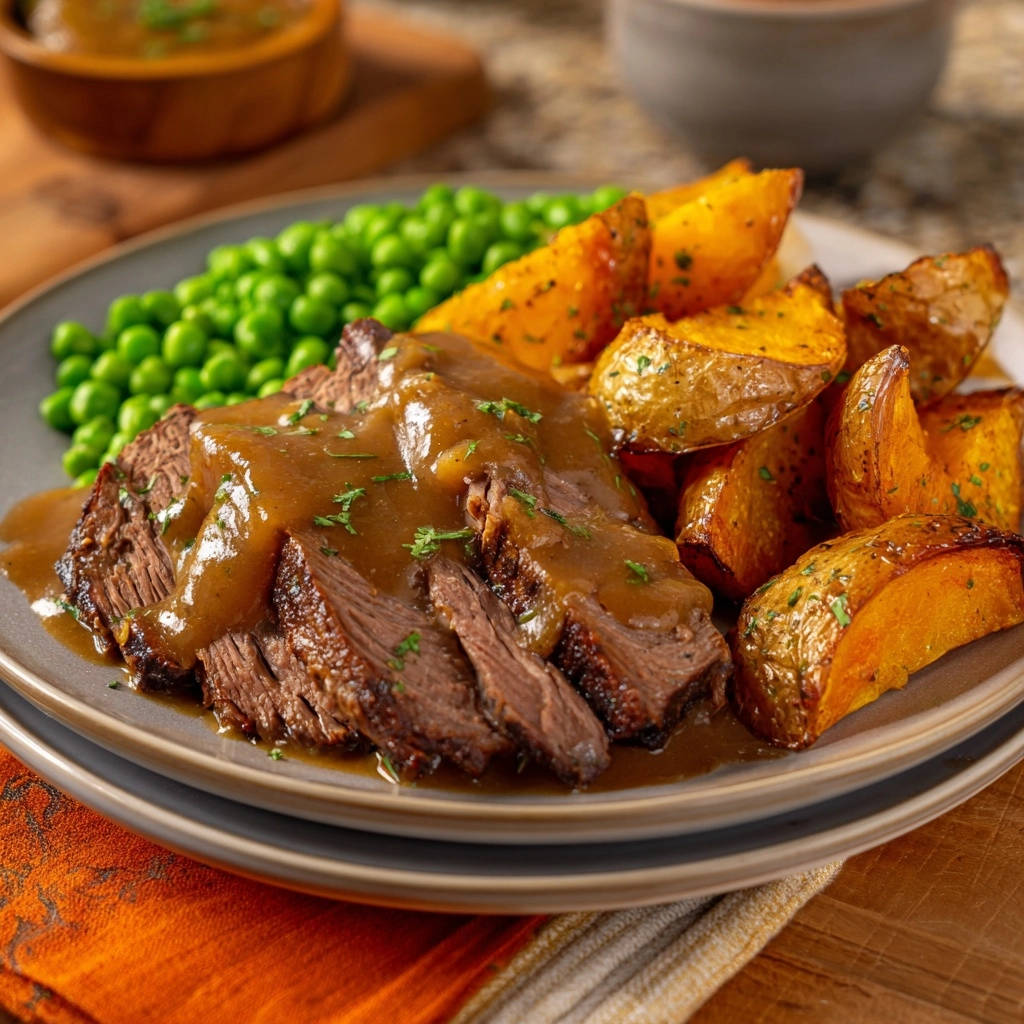
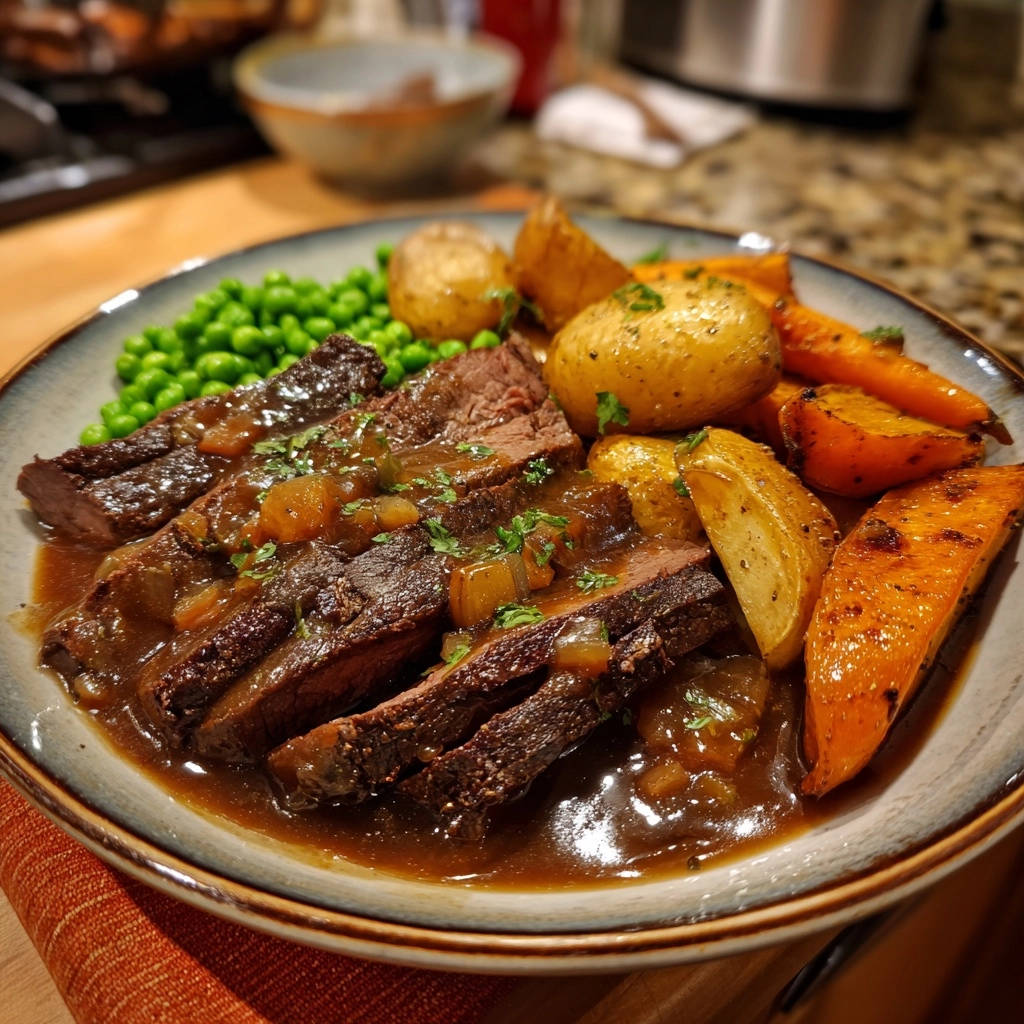
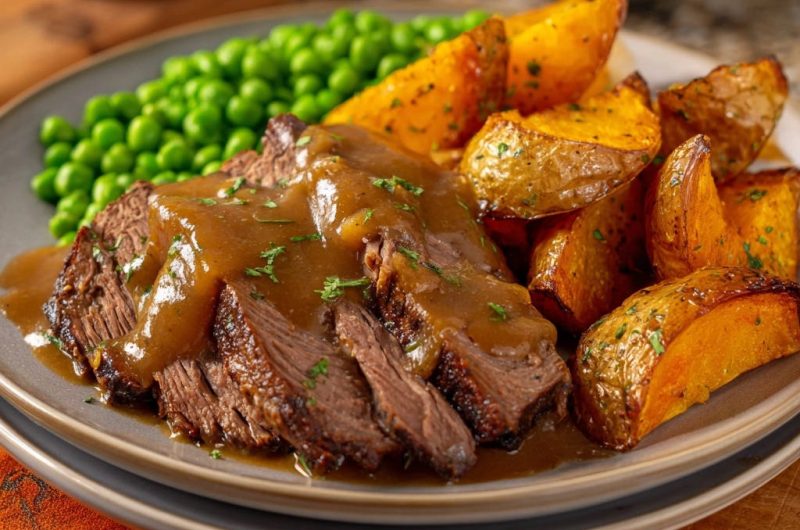
- Step 8: Presenting Your Classic Pot Roast Dinner Masterpiece
Slice the rested beef against the grain into thick, generous pieces. Slicing against the grain ensures maximum tenderness and an easy chew.
Arrange the sliced beef on plates alongside the tender potatoes and vibrant green peas. Spoon generous amounts of the silky, savory gravy over the beef and potatoes, allowing it to pool enticingly.
Round Out Your Meal
To complement your tender pot roast, consider these dishes that offer satisfying flavors and textures.
- For a comforting start, try the Classic Meatball & Tomato Soup, featuring tender bites that echo the richness of your main course.
- If you’re in the mood for more slow-cooked goodness, the Hearty Beef & Veggie Braise offers deep, savory notes that pair well with the comforting nature of pot roast.
Garnish with the remaining 1/2 tablespoon of dried parsley for a fresh finish and a pop of color. Now, it’s time to enjoy your perfectly tender, juicy classic pot roast dinner!
Chef’s Secrets: Elevate Your Classic Pot Roast Dinner Game
Unlock even deeper flavors and ensure flawless results with these expert tips for your classic pot roast dinner.
The Underrated Power of a Deep, Dark Sear
Achieving a truly dark, caramelized crust on your chuck roast is paramount for flavor. Ensure the meat is patted completely dry before searing, as moisture will steam instead of brown.
Don’t overcrowd the pan, and resist the urge to flip the meat too soon; allow a deep crust to form before turning.
Never Skip the Resting Period!
This cannot be stressed enough: resting the meat is non-negotiable for a truly juicy pot roast. If you slice hot meat immediately, all the precious juices will rush out onto your cutting board.
Allowing it to rest gives the muscle fibers time to reabsorb those juices, ensuring every slice is succulent.
Customizing Your Vegetable Medley
While potatoes and peas are classic, feel free to add other root vegetables like carrots, parsnips, or celery.
Chop them into 1-inch pieces and add them alongside the potatoes in Step 4 for perfectly tender results.
Enhancing Your Gravy: Beyond the Basics
For an even richer gravy, consider adding a splash of red wine or a bay leaf to the braising liquid along with the beef broth.
Fresh herbs like thyme or rosemary sprigs can also be added during the braising process, then removed before straining the liquid.
Seasoning in Layers for Deeper Flavor
Don’t just season the beef; think about seasoning at every stage. Generously season the meat before searing, ensure your beef broth has good flavor, and always taste and adjust the gravy at the end.
This layering technique builds complexity and ensures a truly flavorful classic pot roast dinner.
Common Pot Roast Hiccups & How to Fix Them
Even seasoned cooks encounter challenges. Here’s how to troubleshoot common pot roast problems.
“My Pot Roast is Still Dry or Tough!”
This is often due to insufficient cooking time or temperature, or skipping the crucial resting period. Ensure your oven temperature is accurate and allow the full braising time for the connective tissues to break down.
Always rest the meat; it’s the ultimate secret to juiciness.
“The Gravy is Too Thin or Too Thick.”
If your gravy is too thin, create a slurry with 1 tablespoon of cornstarch mixed with 2 tablespoons of cold water, then whisk it into the simmering gravy until thickened. If it’s too thick, simply whisk in more hot beef broth or water until you reach the desired consistency.
“My Vegetables are Mushy (or Undercooked).”
Mushy vegetables often happen if they’re added too early or cut too small, leading to overcooking. Undercooked vegetables mean they were added too late or cut too large.
Stick to the recommended timing and cutting size for perfectly tender, not mushy, results.
“My Pot Roast Lacks Depth of Flavor.”
Ensure you’re getting a deep, dark sear on the beef, as this creates a significant amount of flavor. Season generously with salt and pepper at multiple stages, use a good quality beef broth, and don’t skimp on the aromatics like onion and garlic.
Beyond the Dinner Plate: Serving, Storing, & Making Ahead
Maximize your enjoyment of this delicious classic pot roast dinner with these practical tips.
Perfect Pairings: What to Serve with Your Classic Pot Roast
This hearty meal is wonderfully complete on its own, but a warm, crusty loaf of bread is perfect for soaking up every last drop of gravy.
A simple, crisp green salad with a vinaigrette dressing offers a refreshing contrast to the rich flavors.
Storing Leftovers for Future Enjoyment
Leftover pot roast and gravy store beautifully. Allow everything to cool completely, then transfer the meat, vegetables, and gravy into separate airtight containers.
Refrigerate promptly, and they will keep well for 3-4 days.
Make-Ahead Magic: Prepping for Easier Weeknights
To save time, sear your beef and chop all your vegetables a day in advance. Store the seared beef and chopped vegetables in the refrigerator in separate containers.
You can also pre-measure your broth and spices, making assembly a breeze on cooking day.
Reheating Your Pot Roast for Optimal Taste
Reheat leftover pot roast gently to prevent drying out. For best results, reheat slices of meat and vegetables gently in a covered pot on the stovetop with some of the gravy, or in a covered dish in the oven at a low temperature (around 300°F/150°C).
Add a splash of extra beef broth if the gravy seems too thick during reheating.
Your Classic Pot Roast Dinner Questions, Answered (FAQs)
Can I use a different cut of beef for this recipe?
While beef chuck roast is highly recommended for its marbling and connective tissue, you can use other cuts like beef brisket or bottom round. Be aware that brisket may require slightly longer braising, and bottom round will be less fatty and might result in a slightly less “fall-apart” texture, best sliced thin.
What if I don’t have a Dutch oven?
No Dutch oven? No problem! You can use any heavy-bottomed, oven-safe pot or roasting pan with a tight-fitting lid. If your lid isn’t perfectly snug, cover the pot tightly with aluminum foil before placing the lid on top to ensure no steam escapes during braising.
Can I freeze leftover pot roast and gravy?
Absolutely! Leftover pot roast and gravy freeze exceptionally well. Allow them to cool completely, then transfer the meat, vegetables, and gravy into separate freezer-safe airtight containers or heavy-duty freezer bags. They will keep for 2-3 months. Thaw overnight in the refrigerator before reheating gently.
Is it possible to cook this Classic Pot Roast Dinner in a slow cooker?
Yes, you can adapt this recipe for a slow cooker. Follow Step 1 to sear the beef on the stovetop for critical flavor. Then, transfer the seared beef, cooked aromatics, and beef broth to your slow cooker. Cook on low for 6-8 hours or on high for 3-4 hours, adding the potatoes and parsley during the last 1.5-2 hours, and peas during the last 30 minutes. Make the gravy separately on the stovetop.
How can I make this pot roast gluten-free?
To make the gravy gluten-free, simply replace the all-purpose flour in Step 7 with a cornstarch slurry. For every 1 tablespoon of flour, use 1 tablespoon of cornstarch mixed with 2 tablespoons of cold water. Whisk this slurry gradually into the simmering strained braising liquid until the desired thickness is achieved.
Ready to Impress? Share Your Classic Pot Roast Dinner Triumph!
There’s nothing quite like the comforting aroma and incredible taste of a perfectly prepared classic pot roast dinner. You now have all the tools and expertise to create a dish that’s not just a meal, but a memorable experience.
Go forth and impress your family and friends with this melt-in-your-mouth masterpiece. We’d love to hear about your pot roast triumphs, so feel free to share your photos or any personal tips you discover along the way!
Classic Pot Roast Dinner
Course: Main CourseCuisine: American CuisineDifficulty: easy6
servings30
minutes4
hours300
minutesAmerican Cuisine
Ingredients
3 lb Beef Chuck Roast
2 tbsp Olive Oil
1 tsp Salt (plus more to taste)
1/2 tsp Black Pepper (plus more to taste)
4 cups Beef Broth
1 large Yellow Onion, roughly chopped
4 cloves Garlic, minced
2 lbs Russet Potatoes, scrubbed and cut into 1-inch wedges
1 tbsp Dried Parsley, divided
16 oz Frozen Green Peas
2 tbsp Unsalted Butter
2 tbsp All-Purpose Flour
Directions
- Prep the Roast (Moisture Lock-In!): Pat the beef roast completely dry with paper towels. This is crucial for achieving a deep, flavorful sear. Season generously all over with 1 tsp salt and 1/2 tsp black pepper. Heat 1 tbsp olive oil in a large Dutch oven or oven-safe pot over medium-high heat. Sear the beef on all sides until deeply browned, about 3-4 minutes per side. This step builds immense flavor and creates a crust that helps hold in juices during slow cooking. Remove beef and set aside.
- Aromatics and Braising Liquid: Add the remaining 1 tbsp olive oil to the pot. Add the roughly chopped onion and cook until softened, about 5 minutes. Stir in the minced garlic and cook for 1 minute until fragrant. Pour in the beef broth, scraping up any browned bits from the bottom of the pot. Bring to a simmer.
- Low and Slow Tenderness (Part 1): Return the seared beef to the pot, ensuring it’s mostly submerged in the broth. Cover the pot tightly with a lid. Transfer to a preheated oven at 300°F (150°C) and braise for 2.5 hours.
- Add Vegetables: After 2.5 hours, carefully remove the lid. Add the potato wedges around the beef in the pot. Sprinkle with 1/2 tbsp dried parsley. Re-cover the pot tightly. Return to the oven and continue braising for another 45-60 minutes, or until the beef is absolutely fork-tender and the potatoes are tender.
- Add Peas: During the last 10-15 minutes of cooking, add the frozen green peas to the pot. Stir gently to combine. Re-cover and return to the oven for the remaining time.
- Rest the Meat (Crucial for Juiciness!): Once the beef, potatoes, and peas are tender, carefully remove the beef from the pot and place it on a cutting board. Tent loosely with foil and let it rest for at least 15-20 minutes. Do NOT skip this step! Resting allows the juices to redistribute evenly throughout the meat, guaranteeing a moist and flavorful roast when sliced. Using a slotted spoon, carefully transfer the cooked potatoes and peas to a serving bowl and tent with foil to keep warm.
- Make the Gravy: While the beef rests, carefully strain the braising liquid from the pot into a clean saucepan, discarding any cooked onion and garlic solids caught in the strainer. In the now-empty Dutch oven (or a separate saucepan), melt 2 tbsp butter over medium heat. Whisk in 2 tbsp flour and cook for 1 minute to form a roux. Gradually whisk in the strained braising liquid until smooth and thickened to your desired consistency. Season with salt and pepper to taste.
- Serve: Slice the rested beef against the grain into thick pieces. Arrange on plates with the tender potatoes and peas. Spoon generous amounts of gravy over the beef and potatoes. Garnish with the remaining 1/2 tbsp dried parsley. Enjoy your perfectly tender, juicy pot roast!
Notes
- Resting the meat is crucial for juiciness. Patting beef dry ensures a good sear.