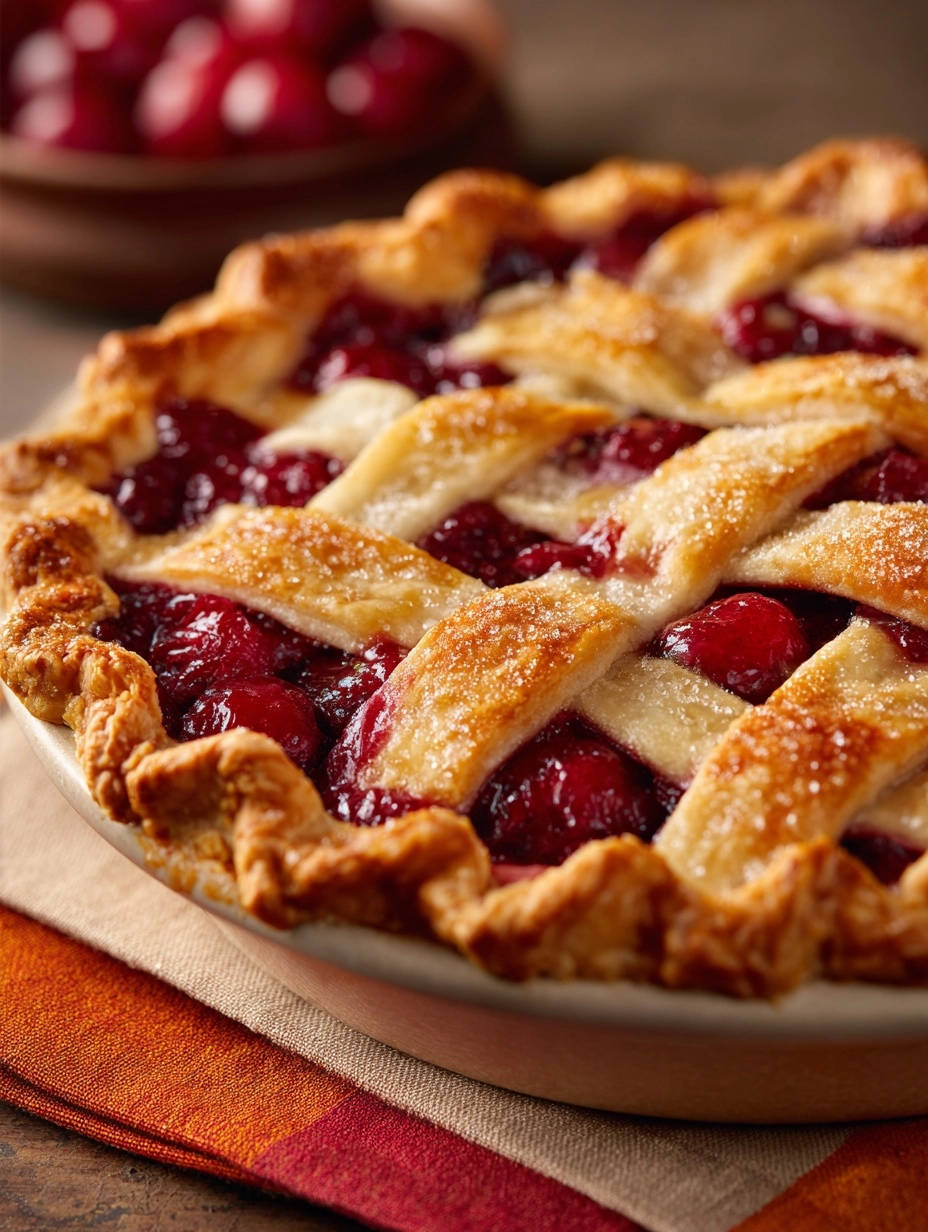
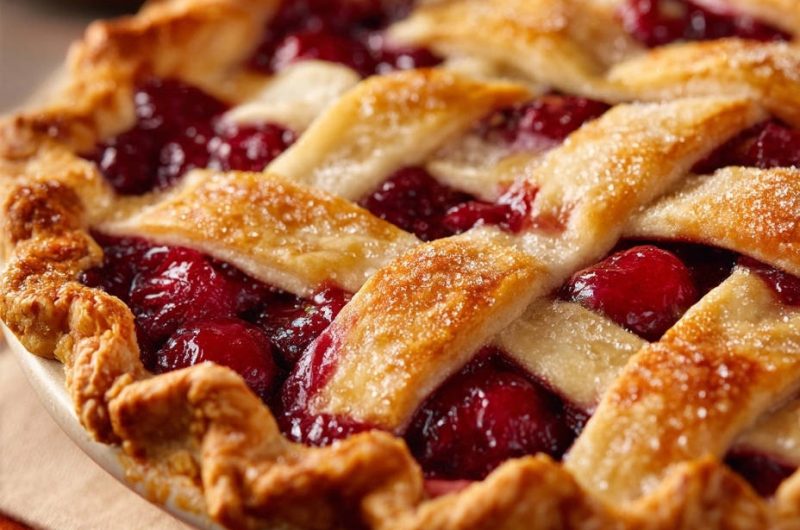
Classic Cherry Lattice Pie: Perfectly Set, Never Watery!
Tired of slicing into a stunning Classic Cherry Lattice Pie, only to discover a disappointing, watery filling? As an expert baker, I understand that frustration, and this recipe is my proven solution. We’ll banish soggy bottoms and runny fruit pie nightmares forever, ensuring your pie boasts a luscious, perfectly set cherry filling and a golden, flaky crust that truly impresses.
Beyond the Basics: Why This Classic Cherry Lattice Pie Recipe Wins Every Time
The Game-Changer: A Filling That Truly Sets (No More Soggy Bottoms!)
This Classic Cherry Lattice Pie recipe is meticulously designed to prevent a watery filling. We leverage specific thickening agents and a precise two-stage baking method to guarantee a luscious, jam-like texture that holds its shape beautifully when sliced.
Achieving That Golden, Flaky Crust of Your Dreams
Our method, from ingredient selection to handling and baking, prioritizes a tender, flaky crust that’s golden brown and delightfully crisp. It perfectly encases the vibrant cherry filling, providing that essential textural contrast.
Get Our Best Recipes Weekly!
Join thousands of food lovers and get delicious recipes delivered to your inbox.
Simple Steps for Stunning Visuals: Master the Lattice
Creating a beautiful lattice top might seem intimidating, but this recipe breaks it down into easy-to-follow steps. Even novice bakers can achieve an impressive design, transforming a simple fruit pie into a true showstopper.
Flavor Harmony: Sweet, Tart, and a Hint of Almond
This pie celebrates the natural brightness of cherries with a balanced sweetness and a touch of lemon, enhancing their tart notes. The optional almond extract elevates the cherry flavor, adding a subtle depth that makes each bite unforgettable.
The Heart of the Pie: Essential Ingredients for Cherry Perfection
Gathering the right components is the first step to a flawless Classic Cherry Lattice Pie. Here’s what you’ll need and why each plays a crucial role:

-
Cherries: Fresh vs. Frozen (The Unthawed Advantage)
You can use either fresh or frozen pitted cherries for this recipe. If using frozen, it’s absolutely critical not to thaw them; adding them directly to the filling mixture helps manage moisture and contributes to a perfectly set result.
-
The Thickening Duo: Cornstarch or Tapioca Flour
This is the secret weapon against watery pie! Cornstarch or tapioca flour effectively binds the cherry juices into a thick, glossy filling. Tapioca flour often yields a slightly clearer and glossier finish, while cornstarch is more commonly available and equally effective.
-
Sweetness & Tang: Sugar and Lemon Juice
Granulated sugar balances the natural tartness of the cherries, creating a harmonious sweet-tart profile. Fresh lemon juice is vital; it brightens the fruit flavors and also aids in the gelling process of the thickener.
-
The Secret Flavor Booster: Almond Extract
Almond extract is optional but highly recommended. Its subtle, nutty notes enhance the cherry flavor beautifully, adding a layer of complexity without overpowering the fruit.
-
Crust Essentials: Butter, Egg Wash & Coarse Sugar
Small pieces of unsalted butter dotting the filling melt into a luscious richness. An egg wash applied to the crust yields that coveted golden-brown sheen. Coarse sugar sprinkled on top adds a sparkling finish and a delightful crunch.
Your Toolkit for Classic Cherry Lattice Pie Success
While the ingredients are key, having the right equipment makes the baking process smoother and more enjoyable. Here are the essentials for your Classic Cherry Lattice Pie endeavor:
9-inch Pie Plate: The standard size for perfect pie proportions.
Large Mixing Bowls: For combining ingredients without a mess.
Whisk: Essential for thoroughly blending dry ingredients, especially the thickener.
Sharp Knife or Pastry Wheel: For precise lattice strip cutting.
Pastry Brush: For applying an even egg wash.
Baking Sheet: A crucial safeguard to catch any potential drips during baking.
Wire Cooling Rack: For proper air circulation, allowing the pie to cool evenly and set.
Your Path to Perfection: Crafting Your Classic Cherry Lattice Pie, Step-by-Step
Follow these meticulously crafted steps to ensure your Classic Cherry Lattice Pie turns out beautifully, with a filling that’s perfectly set and a crust that’s golden and flaky.
-
Prepare Your Crust and Preheat
Preheat your oven to 425°F (220°C). Carefully place one prepared pie crust into a 9-inch pie plate, gently pressing it to fit the contours. Trim the edges, leaving about a 1/2-inch overhang; this will be used for crimping later to seal the pie.
-
The Secret to a Smooth Filling: Thoroughly Mix Dry Ingredients
In a large bowl, whisk together the granulated sugar and cornstarch (or tapioca flour) very thoroughly. This critical step ensures the thickener is evenly distributed and prevents lumps, guaranteeing your filling sets perfectly without any surprises.
-
Combine Cherries with Flavor Enhancers
Add the pitted cherries, fresh lemon juice, and almond extract (if using) to the sugar and cornstarch mixture. Gently toss until all the cherries are evenly coated with the dry mixture and wet ingredients, ensuring every bite will be perfectly flavored and thickened.
-
Fill and Dot with Butter
Pour the prepared cherry filling into the pie crust that’s already in the pie plate, spreading it evenly. Evenly dot the top of the filling with the small pieces of unsalted butter. These butter pieces will melt into the filling, adding richness and a luscious texture as it bakes.
-
Weave Your Lattice Masterpiece
Take your second pie crust and cut it into 1-inch wide strips using a sharp knife or pastry wheel. Lay half of these strips parallel across the pie, leaving approximately 1-inch of space between them. Now, gently fold back alternating strips, then lay a perpendicular strip over the unfolded strips. Weave the folded strips back over the new strip. Repeat this process, alternating which strips you fold, until your lattice is complete and beautiful. Trim any excess dough from the edges and crimp both crusts together securely to seal, creating a decorative and functional edge.
-
The Golden Finish: Egg Wash and Coarse Sugar
Brush the entire lattice top and the crimped edges with the beaten egg wash. This will give your crust a beautiful golden sheen during baking. Sprinkle generously with coarse sugar for an added sparkle and a delightful textural crunch with every bite.
-
Baking for Perfection: The Two-Stage Temperature Approach
Place the pie on a baking sheet to catch any potential drips (though with this method, they’ll be minimal!). Bake for 15 minutes at 425°F (220°C). This initial high heat helps set the crust quickly and start the thickening process. Then, reduce the oven temperature to 375°F (190°C) and continue to bake for another 40-50 minutes, or until the crust is deeply golden brown and the filling is visibly bubbly and thick. You should see distinct, slow-moving bubbles within the filling, indicating it’s fully cooked and thickened. If the crust edges start to brown too quickly, loosely cover them with strips of aluminum foil to prevent over-browning.
-
The Ultimate Patience Test: Cooling for a Flawless Set
This step is absolutely critical for a perfectly set, non-watery filling. Let the pie cool completely on a wire rack for at least 3-4 hours before slicing. This extended cooling time allows the filling to fully set and achieve that desired thick, luscious consistency. Slicing too early is the number one reason for a runny filling, even with perfect thickening – resist the temptation!
Chef’s Secrets: Elevate Your Classic Cherry Lattice Pie Game
Beyond the recipe steps, a few expert insights can transform your pie from great to unforgettable. Incorporate these tips for a truly exceptional Classic Cherry Lattice Pie:
Don’t Overwork the Dough: Handle your pie crusts as little as possible. Overworking develops gluten, leading to a tough, less flaky crust. Keep it tender for that perfect texture in your homemade pie.
Keep it Cold: Ensure your pie dough and even the butter for the filling remain cold until just before use. Cold ingredients contribute to a flakier crust and prevent butter from melting too quickly during the initial bake, supporting a perfect flaky pastry.
Taste Your Cherries: Cherries vary greatly in sweetness. Taste a few before mixing the filling and adjust the sugar quantity accordingly. This ensures a perfectly balanced sweet-tart pie filling.
Prevent Sticky Situations: If your pie crust is sticking to your counter while cutting lattice strips, lightly flour your surface and your rolling pin. A small offset spatula can also help lift delicate strips without tearing.
Baking Sheet for Security: Always bake your pie on a rimmed baking sheet. Even if drips are minimal with this recipe, it provides peace of mind and keeps your oven clean. It also helps conduct heat to the bottom crust for a crispier finish.
Rest the Pie Dough: If using homemade pie dough, allow it to rest in the refrigerator for at least 30 minutes (or longer) before rolling. This relaxes the gluten, making it easier to roll out without shrinking back.
Common Pie Pitfalls & Foolproof Fixes for Your Cherry Pie
Even seasoned bakers encounter challenges. Here’s how to troubleshoot common issues you might face when making your Classic Cherry Lattice Pie, ensuring a perfect outcome every time.
My Cherry Pie Filling is Still Runny!
The most common culprit is slicing the pie too early. Ensure you allow the pie to cool completely for at least 3-4 hours, or even longer, for the thickener to fully gel and set. Other reasons could be insufficient thickener (cornstarch/tapioca flour), underbaking (look for those slow, distinct bubbles), or too much moisture from fruit if they weren’t drained (if fresh and very juicy).
The Crust Edges Are Browning Too Quickly
If you notice the edges of your lattice or crimped crust browning before the rest of the pie is cooked, gently tent them with small strips of aluminum foil. This protects them from direct heat, allowing the rest of the pie to catch up without burning.
My Lattice Design Isn’t Looking Clean or Even
A few factors can contribute to a messy lattice. Ensure your pie dough is sufficiently chilled; cold dough is easier to handle and less prone to stretching or tearing. Use a ruler and a sharp knife or pastry wheel to cut strips of consistent width. If a strip tears, gently pinch it back together or replace it with a fresh one.
The Bottom Crust is Soggy
While this recipe is designed to prevent a watery filling from making the bottom crust soggy, if you’re still experiencing this, ensure your oven is accurately preheated. Baking on a preheated baking sheet can also help conduct heat to the bottom crust, making it crispier. For particularly juicy fruit, some bakers opt for a very brief blind bake of the bottom crust, but it’s often not necessary with our method.
Beyond the Bake: Serving & Storage Suggestions
The Perfect Accompaniments for Your Classic Cherry Lattice Pie
While incredible on its own, a slice of warm Classic Cherry Lattice Pie is elevated with simple additions. A scoop of premium vanilla bean ice cream, a dollop of freshly whipped cream, or a light dusting of powdered sugar are classic choices that complement the sweet-tart filling beautifully. Consider a sprig of fresh mint for a touch of color, enhancing this perfect dessert recipe.
What Else Will You Try?
Complement your sweet cherry pie with these savory options.
- For a comforting meal with a similar pastry technique, consider this Classic Chicken Pot Pie featuring a flaky golden crust.
- If you enjoy hearty bakes, this Hearty Sausage & Cheese Breakfast Bake is a satisfying choice for any time of day.
Storing Leftovers for Lasting Freshness
Once completely cooled, cherry pie can be stored at room temperature, loosely covered, for up to 2 days. For longer storage, or in warmer climates, refrigerate the pie. Cover it tightly with plastic wrap or aluminum foil; it will keep well for up to 4-5 days. Allow it to come to room temperature or gently warm a slice before serving for the best texture.
Can I Make This Classic Cherry Lattice Pie Ahead of Time?
Yes, absolutely! You can assemble the entire pie (without egg wash or coarse sugar) and freeze it unbaked. Wrap it tightly in several layers of plastic wrap and then foil. It will keep in the freezer for up to 3 months. When ready to bake, unwrap, apply egg wash and sugar, and bake from frozen, adding about 20-30 minutes to the baking time (start at the higher temperature). This makes it perfect for holiday preparation!
Your Classic Cherry Lattice Pie Questions Answered
Can I Use Sour Cherries Instead of Sweet Cherries?
Absolutely! If using sour cherries, you will likely need to increase the granulated sugar amount. Start by adding an extra 1/4 to 1/2 cup of sugar and taste a small amount of the filling mixture before baking to ensure your preferred sweetness level. The vibrant tartness of sour cherries can be wonderfully balanced with more sugar.
What If I Don’t Have Cornstarch or Tapioca Flour?
While cornstarch and tapioca flour are highly recommended for their clarity and setting power, you can substitute all-purpose flour. However, flour can make the filling appear a bit cloudier and less translucent. Use about 1/2 cup of flour for this recipe, ensuring it’s thoroughly whisked with the sugar to prevent lumps. The filling might be slightly less “gel-like” but will still set.
Is Almond Extract Essential? Can I Substitute It?
Almond extract is optional but highly recommended as it beautifully complements the cherry flavor. If you don’t have it, you can omit it entirely without issue. For a different twist, a splash of vanilla extract or a few drops of kirsch (cherry brandy) could also be used, but start with a very small amount and adjust to taste.
Do I Need to Blind Bake the Crust?
For this Classic Cherry Lattice Pie recipe, blind baking the bottom crust is generally not necessary. The combination of our two-stage baking temperature and the powerful thickening agents helps prevent a soggy bottom. However, if you’ve had persistent issues with soggy crusts in the past, a brief, partial blind bake (baking the empty crust for 10-15 minutes until lightly golden) can add an extra layer of insurance.
Ready to Impress? Share Your Classic Cherry Lattice Pie Masterpiece!
You now possess the secrets to baking a truly exceptional Classic Cherry Lattice Pie – one with a perfectly set, never-watery filling and a golden, flaky crust that will earn rave reviews. From understanding the crucial role of ingredients to mastering the two-stage bake and the art of patience during cooling, you’re equipped for success.
For an equally delightful cherry creation that skips the oven entirely, consider this no-bake cherry dream pie.
Don’t let the thought of a runny pie deter you any longer. Gather your ingredients, follow these proven steps, and prepare to delight your family and friends with a pie that’s as beautiful as it is delicious. We encourage you to try this recipe, make it your own, and share your baking triumphs with us!
Classic Cherry Lattice Pie
Course: DessertCuisine: American CuisineDifficulty: easy8
servings45
minutes1
hour300
minutesAmerican Cuisine
Ingredients
2 prepared pie crusts (store-bought or homemade)
6 cups fresh or frozen pitted cherries (if frozen, do not thaw)
3/4 cup granulated sugar (adjust to cherry sweetness)
1/4 cup cornstarch or tapioca flour (this is key!)
1 tablespoon fresh lemon juice
1/4 teaspoon almond extract (optional, for flavor boost)
2 tablespoons unsalted butter, cut into small pieces
1 large egg, beaten (for egg wash)
1 tablespoon coarse sugar (for sprinkling)
Directions
- Preheat your oven to 425F (220C). Place one pie crust into a 9-inch pie plate. Trim edges, leaving about a 1/2-inch overhang.
- In a large bowl, whisk together the granulated sugar and cornstarch (or tapioca flour) very thoroughly. This critical step ensures the thickener is evenly distributed and prevents lumps, guaranteeing your filling sets perfectly.
- Add the pitted cherries, lemon juice, and almond extract (if using) to the sugar and cornstarch mixture. Gently toss until the cherries are evenly coated.
- Pour the cherry filling into the prepared pie crust. Dot the top of the filling with the small pieces of butter.
- Create a lattice top with the second pie crust. Cut the crust into 1-inch wide strips. Lay half the strips parallel across the pie, leaving space between them. Fold back alternating strips, then lay a perpendicular strip over the unfolded strips. Weave the folded strips back over the new strip. Repeat this process until your lattice is complete. Trim any excess dough and crimp the edges of both crusts together securely to seal.
- Brush the lattice top and crimped edges with the beaten egg wash. Sprinkle generously with coarse sugar for a beautiful sparkle and crunch.
- The Secret to a Set Filling: Place the pie on a baking sheet to catch any potential drips (though with this method, they’ll be minimal!). Bake for 15 minutes at 425F (220C). Then, reduce the oven temperature to 375F (190C) and continue to bake for another 40-50 minutes, or until the crust is golden brown and the filling is bubbly and thick. You should see distinct, slow-moving bubbles. If the crust edges start to brown too quickly, loosely cover them with aluminum foil.
- Patience is Key: Let the pie cool completely on a wire rack for at least 3-4 hours before slicing. This allows the filling to fully set and achieve that perfect, non-watery consistency. Slicing too early is the number one reason for a runny filling, even with perfect thickening!
Notes
- Cool completely for at least 3-4 hours to ensure the filling sets perfectly and avoid a runny consistency.