No-Bake Cherry Dream Pie: Perfect Layers, Zero Soggy Bottoms
There’s nothing quite like the dream of a beautifully layered pie, but often, the reality can be a soggy crust that disappoints with the first slice. That’s a frustration I’ve tackled head-on, and this No-Bake Cherry Dream Pie recipe is my perfected answer.
It’s engineered to deliver distinct, stunning layers and, most importantly, a reliably sturdy, anti-soggy graham cracker crust every single time. Get ready for a showstopper that’s as easy to make as it is delightful to eat, ideal for any gathering.
Why This No-Bake Cherry Dream Pie Reigns Supreme
The Anti-Soggy Bottom Secret Revealed
The secret to a triumphant, non-soggy crust lies in two crucial techniques: firm packing and thorough chilling.
Get Our Best Recipes Weekly!
Join thousands of food lovers and get delicious recipes delivered to your inbox.
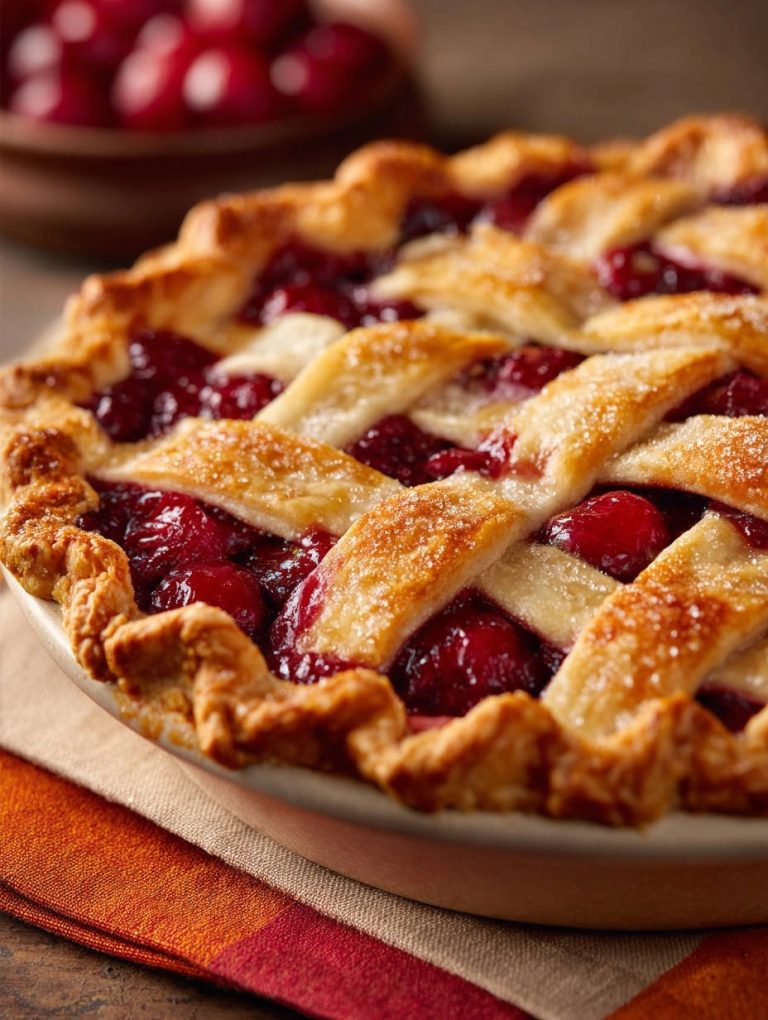
For a delightful baked option, consider this Classic Cherry Lattice Pie.
Packing the graham cracker crumbs tightly creates a dense, impenetrable barrier. Chilling solidifies the butter, forming a protective shield that actively repels moisture from the creamy filling.
Effortless Elegance: Stunning Layers, No Oven Required
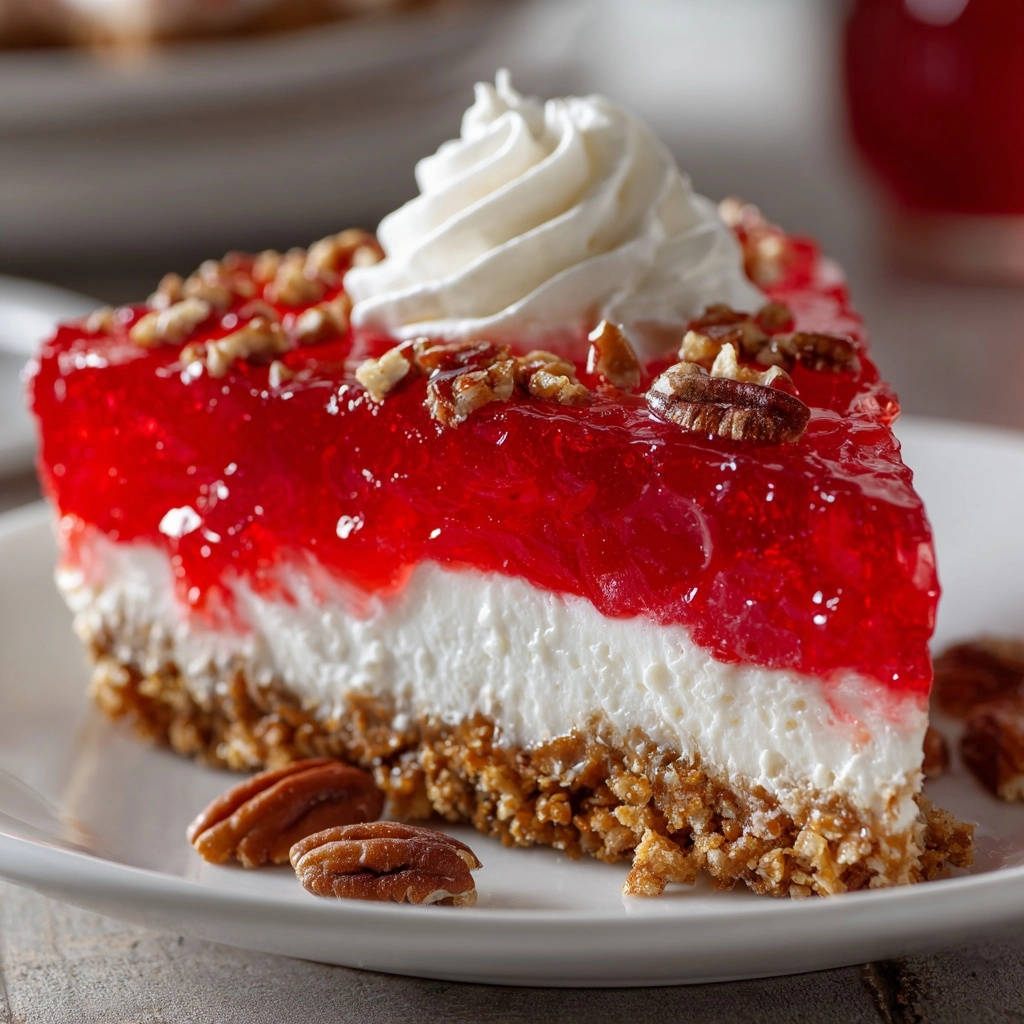
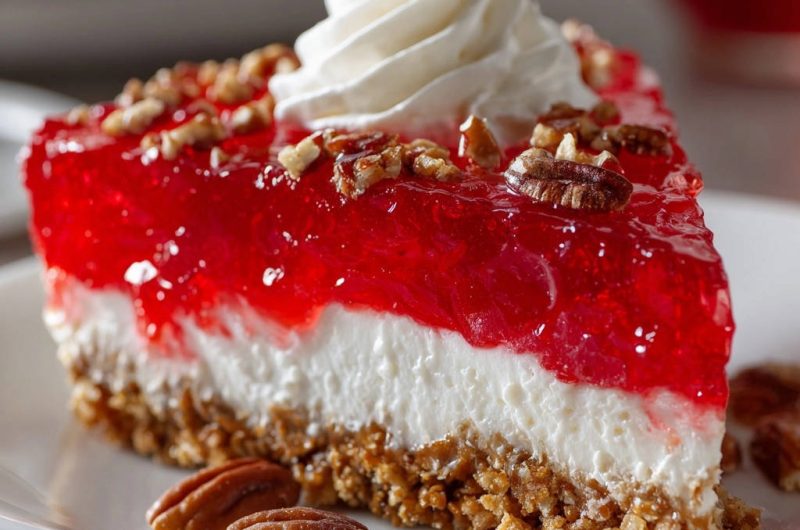
This No-Bake Cherry Dream Pie offers remarkable visual appeal with its distinct, vibrant layers of crunchy crust, velvety cream, and glistening cherry gelatin.
For similar results with another favorite, check out this classic banana cream pie.
Its no-bake nature simplifies preparation significantly, eliminating oven time and making it perfect for busy schedules or hot weather. The result is an impressive dessert with minimal fuss.

A Crowd-Pleaser for Every Occasion
With its delightful combination of sweet, creamy, and fruity flavors, this cherry dessert appeals to nearly everyone.
What to Pair with Your Cherry Dream Pie
Round out your meal with these satisfying dishes that offer different textures and tastes.
- For a hearty morning meal, consider the Hearty Sausage & Cheese Breakfast Bake, a comforting option that’s always fluffy.
- If you’re looking for a flavorful rice dish, try the Skillet Jambalaya-Style Rice, a fuss-free way to enjoy a vibrant meal.
It’s an ideal choice for family dinners, holiday gatherings, potlucks, or simply a treat to brighten an ordinary day. Prepare for enthusiastic requests for the recipe!
Gathering Your Dream Team: Essential Ingredients Unpacked
For the Sturdy Graham Cracker Crust
Graham Cracker Crumbs: These form the flavorful, slightly sweet base. Their texture is perfect for absorbing butter and compacting into a firm crust.
Granulated Sugar: Adds a touch of sweetness and helps bind the crumbs together, contributing to the crust’s structure.
Unsalted Butter, Melted: The critical binder that transforms crumbs into a cohesive, sturdy crust. It solidifies upon chilling, creating that essential moisture barrier.
The Velvety Cream Cheese Layer
Cream Cheese, Softened: The heart of the creamy layer, it provides a tangy richness and smooth texture. Softened cream cheese is vital for a lump-free mixture.
Powdered Sugar: Ensures a silky-smooth sweetness without any grittiness, perfectly complementing the cream cheese and vanilla.
Vanilla Extract: Enhances all the other flavors, adding a warm, aromatic depth to the creamy filling.
Heavy Cream, Cold: When whipped, it introduces lightness and airiness to the filling, creating a luxurious, fluffy consistency that sets firmly.
The Vibrant Cherry Gelatin Swirl
Cherry Gelatin Mix: Provides the pie’s signature bright cherry flavor and stunning red color. It’s what gives the top layer its unique jiggle and set.
Boiling Water: Essential for completely dissolving the gelatin granules, ensuring a smooth, lump-free solution.
Ice Cold Water: Helps to cool the gelatin quickly and begins the setting process, crucial for preventing it from melting the cream layer.
Finishing Touches: Topping it Off
Whipped Topping or Freshly Whipped Cream: Offers a light, airy contrast to the rich pie layers and a beautiful presentation.
Chopped Pecans: Adds a delightful crunch and nutty flavor, providing texture balance to each bite of this No-Bake Cherry Dream Pie.
Your Toolkit for No-Bake Cherry Dream Pie Success
9-inch Pie Plate: The ideal vessel for your layered masterpiece.
Medium and Large Mixing Bowls: Essential for combining different components without cross-contamination.
Electric Mixer (Handheld or Stand): Key for whipping cream and blending cream cheese to perfect consistency.
Rubber Spatula: For folding ingredients gently and spreading layers smoothly.
Flat-Bottomed Glass or Measuring Cup: Crucial for firmly packing the graham cracker crust.
Whisk: For dissolving gelatin and combining dry ingredients.
Measuring Cups and Spoons: For accurate ingredient proportions.
Crafting Your Masterpiece: Step-by-Step No-Bake Cherry Dream Pie Guide
- Prepare the Pan & Crust Mixture:
In a medium bowl, combine graham cracker crumbs and granulated sugar. Pour in melted butter and mix until all crumbs are thoroughly moistened.
Press this mixture firmly and evenly into the bottom and up the sides of a 9-inch pie plate. Use a flat-bottomed glass or measuring cup to pack it down very tightly; this firm packing is crucial for a sturdy, non-soggy crust.
- The Crucial Chill: Setting the Barrier:
Place the packed crust in the refrigerator for at least 30 minutes, or in the freezer for 15 minutes.
This critical chilling step solidifies the butter, forming a protective barrier that prevents sogginess when the creamy filling is added later.
- Whip Up the Dreamy Filling:
In a large bowl, beat the softened cream cheese with powdered sugar and vanilla extract until the mixture is completely smooth and creamy, with no lumps.
In a separate, chilled bowl, whip the cold heavy cream until it forms stiff peaks. Gently fold this whipped cream into the cream cheese mixture until just combined, being careful not to deflate the cream.
- Layer and Secure: Initial Chill:
Carefully spread the fluffy cream cheese mixture evenly over the thoroughly chilled graham cracker crust.
Return the pie plate to the refrigerator and chill for at least 1 hour, or until the cream cheese layer is firm to the touch. This ensures a clean, distinct layer and further shields the crust from moisture.
- Perfecting the Gelatin: Temperature is Key:
In a heatproof bowl, dissolve the cherry gelatin mix completely in boiling water, stirring for at least 2 minutes until no granules remain.
Stir in the ice-cold water. Let the gelatin cool at room temperature for about 15-20 minutes, stirring occasionally, until it starts to thicken slightly, resembling thin syrup, but is not yet set. This prevents it from melting the cream layer and helps it set more evenly.
- Pour and Patience: Final Setting:
Carefully pour the slightly thickened cherry gelatin over the firmly chilled creamy layer, ensuring an even distribution.
Return the pie to the refrigerator and chill for a minimum of 4 hours, or preferably overnight, until the gelatin layer is completely set and firm to the touch.
- Garnish and Serve Your Stunning Pie:
Before serving, add a dollop of whipped topping or freshly whipped cream onto each slice.
Finish with a sprinkle of chopped pecans for added texture and a beautiful presentation. Slice and enjoy your perfectly layered, non-soggy pie!
Phase 1: Building the Foundation (The Crust)
Phase 2: The Creamy Heart of the Pie
Phase 3: The Vibrant Cherry Crown
Phase 4: The Grand Finale
Chef’s Secrets: Elevate Your No-Bake Cherry Dream Pie Game
Mastering the Graham Cracker Crust
Don’t Skimp on Packing: The firmer you press the crust, the sturdier and more “anti-soggy” it will be. Use consistent, strong pressure.
Chill Thoroughly: Always ensure the crust is well-chilled before adding the filling. This is your primary defense against a soggy bottom.
Achieving Fluffy Creamy Layers
Softened Cream Cheese is Non-Negotiable: Cold cream cheese will result in lumps. Ensure it’s truly at room temperature for a silky-smooth filling.
Whip Cream in a Chilled Bowl: Using a cold bowl and cold heavy cream will help your whipped cream achieve stiff peaks faster and hold its structure better.
Fold Gently: Overmixing after folding in the whipped cream will deflate it, leading to a denser filling. Use a gentle folding motion.
Perfecting Your Gelatin Layer (Avoiding Meltdowns!)
Cool Down the Gelatin: Never pour hot gelatin directly onto the cream cheese layer. Allowing it to cool and thicken slightly prevents melting and ensures distinct layers.
Chill Completely: Patience is key. The gelatin layer needs ample time (preferably overnight) to set fully for perfect slices.
Creative Topping Ideas Beyond Pecans
Fresh Cherries: A few pitted fresh cherries can add a burst of fresh fruit flavor and a beautiful visual.
Chocolate Shavings: Dark or white chocolate shavings can complement the cherry flavor beautifully.
Toasted Coconut Flakes: For an added tropical touch and crunch.
Troubleshooting Common No-Bake Pie Problems
Why is My Crust Soggy?
A soggy crust is often due to insufficient chilling of the crust before adding the filling, or not packing the crumbs firmly enough. Ensure both steps are executed with care.
My Creamy Layer is Too Soft/Runny!
This usually indicates the cream cheese wasn’t beaten sufficiently, or the heavy cream wasn’t whipped to stiff peaks. Re-chill and, if needed, you can try gently whipping the mixture again with a cold bowl.
The Gelatin Didn’t Set Properly or Melted the Cream Layer
If the gelatin didn’t set, it might have been too hot when poured, or not chilled long enough. Make sure the gelatin cools to a slightly thickened, syrupy consistency before adding to the pie.
My Pie Slices Aren’t Clean
Clean slices depend on a fully set pie (especially the gelatin layer) and using a warm, sharp knife. Run your knife under hot water and wipe dry between each slice for crisp edges.
Serving Your Dream Pie & Smart Storage Tips
Presentation Perfect: Slicing and Serving
For the neatest slices, use a sharp knife warmed under hot water and wiped dry before each cut. This helps glide through the layers without sticking or dragging.
Serve each slice immediately after topping with whipped cream and pecans for the best texture and visual appeal.
Make-Ahead Magic: Planning Your Dessert
This pie is an excellent make-ahead dessert! It needs significant chilling time, so preparing it the day before you plan to serve it is ideal. This allows all layers to fully set and marry their flavors.
Storing Leftovers for Lasting Freshness
Store any leftover No-Bake Cherry Dream Pie tightly covered with plastic wrap in the refrigerator. It will remain fresh and delicious for 3-4 days. The crust may soften slightly over time, but the flavors will still be great.
Your No-Bake Cherry Dream Pie Questions Answered
Can I use a different type of crust?
Absolutely! While graham cracker crumbs are classic, you can substitute with crushed vanilla wafers, chocolate wafers, or even shortbread cookies for a different flavor profile. The key is to maintain the correct butter-to-crumb ratio for a sturdy base.
What if I don’t have heavy cream?
For the creamy layer, heavy cream is best for stability and texture. However, you could try using an equivalent amount of whipped topping (like Cool Whip) as a substitute for the freshly whipped cream, folding it into the cream cheese mixture.
Can I use fresh cherries instead of gelatin?
This recipe relies on the gelatin for its set texture and vibrant color. While you can add fresh cherries as a topping or mix them into the gelatin as it cools and slightly thickens, they cannot fully replace the gelatin base for the top layer.
How long does No-Bake Cherry Dream Pie last in the fridge?
When properly stored in an airtight container or tightly covered, your No-Bake Cherry Dream Pie will stay fresh and delicious in the refrigerator for 3 to 4 days.
Is this recipe suitable for dietary restrictions (gluten-free, dairy-free)?
For a gluten-free version, simply use gluten-free graham crackers for the crust. Making it dairy-free is more challenging, as cream cheese and heavy cream are central ingredients. You could explore dairy-free cream cheese and coconut cream alternatives, but the texture and flavor may vary significantly.
Ready to Impress? Share Your No-Bake Cherry Dream Pie Masterpiece!
You’ve now mastered the art of creating a stunning, “anti-soggy bottom” No-Bake Cherry Dream Pie that promises perfectly layered slices every time. This recipe is more than just a dessert; it’s a testament to simple elegance and delicious satisfaction.
We encourage you to try this recipe, share it with loved ones, and savor every delightful bite. Don’t forget to tag us in your beautiful creations on social media – we can’t wait to see your No-Bake Cherry Dream Pie masterpieces!
No-Bake Cherry Dream Pie
Course: DessertCuisine: AmericanDifficulty: medium8
servings30
minutes380
kcal360
minutesEver dream of a stunning layered pie that holds up beautifully, slice after perfect slice? This No-Bake Cherry Dream Pie is your secret weapon against the dreaded soggy bottom, featuring vibrant cherry gelatin, a creamy middle, and a crisp, sturdy crust. Impress everyone with this frustration-free dessert!
Ingredients
For the Crust:
1 and 1/2 cups graham cracker crumbs
1/4 cup granulated sugar
1/2 cup unsalted butter, melted
For the Creamy Layer:
1 (8 ounce) package cream cheese, softened
1/2 cup powdered sugar
1 teaspoon vanilla extract
1 cup heavy cream, cold
For the Cherry Gelatin Layer:
1 (6 ounce) package cherry gelatin mix
2 cups boiling water
1/2 cup ice cold water
For the Topping:
1 cup whipped topping or freshly whipped cream
1/4 cup chopped pecans
Directions
- Prep Your Pan and Crush the Crust Pain Point: In a medium bowl, combine the graham cracker crumbs and granulated sugar. Pour in the melted butter and mix until the crumbs are thoroughly moistened. Press this mixture firmly and evenly into the bottom and up the sides of a 9-inch pie plate. Use the bottom of a flat glass or measuring cup to really pack it down. This firm packing is key for a sturdy crust.
- The Chilling Barrier: Place the crust in the refrigerator to chill for at least 30 minutes, or in the freezer for 15 minutes. This crucial step helps the butter solidify and creates a barrier, directly preventing sogginess when the creamy filling is added.
- Whip Up the Creamy Layer: In a large bowl, beat the softened cream cheese with the powdered sugar and vanilla extract until smooth and creamy. In a separate chilled bowl, whip the cold heavy cream until stiff peaks form. Gently fold the whipped cream into the cream cheese mixture until fully combined.
- Layer and Chill Again: Spread the creamy mixture evenly over the chilled graham cracker crust. Return the pie plate to the refrigerator and chill for at least 1 hour, or until the cream cheese layer is firm. This ensures a clean, distinct layer and further protects the crust.
- Prepare the Cherry Gelatin: In a heatproof bowl, dissolve the cherry gelatin mix in the boiling water, stirring for at least 2 minutes until no granules remain. Stir in the ice cold water. Let the gelatin cool at room temperature for about 15-20 minutes, stirring occasionally, until it starts to thicken slightly but is not yet set. This prevents it from being too hot and melting the cream layer, and helps it set more evenly.
- Add the Gelatin Top: Carefully pour the slightly thickened cherry gelatin over the chilled creamy layer. Return the pie to the refrigerator and chill for at least 4 hours, or preferably overnight, until the gelatin layer is completely set and firm.
- Final Flourish: Before serving, top each slice with a dollop of whipped topping or fresh whipped cream and a sprinkle of chopped pecans. Slice and serve your perfectly layered, non-soggy pie!
Notes
- Proper chilling at each stage is crucial for distinct layers and a non-soggy crust.