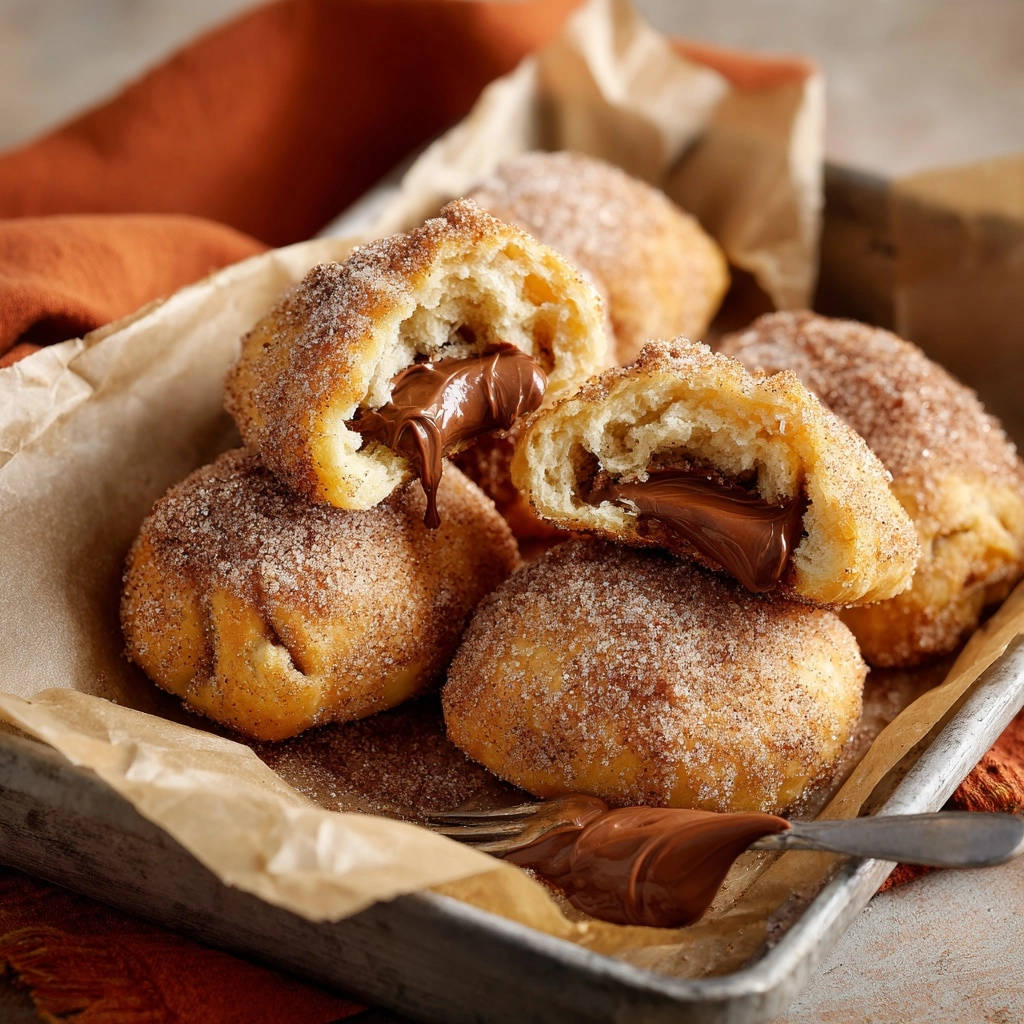
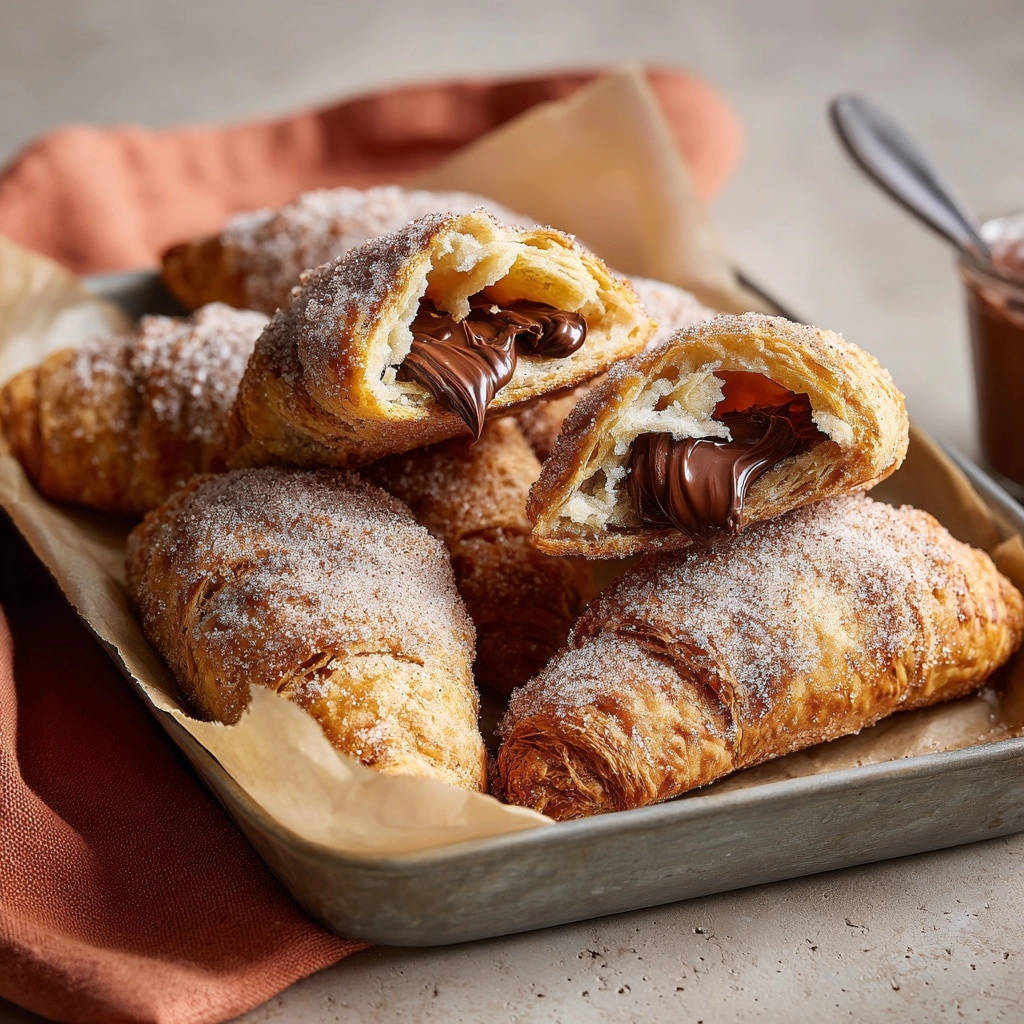
Chocolate Stuffed Doughnut Holes: No More Exploding Filling!
I’ve been there: biting into a seemingly perfect doughnut hole, only to find the delicious chocolate filling has either vanished or, worse, burst out all over the frying oil. That’s precisely why this recipe for Chocolate Stuffed Doughnut Holes is a game-changer.
We’re not just making delightful little treats; we’re mastering a technique that guarantees a perfectly gooey, melty chocolate center, contained without any messy explosions. Get ready to elevate your home baking and impress everyone with these irresistibly good, explosion-proof Chocolate Stuffed Doughnut Holes.
More Chocolate Delights
Round out your dessert spread with these complementary chocolate recipes.
Get Our Best Recipes Weekly!
Join thousands of food lovers and get delicious recipes delivered to your inbox.
- For a different handheld chocolate treat, consider these Chocolate Banana Crepe Roll-Ups, designed to keep their filling secure.
- If you enjoy the texture of doughnuts, you might also like these Chewy Chocolate Chip Oatmeal Bars for a satisfying bite that holds together well.
Why This Chocolate Stuffed Doughnut Holes Recipe is Your New Favorite
The “No Exploding Filling” Promise: Our Secret Weapon
The frustration of a lost or leaking filling is real. This recipe introduces a genius, yet simple, technique that completely eradicates the problem of exploding Chocolate Stuffed Doughnut Holes.
By pre-freezing the chocolate filling, we ensure it remains firm during the initial frying, allowing the dough to cook and seal around it before the chocolate ever has a chance to liquify and escape.
Irresistibly Fluffy Dough, Melt-in-Your-Mouth Chocolate
Beyond the ingenious filling method, this recipe delivers an incredibly light and airy doughnut dough. Each bite offers a satisfyingly tender texture that perfectly complements the rich, molten chocolate center.
The balance of soft dough and warm, decadent chocolate creates a truly unforgettable treat that’s impossible to resist.
A Rewarding Project for Home Bakers
While the idea of making doughnuts at home might seem daunting, this recipe is designed to be approachable and incredibly rewarding. Following our clear, expert-guided steps will build your confidence in handling yeast dough and deep frying.
The satisfaction of pulling these golden, chocolate-filled delights from the oil, perfectly intact, is immense. It’s a fantastic baking project for anyone looking to expand their skills.
Essential Tools for Your Doughnut Hole Adventure
Must-Have Equipment for Frying Perfection
-
Heavy-Bottomed Pot or Dutch Oven: This ensures even heat distribution, crucial for consistent frying temperatures and preventing hot spots that can lead to uneven cooking or burning.
-
Candy Thermometer: Absolutely vital for precise temperature control. Maintaining the oil at 350°F (175°C) prevents greasy doughnuts (if too cool) or burned exteriors with raw centers (if too hot).
-
Slotted Spoon or Spider: Essential for safely lowering doughnut holes into the hot oil and efficiently removing them once golden brown, allowing excess oil to drain.
-
Wire Rack with Paper Towels: Allows fried doughnut holes to cool and drain additional oil, preventing sogginess and maintaining a crisp exterior.
Baking Basics: Dough Preparation Tools
-
Large Mixing Bowls: You’ll need at least two – one for activating yeast and mixing the dough, another lightly oiled for the first rise.
-
Measuring Cups and Spoons: Accuracy in ingredient measurement is key for yeast dough, affecting texture and rise.
-
Parchment Paper: Used to line plates for freezing the chocolate filling and baking sheets for the second rise, preventing sticking.
-
Rolling Pin (Optional, but helpful): While you can flatten dough by hand, a rolling pin ensures uniform disc thickness for easier filling and sealing.
-
Kitchen Scale: Highly recommended for dividing the dough into equal portions. This ensures uniform cooking times and perfectly sized Chocolate Stuffed Doughnut Holes.
Gathering Your Ingredients: What You’ll Need for Perfect Chocolate Stuffed Doughnut Holes
The Dough Base: Yeast, Flour, and Sweeteners
Active Dry Yeast: Ensure your yeast is fresh and active. Warm milk is crucial for activating it; too hot will kill it, too cold won’t wake it up.
All-Purpose Flour: Provides the structure for the doughnut holes. For a traditional texture, stick to all-purpose; gluten-free flours would require significant recipe adjustments.
Granulated Sugar: A small amount in the dough feeds the yeast, contributing to flavor and tenderness. The rest is for the delightful cinnamon-sugar coating.
Large Egg: Adds richness, moisture, and helps create a tender crumb. It also contributes to the dough’s structure and elasticity.
Unsalted Melted Butter: Provides flavor, tenderness, and a rich mouthfeel. Unsalted allows you to control the overall salt content precisely.
Salt: Essential for balancing the sweetness and enhancing the overall flavor of the doughnut dough. It also helps regulate yeast activity.
Our Star: Chocolate Hazelnut Spread (and Creative Alternatives)
Chocolate Hazelnut Spread: This is the classic choice for our Chocolate Stuffed Doughnut Holes, delivering a creamy, nutty, and intensely chocolatey core. Its semi-firm texture freezes beautifully.
For alternatives, consider a thick homemade ganache or even small chocolate chips (ensure they are tightly sealed). The key is a filling that can firm up significantly when frozen.
Frying Oil and Flavorful Coating Essentials
Vegetable Oil (or Canola/Peanut Oil): A neutral-flavored oil with a high smoke point is essential for deep frying. Avoid olive oil as it has a low smoke point and strong flavor.
Ground Cinnamon: Pairs perfectly with sugar to create the warm, aromatic coating. Ensure your cinnamon is fresh for the best flavor.
Granulated Sugar (for coating): Creates that iconic, sparkling, sweet exterior that makes these doughnut holes irresistible.
Crafting Chocolate Stuffed Doughnut Holes: Your Detailed Guide to Perfection
Step 1: The Secret Filling Freeze – Our Game-Changer!
Spoon the chocolate hazelnut spread onto a parchment-lined plate in small, uniform 1/2 teaspoon portions. Aim for consistency in size for even filling.
Place the plate in the freezer for at least 30 minutes, or until each dollop is firm and solid. This crucial step prevents the filling from becoming too liquid too quickly during frying, drastically reducing the chance of blowouts and ensuring a perfectly contained, melty center in every Chocolate Stuffed Doughnut Hole.
Step 2: Activating Your Yeast for a Fluffy Rise
In a large mixing bowl, gently warm the milk to around 105-115°F (40-46°C). This temperature range is ideal for activating active dry yeast without killing it.
Combine the warm milk with the active dry yeast and 1 tablespoon of the 1/4 cup granulated sugar. Let this mixture sit undisturbed for 5-10 minutes until it becomes foamy and bubbly on the surface. This visual cue indicates your yeast is active and ready to make your doughnut holes wonderfully light and airy.
Step 3: Mixing the Dough to Perfection
To the activated yeast mixture, add the remaining 3 tablespoons of the 1/4 cup granulated sugar, a large egg, the 1/4 cup of melted unsalted butter, and the 1/2 teaspoon of salt. Stir these ingredients together until they are well combined and smooth.
Gradually add 3 cups of all-purpose flour, mixing with a sturdy wooden spoon or spatula. Continue mixing until a shaggy, somewhat sticky dough forms that just pulls away from the sides of the bowl. Avoid overmixing at this initial stage to prevent developing too much gluten too quickly.
Step 4: Kneading and the First Rise: Building Structure
Turn the shaggy dough out onto a lightly floured surface. Knead the dough for 5-7 minutes, incorporating more flour a tablespoon at a time only if the dough is excessively sticky and unmanageable. The goal is to achieve a smooth, elastic dough that is pliable and no longer adheres to your hands or the work surface.
Lightly oil a clean large bowl, place the kneaded dough inside, and turn it once to coat all surfaces with a thin layer of oil. Cover the bowl tightly with plastic wrap and let it rise in a warm, draft-free place for 1 to 1.5 hours, or until it has visibly doubled in size. This primary rise is essential for developing the dough’s flavor and achieving a tender texture.
Step 5: The “No-Leak” Filling and Sealing Technique
Once the dough has doubled, gently punch it down to release the trapped air. Turn the dough out onto a lightly floured surface and divide it into 24 equal pieces. Using a kitchen scale ensures uniform portions, which helps with even frying.
Flatten each dough piece into a small, even disc, about 2-3 inches in diameter. Retrieve the frozen chocolate hazelnut dollops from the freezer just before you are ready to fill each one.
Place one frozen chocolate dollop directly in the center of each dough disc. Carefully bring the edges of the dough up and pinch them together very tightly at the top, completely enclosing the filling. Ensure the seam is secure.
Once sealed, gently roll the filled dough between your palms to form a smooth, round ball. Ensure there are absolutely NO cracks, gaps, or weak seams where the filling could escape. This tight, flawless seal is paramount for preventing leaks during frying and is key to our “no exploding filling” promise for these Chocolate Stuffed Doughnut Holes.
Step 6: The All-Important Second Rise
Place the filled and meticulously sealed doughnut balls on a parchment-lined baking sheet, ensuring you leave at least 1-2 inches of space between them. This spacing allows for adequate expansion during this crucial second rise.
Cover them loosely with plastic wrap or a clean kitchen towel. Let them rise for another 30 minutes in a warm, draft-free place. This crucial secondary proof contributes significantly to an incredibly light, fluffy, and tender texture in the final Chocolate Stuffed Doughnut Holes.
Step 7: Mastering Oil Temperature for Golden Frying
In a large, heavy-bottomed pot or Dutch oven, pour about 3-4 inches of vegetable oil (or another suitable neutral oil for frying). Ensure the pot is large enough to prevent boil-overs.
Heat the oil over medium heat to precisely 350°F (175°C). Use a reliable candy thermometer to monitor the temperature constantly. Maintaining this exact temperature is vital for even cooking, achieving a beautiful golden crust, and preventing the doughnut holes from becoming greasy (if too cool) or burning (if too hot), which can also lead to bursting.
Step 8: Frying Your Doughnut Holes to Golden Brown
Carefully place 3-4 doughnut holes into the hot oil using a slotted spoon or spider, taking care not to overcrowd the pot. Overcrowding will significantly drop the oil temperature, leading to greasy and undercooked doughnut holes.
Fry for 2-3 minutes per side, or until they are a deep, uniform golden brown. Adjust the heat as needed throughout the frying process to maintain the consistent 350°F (175°C) temperature. Flip them gently to ensure even cooking.
Remove the fried Chocolate Stuffed Doughnut Holes with a slotted spoon and immediately transfer them to a wire rack lined with paper towels. This allows any excess oil to drain away, keeping them light and non-greasy.
Step 9: The Sweet Finale: Cinnamon Sugar Coating
In a shallow dish (a pie plate works perfectly), combine the 1/2 cup granulated sugar (designated for coating) and the 1 tablespoon of ground cinnamon. Whisk these two ingredients together thoroughly until they are evenly distributed.
While the doughnut holes are still warm (but not scalding hot, which could melt the sugar too quickly), roll them generously in the cinnamon sugar mixture until they are evenly and completely coated. The residual warmth helps the sugar adhere beautifully to the surface, creating that irresistible sugary crunch.
Step 10: Serving Your Irresistible Treat
Serve your freshly made Chocolate Stuffed Doughnut Holes immediately while they are still warm. This is when the chocolate filling is perfectly gooey and molten, and the dough is at its absolute most tender and fluffy.
Expert Tips & Tricks for Ultimate Doughnut Hole Success
Don’t Rush the Rise: Patience is Key to Fluffy Dough
Allow your dough to complete both its first and second proofing cycles fully. A well-proofed dough is critical for achieving that light, airy, and tender texture characteristic of perfect doughnut holes, rather than dense, heavy ones. If your kitchen is cool, a slightly warmed (but turned off!) oven or a proofing box can provide an ideal environment for rising.
Temperature Control: Your Frying Fry’s Best Friend
Investing in and diligently using a reliable candy thermometer is paramount. Oil that’s too cool will lead to greasy, oil-soaked doughnut holes, while oil that’s too hot will burn the exterior before the inside cooks through. Strive to maintain a consistent 350°F (175°C) for uniformly golden, perfectly cooked results.
Perfecting the Seal: Your Exploding-Filling Prevention Strategy
When sealing the frozen chocolate filling inside the dough, exert extra care to pinch the seams together very tightly, ensuring no gaps remain. After pinching, gently roll the filled dough ball between your palms to create a smooth, seamless surface, eliminating any potential weak points. Even a tiny opening can unfortunately lead to a messy filling blowout during frying.
Beyond Hazelnut: Creative Filling Swaps for Your Doughnut Holes
While chocolate hazelnut spread is a beloved classic, feel empowered to experiment with other firm fillings. Consider using firm peanut butter, a dollop of thick fruit jam (ensure it’s not too watery), a small cube of cream cheese, or even a mini marshmallow. Regardless of your choice, always ensure the filling is well-chilled or frozen into small dollops to prevent leaks during the frying process.
Troubleshooting Common Doughnut Hole Challenges
Problem: Doughnut Holes are Dense or Flat
This issue often indicates that your yeast wasn’t sufficiently active, or your dough was significantly under-proofed. Always check that your yeast is fresh and that your milk is within the correct temperature range for activation. Additionally, be mindful not to incorporate too much flour during the kneading process, as this can result in a tough, dense dough.
Problem: Filling Leaks During Frying
The most frequent cause for a leaking filling is either an insufficiently frozen filling or a weak, incomplete seal. Ensure your chocolate dollops are truly rock-solid before enclosing them in the dough. Critically, pinch the dough edges together very tightly and then roll the entire ball into a smooth, seamless sphere to prevent any escape routes.
Problem: Doughnut Holes are Greasy
Greasy doughnut holes almost always point to an oil temperature that is too low. When the oil is not hot enough, the dough absorbs excessive oil rather than quickly forming a crisp exterior. Always monitor your oil temperature with a thermometer, maintaining a consistent 350°F (175°C) to ensure they cook properly without becoming saturated.
Problem: Uneven Browning
Uneven browning can be caused by overcrowding the pot, which drastically lowers the oil temperature, or by failing to maintain a consistent oil temperature throughout the frying process. To achieve uniformly golden Chocolate Stuffed Doughnut Holes, fry in small batches and continuously adjust your heat source to keep the oil consistently at 350°F.
Frequently Asked Questions About Chocolate Stuffed Doughnut Holes
Can I make the dough for Chocolate Stuffed Doughnut Holes ahead of time?
Yes, you absolutely can! After the initial first rise, gently punch down the dough, return it to the lightly oiled bowl, cover it tightly with plastic wrap, and refrigerate it overnight for up to 24 hours. When ready to use, allow the dough to come to room temperature for about 30-60 minutes before proceeding with portioning and filling.
What’s the best way to store leftover doughnut holes?
These Chocolate Stuffed Doughnut Holes are undoubtedly at their peak freshness and flavor when enjoyed warm on the day they are made. If you happen to have any leftovers, store them in an airtight container at room temperature for up to 2 days. For the best experience, reheat them briefly in a microwave for a few seconds to gently soften the chocolate filling.
Can I bake these Chocolate Stuffed Doughnut Holes instead of frying?
While deep frying imparts their signature crisp exterior and soft, fluffy interior, you can certainly bake them as an alternative. Bake them at 375°F (190°C) for 10-15 minutes, or until they turn golden brown. Please note that the texture will be closer to a soft roll than a traditional fried doughnut, but they will still be delicious!
What other fillings can I use for stuffed doughnut holes?
Feel free to get creative with your fillings! Besides the classic chocolate hazelnut spread, consider using a firm cream cheese frosting (frozen into dollops), a thick lemon curd, or even a small piece of caramel. The crucial element for any filling is ensuring it is very firm and frozen into small, manageable dollops to prevent any leaking during the cooking process.
Serving Suggestions & Enjoying Your Creation
The Perfect Pairing for Your Sweet Treat
These warm Chocolate Stuffed Doughnut Holes are undeniably divine all on their own, offering a pure moment of sweet indulgence. However, they also pair wonderfully with a robust cup of coffee, a tall glass of cold milk, or even a decadent scoop of vanilla ice cream for a truly elevated dessert experience.
Creative Presentation Ideas
Arrange your golden, sugar-coated Chocolate Stuffed Doughnut Holes artfully on a platter. For an extra touch of elegance, consider a light dusting of cocoa powder, a delicate drizzle of melted chocolate, or even a scattering of toasted hazelnuts. They make an excellent, crowd-pleasing centerpiece for brunches, parties, or simply a cozy family treat.
Ready to Impress? Share Your Chocolate Stuffed Doughnut Holes Masterpiece!
With this foolproof recipe and our unique “no exploding filling” secret, you are now perfectly equipped to create truly spectacular Chocolate Stuffed Doughnut Holes that will delight everyone. Get ready for an abundance of rave reviews and happy, chocolate-smeared faces!
Don’t forget to share your delicious creations with us online! We absolutely love seeing your baking triumphs. Now, go forth and enjoy every blissful, perfectly chocolate-filled bite!

Chocolate Stuffed Doughnut Holes
Course: DessertCuisine: American CuisineDifficulty: easy4
24 doughnut holes45
minutes30
minutes180
minutesAmerican Cuisine
Ingredients
1 cup warm milk (around 105-115F)
2 1/4 teaspoons active dry yeast (one packet)
1/4 cup granulated sugar (for dough)
1/2 cup granulated sugar (for coating)
1 large egg
1/4 cup melted butter, unsalted
1/2 teaspoon salt
3 to 3 1/2 cups all-purpose flour
1/2 cup chocolate hazelnut spread (or similar chocolate filling)
Vegetable oil, for frying
1 tablespoon ground cinnamon
Directions
- The Filling Freeze (Your Secret Weapon!): This is the key to no-burst filling! Spoon the chocolate hazelnut spread onto a parchment-lined plate in 1/2 teaspoon portions. Place in the freezer for at least 30 minutes, or until firm. This crucial step prevents the filling from becoming too liquid too quickly during frying, reducing the chance of blowouts.
- Activate the Yeast: In a large bowl, combine warm milk, yeast, and 1 tablespoon of the 1/4 cup granulated sugar. Let sit for 5-10 minutes until foamy.
- Mix the Dough: Add the remaining 3 tablespoons of the 1/4 cup granulated sugar, egg, melted butter, and salt to the yeast mixture. Stir well. Gradually add 3 cups of flour, mixing until a shaggy dough forms.
- Knead and Rise: Turn the dough out onto a lightly floured surface. Knead for 5-7 minutes, adding more flour a tablespoon at a time if the dough is too sticky, until it’s smooth and elastic. Place in a lightly oiled bowl, cover with plastic wrap, and let rise in a warm place for 1-1.5 hours, or until doubled in size.
- Portion and Fill (The Sealing Technique!): Gently punch down the dough. Divide it into 24 equal pieces. Flatten each piece into a small disc (about 2-3 inches). Place one frozen chocolate hazelnut dollop in the center of each disc. Carefully bring the edges of the dough up and pinch them together tightly at the top to completely seal the filling inside. Roll into a smooth ball. Ensure there are NO cracks or seams. This tight seal is critical for preventing leaks.
- Second Rise: Place the filled dough balls on a parchment-lined baking sheet, leaving some space between them. Cover loosely and let rise for another 30 minutes. This second rise ensures a light, fluffy texture.
- Heat the Oil: In a large, heavy-bottomed pot or Dutch oven, heat about 3-4 inches of vegetable oil to 350F (175C). Use a candy thermometer to monitor the temperature precisely. Maintaining this temperature is vital for even cooking and preventing explosions.
- Fry to Perfection: Carefully place 3-4 doughnut holes into the hot oil, being careful not to overcrowd the pot. Fry for 2-3 minutes per side, or until golden brown. Adjust heat as needed to maintain 350F. Remove with a slotted spoon and place on a wire rack lined with paper towels to drain excess oil.
- Cinnamon Sugar Coating: In a shallow dish, combine the 1/2 cup granulated sugar (for coating) and the ground cinnamon. While the doughnut holes are still warm, roll them thoroughly in the cinnamon sugar mixture until evenly coated.
- Serve Warm: Serve immediately and enjoy the glorious, non-exploding, melty chocolate center!
Notes
- Freezing the chocolate filling is crucial for preventing blowouts during frying.