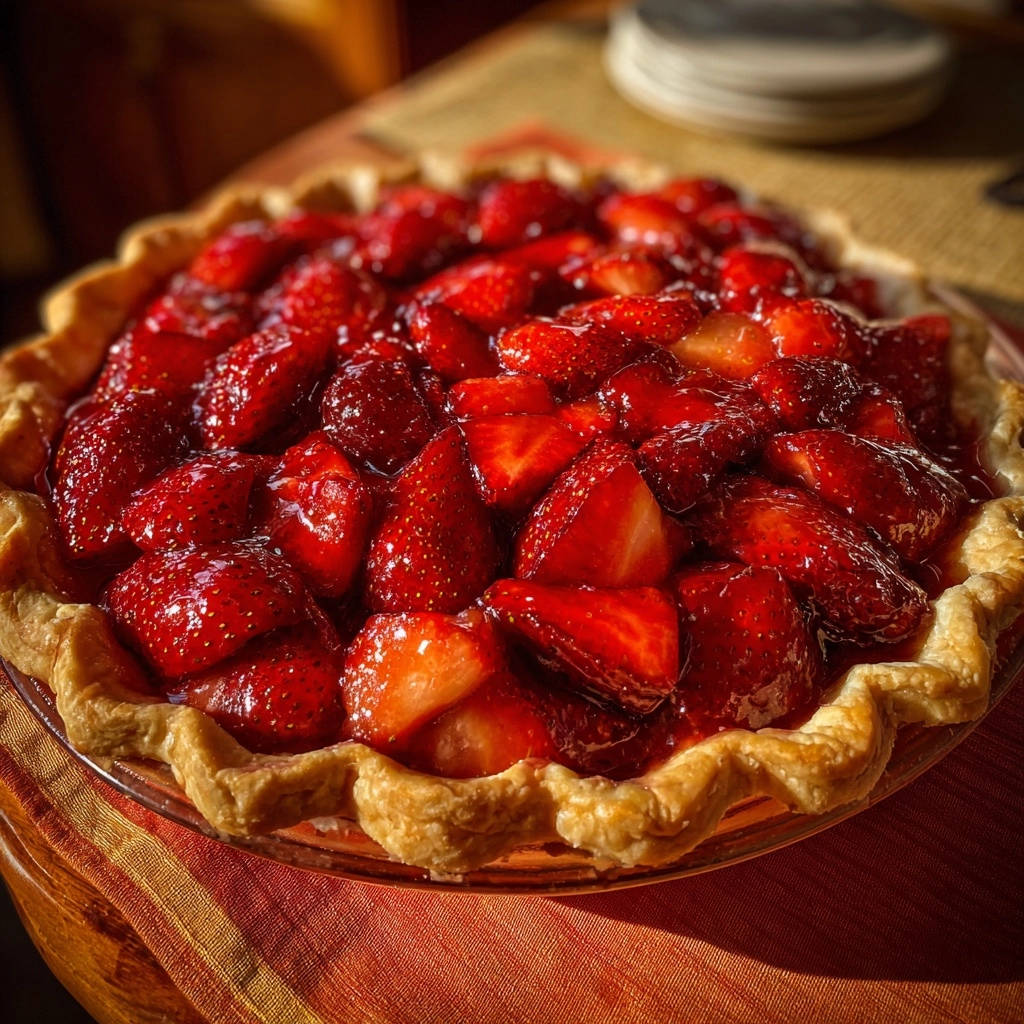
Fresh Strawberry Pie: The Secret to a Firm, Flavorful Filling
There’s nothing quite like the vibrant beauty of a perfectly set Fresh Strawberry Pie, yet many bakers face the frustrating challenge of a watery filling. I’ve personally experienced the disappointment of a soggy crust and a runny interior, which is why I perfected this recipe. It promises a truly firm, glistening, and irresistibly flavorful strawberry pie every single time, making it ideal for your next summer gathering or any sweet craving.
Why This Fresh Strawberry Pie Will Be Your New Go-To Recipe
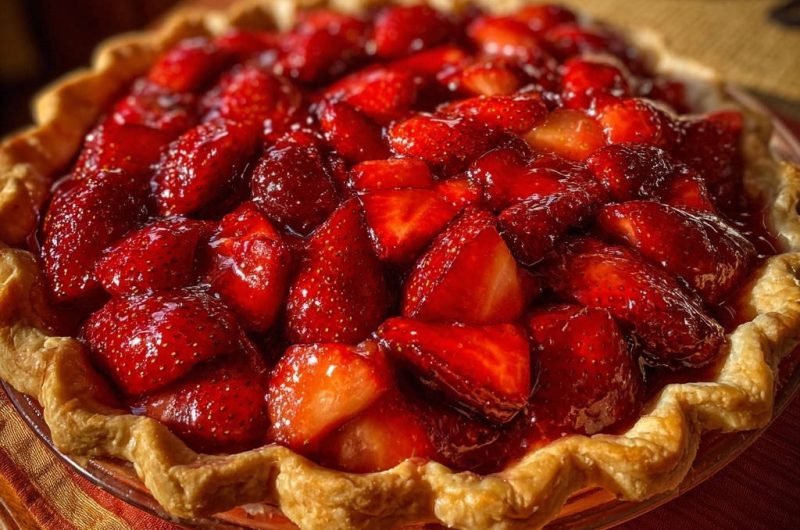
The “Never Watery” Marvel: Glistening, Perfectly Set Slices
The core innovation of this recipe lies in its meticulous moisture control. By drawing out excess liquid from the berries before assembly, we eliminate the primary cause of watery pie filling.
For a different kind of strawberry deliciousness, explore the crisp, layered goodness of Strawberry Pretzel Pie.
Get Our Best Recipes Weekly!
Join thousands of food lovers and get delicious recipes delivered to your inbox.
This ensures each slice of Fresh Strawberry Pie stands tall, boasting a beautifully set, glistening texture that holds its shape. Say goodbye to runny messes and hello to elegant presentation.
Bursting with Fresh, Unadulterated Strawberry Flavor
We prioritize the natural essence of fresh strawberries, allowing their sweet-tart profile to shine. The preparation method intensifies the fruit’s flavor without diluting it.
A touch of lemon juice enhances this bright, authentic taste, creating a dessert that truly celebrates the season. It’s a pure strawberry dessert experience.
Simple Steps for a Visually Stunning Dessert
Despite its impressive outcome, this recipe is designed for clarity and ease. Each step is straightforward, guiding you to a visually stunning result.
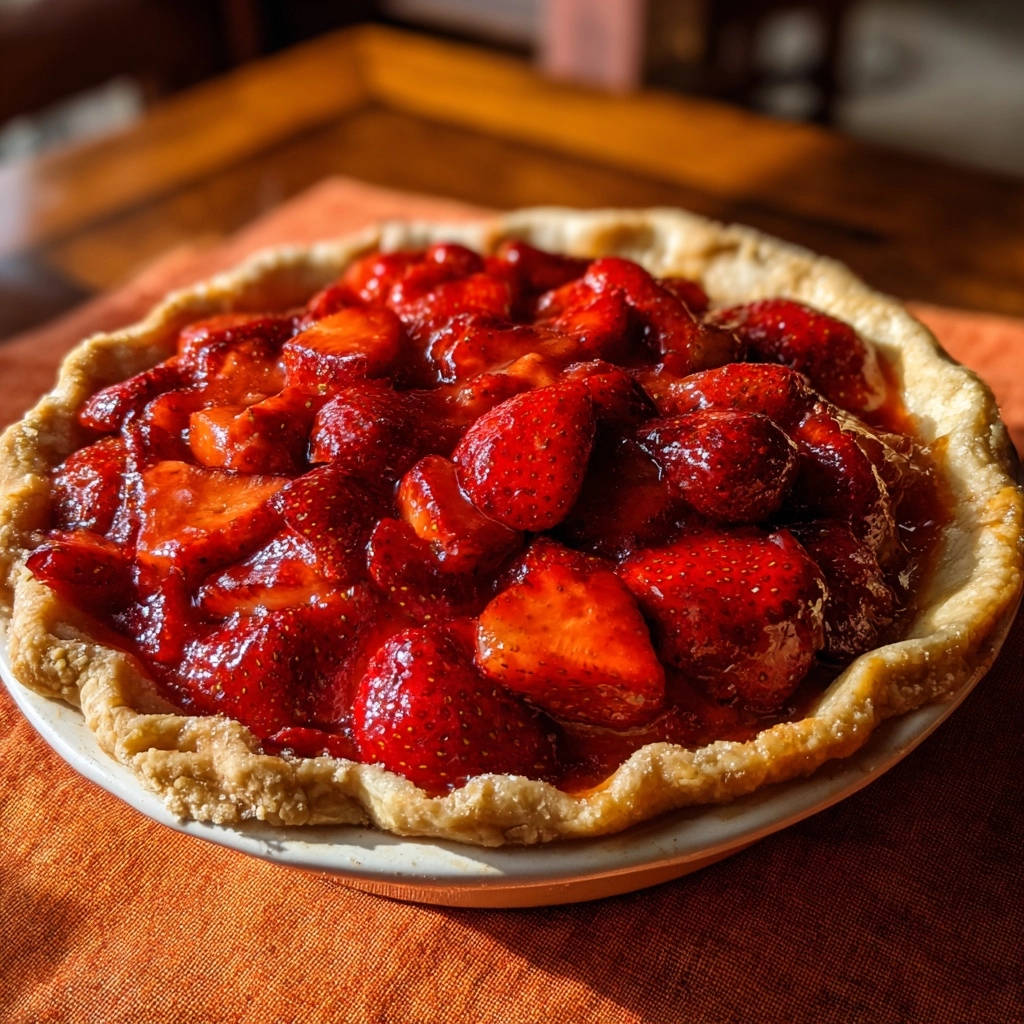
The vibrant red berries encased in a clear, glossy glaze against a golden crust create an aesthetic masterpiece. This pie is a genuine showstopper.
Crafting Perfection: The Essential Ingredients for Your Pie
Here’s what you’ll need to create your flawless fresh strawberry pie:
- 1 pre-made pie crust (9-inch), blind-baked and cooled:
A good quality crust is your dessert’s foundation, ensuring a crisp base. Blind baking is critical to prevent a soggy bottom.
- 6 cups fresh strawberries, hulled and sliced:
The star of the show! Choose ripe, firm, and fragrant berries for optimal flavor and texture.
- 1 cup granulated sugar, divided:
Used to macerate the berries and sweeten the glaze, balancing the tartness of the fruit and lemon.
- 1/4 cup water:
Essential for creating the cornstarch slurry, which is the thickening agent for the glaze.
- 3 tablespoons cornstarch:
Our secret weapon for a perfectly thick, clear, and stable filling that sets beautifully without clouding the fruit.
- 1 tablespoon fresh lemon juice:
Brightens the strawberry flavor and helps the cornstarch activate, contributing to the firm set of the glaze.
The Berry Heart: Choosing and Preparing Your Strawberries
For the best results, select strawberries that are deep red, firm, and have a strong, sweet aroma. Avoid berries with soft spots or mold.
After a gentle wash, hull the strawberries by removing the green leafy tops and slice them uniformly. This ensures even maceration and distribution in the pie.
The Foundation: A Perfectly Blind-Baked Pie Crust
A pre-made pie crust offers convenience, but ensure it’s blind-baked until golden and fully cooled. This process eliminates excess moisture from the dough.
Cooling the crust completely before filling prevents steam from forming, which could lead to a soggy bottom later. It’s a critical step for a structurally sound pie.
The Magic Binder: Cornstarch, Sugar, and Lemon Juice
Cornstarch is indispensable here; it creates a stable, clear, and glossy glaze that holds its shape. Accurate measurement is key for the right consistency.
Granulated sugar not only sweetens but also plays a role in drawing out moisture from the berries during maceration. It also contributes to the beautiful sheen of the glaze.
Fresh lemon juice provides a crucial acidic balance to the sweetness, enhancing the overall berry flavor. It also helps the cornstarch thicken more effectively.
Your Kitchen Arsenal: Essential Tools for Fresh Strawberry Pie Success
Having the right tools makes the pie-making process smooth and enjoyable:
- Large mixing bowl:
For macerating the strawberries with sugar.
- Fine-mesh sieve:
Absolutely essential for thoroughly draining the strawberry juices, preventing a watery filling.
- Medium saucepan:
Used to cook the strawberry glaze to the perfect glossy consistency.
- Whisk:
Critical for making a smooth cornstarch slurry and for preventing lumps while cooking the glaze.
- Measuring cups and spoons:
Accuracy is key for consistent results in baking.
- Rubber spatula:
For gently folding berries into the glaze and scraping down bowls.
- Electric mixer (optional, but helpful for even slicing):
Not explicitly needed for the recipe steps but useful for consistent slicing if you have a mandoline attachment.
Your Step-by-Step Guide to a Flawless Fresh Strawberry Pie
Phase 1: Mastering Moisture Control for Juicy Berries
- Prep and Macerate Strawberries:
In a large bowl, combine your hulled and sliced strawberries with 1/2 cup of the granulated sugar. Gently toss the berries until they are evenly coated.
Allow them to sit at room temperature for at least 30 minutes, or up to an hour. This vital step uses osmosis to draw excess water out of the fruit, a primary defense against a watery pie.
- Drain the Juices:
Position a fine-mesh sieve over a medium saucepan. Carefully pour the macerated strawberries into the sieve, allowing all the liquid to drain into the saucepan.
Let the berries drain for a minimum of 15 minutes. You can gently shake the sieve periodically, but refrain from pressing down on the berries, as this can force out beneficial fruit pulp. This process separates the excess water, leaving you with intensely flavored berries and concentrated juice for the glaze.
Phase 2: Whisking Up the Perfect Glistening Glaze
- Create the Glossy Base:
To the saucepan containing the collected strawberry juice, add the remaining 1/2 cup granulated sugar and the fresh lemon juice. These ingredients will form the sweet and tangy base of our thick glaze.
In a small, separate bowl, whisk together the 1/4 cup water and cornstarch until the mixture is completely smooth, forming a slurry. A lump-free slurry is essential for a smooth glaze.
- Thicken the Glaze:
Bring the strawberry juice mixture in the saucepan to a gentle simmer over medium heat, stirring continuously until all the sugar has fully dissolved. This usually takes a few minutes.
Slowly whisk in the cornstarch slurry. Continue whisking constantly for 1 to 2 minutes. The mixture will visibly thicken and become clear and glossy. This transformation ensures your pie filling will achieve that coveted firm, sliceable texture.
Remove the saucepan from the heat and let the glaze cool for about 10-15 minutes. It will continue to thicken slightly as it cools. Ensure it’s not steaming hot before moving to the next step.
Phase 3: Assembling and Chilling for Structural Integrity
- Gently Fold and Fill:
Once the glaze has cooled and thickened, gently fold the reserved, drained strawberries into it until they are evenly coated. The goal is to incorporate the berries without crushing them.
Pour this vibrant strawberry mixture into your blind-baked and completely cooled 9-inch pie crust. Spread it out evenly with a spatula.
- Chill for Perfection:
Loosely cover the pie with plastic wrap, being careful not to touch the filling, and refrigerate it for at least 4 hours. For the absolute best results and a truly firm set, chilling overnight is highly recommended.
This extended chill time allows the cornstarch glaze to fully set, ensuring your Fresh Strawberry Pie slices are firm, beautiful, and absolutely never watery.
Serving Your Beautifully Set Fresh Strawberry Pie
- Slice and Enjoy:
Once thoroughly chilled, your pie is ready to be admired and devoured! Use a sharp knife to cut clean, elegant slices.
Serve this delightful summer pie as is, or with your favorite accompaniments like a dollop of fresh whipped cream or a scoop of vanilla bean ice cream.
More Strawberry Goodness
If you’re enjoying the fresh strawberry flavors, here are a couple more fruit-focused ideas.
- For a refreshing breakfast or snack, try the Strawberry Banana Bliss Bowl, which uses similar fruit bases for a satisfying crunch.
- If you prefer a drinkable treat, the Strawberry Dream Smoothie offers a thick, fruity experience without being watered down.
Chef’s Secrets: Elevating Your Fresh Strawberry Pie to Artistry
Optimizing Your Strawberry Maceration
For uniform moisture release, ensure your strawberries are sliced to similar thicknesses. Gentle tossing prevents bruising and allows sugar to coat every piece evenly.
If you have extra time, letting the berries macerate for a full hour, or even up to two hours in the fridge, can enhance the moisture extraction process even further.
Achieving the Ideal Glaze Consistency
When cooking the glaze, consistent whisking is crucial to prevent scorching and ensure an even thickness. Look for the moment it turns from cloudy to clear and glossy.
If your glaze seems too thick after cooling, you can gently whisk in a tablespoon of hot water at a time until the desired consistency is reached. If it’s too thin, whisk in a cornstarch slurry (1 tsp cornstarch mixed with 1 tsp cold water) and simmer briefly again.
Crust Perfection: Beyond the Blind Bake
To prevent crust shrinkage during blind baking, line your chilled pie crust with parchment paper and fill it generously with pie weights or dried beans. Bake until the edges are golden, then remove the weights and bake a few more minutes until the bottom is also lightly browned.
Allow the crust to cool completely on a wire rack before adding the filling. This prevents condensation and keeps your crust delightfully crisp. Consider brushing the blind-baked crust with a thin layer of egg white and baking for an extra minute to create a moisture barrier.
Presentation Pointers for a Showstopping Finish
Before serving, garnish your Fresh Strawberry Pie with a few perfectly whole, fresh strawberries, perhaps nestled in a dollop of whipped cream. A sprinkle of fresh mint leaves adds a touch of color and aroma.
A light dusting of powdered sugar just before serving can also elevate its visual appeal, making it an even more enticing strawberry dessert.
Creative Flavor Pairings for Your Berries
For an unexpected twist, consider adding a whisper of freshly ground black pepper to the macerating strawberries. It subtly enhances their sweetness.
A very light drizzle of good quality balsamic glaze over individual slices can also create a sophisticated flavor pairing. Fresh basil or thyme sprigs can introduce an aromatic complexity.
Solving Common Fresh Strawberry Pie Challenges
The Filling Is Still Watery!
This most often occurs if the strawberries weren’t adequately macerated or drained. Ensure you give them ample time to release their juices, at least 30 minutes, and drain thoroughly for 15 minutes.
Another common culprit is not cooking the cornstarch glaze long enough or at a sufficient temperature. The glaze needs to come to a full simmer and thicken noticeably, turning clear and glossy, to activate the cornstarch.
My Pie Crust Is Soggy
A soggy crust is usually a result of insufficient blind baking. The crust must be fully baked and golden before filling.
Additionally, ensure your glaze has cooled down sufficiently before folding in the berries and pouring into the crust. Introducing hot filling can create steam and soften the crust. The egg white wash trick mentioned earlier is also a fantastic preventative measure.
The Glaze Didn’t Thicken Properly (or Thickened Too Much!)
If the glaze didn’t thicken, the cornstarch might not have been cooked long enough to activate, or the proportions were off. Return it to a gentle simmer, whisking constantly until it reaches the desired consistency.
If it became too thick, gently whisk in a tablespoon of water or a tiny splash of lemon juice at a time until it loosens slightly. This must be done carefully to avoid making it too thin.
Pie Looks Dull, Not Glistening
The clear, glossy appearance comes from properly cooked cornstarch and dissolved sugar. If your glaze appears cloudy, it likely wasn’t cooked to a full simmer for long enough.
A quick re-whisk over gentle heat can often bring back that desired sheen. Ensuring the glaze is completely clear before cooling and mixing with berries is key.
Your Fresh Strawberry Pie Questions Answered
Can I use frozen strawberries for this recipe?
While fresh strawberries yield the best texture, frozen strawberries can be used. Thaw them completely in a colander set over a bowl in the refrigerator.
Drain the thawed berries very thoroughly, even gently pressing some excess liquid out, as they release more water than fresh berries. Then proceed with the maceration step as written.
How can I make this pie gluten-free or dairy-free?
This Fresh Strawberry Pie recipe is naturally dairy-free. To make it gluten-free, simply use a certified gluten-free pie crust that has been blind-baked.
The filling itself is free of gluten, so the crust is the only component needing modification. There are many excellent GF pie crusts available commercially.
What are the best accompaniments for Fresh Strawberry Pie?
Classic choices include a generous dollop of freshly whipped cream, perhaps lightly sweetened with vanilla, or a scoop of premium vanilla bean ice cream.
For a lighter touch, a spoonful of crème fraîche offers a lovely tangy contrast. A simple dusting of powdered sugar also works beautifully.
How long does Fresh Strawberry Pie last and how should I store it?
This pie is best enjoyed within 2-3 days when stored covered loosely in the refrigerator. The filling’s stability ensures it holds up well.
Always keep it chilled to maintain its firm texture and preserve the freshness of the berries.
Can I make the filling ahead of time?
You can prepare the glaze up to 2 days in advance and store it, covered, in the refrigerator. Reheat gently over low heat, whisking until smooth, before folding in the fresh strawberries.
However, it’s best to fold in the fresh, drained strawberries and assemble the pie just before the final chill. This maintains the berries’ fresh texture.
Beyond the Classic: Delicious Fresh Strawberry Pie Variations
Adding Complementary Flavors (Balsamic, Mint, etc.)
Experiment with a few drops of high-quality vanilla extract or almond extract in the glaze for added depth. A teaspoon of finely chopped fresh mint, basil, or even a tiny drizzle of good balsamic vinegar (just a hint!) can elevate the strawberry’s natural notes.
These additions should be subtle, designed to enhance rather than overpower the delicate strawberry flavor. Add them to the glaze as it cools.
Crust Innovations: From Graham Cracker to Nut-Based
Instead of a traditional pastry crust, consider a graham cracker or digestive biscuit crust for a different texture. Press crumb crusts into the pie plate and chill or lightly bake before filling.
A crushed nut crust, such as almond or pecan, mixed with butter and sugar, can also provide a unique, rich flavor profile. Ensure any alternative crust is also blind-baked or chilled to prevent sogginess.
Dietary Friendly Swaps: Less Sugar or Alternate Thickeners
For a less sweet pie, you can reduce the amount of granulated sugar slightly, adjusting to taste. Be mindful that sugar aids in the maceration process and glaze texture.
While cornstarch is ideal for its clarity, arrowroot powder can be used as an alternative thickener. Use slightly less arrowroot than cornstarch and whisk it into cold liquid before adding to a gently simmering mixture, as it can become stringy if overcooked.
Turning it into Individual Tarts or Parfaits
This recipe adapts beautifully to smaller formats. Pour the filling into blind-baked mini tart shells for elegant individual desserts.
Alternatively, layer the glaze and berries with crumbled shortbread or granola and whipped cream in glasses for a stunning Fresh Strawberry Pie parfait. These are perfect for entertaining.
Ready to Impress? Share Your Fresh Strawberry Pie Masterpiece!
Now that you’re armed with the secrets to a truly firm and flavorful Fresh Strawberry Pie, it’s time to get baking. This recipe guarantees a gorgeous, delicious strawberry dessert that will earn rave reviews.
Embrace the joy of creating a pie that looks as incredible as it tastes, proving that a non-watery fruit pie is not just a dream, but an achievable reality. Share your masterpiece with loved ones and savor every perfect slice!
Fresh Strawberry Pie
Course: DessertCuisine: American CuisineDifficulty: easy1
(9-inch) pie, 8 servings30
minutes10
minutes360
minutesAmerican Cuisine
Ingredients
1 pre-made pie crust (9-inch), blind-baked and cooled
6 cups fresh strawberries, hulled and sliced
1 cup granulated sugar, divided
1/4 cup water
3 tablespoons cornstarch
1 tablespoon fresh lemon juice
Directions
- Prep and Macerate Strawberries (The Moisture Control Secret): In a large bowl, combine the sliced strawberries with 1/2 cup of the granulated sugar. Gently toss and let them sit at room temperature for at least 30 minutes, or up to an hour. This crucial step draws out excess moisture from the berries, preventing a watery final pie.
- Drain the Juices (Stop the Watery Filling!): Place a fine-mesh sieve over a saucepan. Pour the macerated strawberries into the sieve, allowing all the accumulated liquid to drain into the saucepan. Let it drain for at least 15 minutes, gently shaking the sieve occasionally, but do not press down on the berries. Set the drained strawberries aside. This step is key to separating excess water from your fruit.
- Create the Glossy, Thick Glaze: To the saucepan with the collected strawberry juice, add the remaining 1/2 cup granulated sugar and the lemon juice. In a small separate bowl, whisk together the 1/4 cup water and cornstarch until completely smooth to create a slurry.
- Bring the strawberry juice mixture in the saucepan to a simmer over medium heat, stirring until the sugar dissolves. Slowly whisk in the cornstarch slurry. Continue whisking constantly for 1 to 2 minutes until the mixture thickens significantly and becomes clear and glossy. This thickening process ensures your pie filling will be perfectly set, not runny. Remove from heat and let it cool for about 10-15 minutes, allowing it to thicken further.
- Assemble the Pie (Lock in the Flavor and Texture): Gently fold the drained strawberries into the cooled, thickened glaze until evenly coated. Pour the mixture into your blind-baked and cooled pie crust.
- Chill for Perfection: Cover the pie loosely with plastic wrap and refrigerate for at least 4 hours, or preferably overnight, to allow the filling to set completely. This final chill ensures every slice is firm, beautiful, and never watery!
- Slice and serve your perfectly set, non-watery fresh strawberry pie!
Notes
- Blind-baking the crust is crucial for preventing sogginess.