Skillet Tater Tot Hotdish: The Crispy Tot Secret Revealed!
There’s nothing quite like a bubbling hotdish fresh from the oven, but the common culprit of soggy tater tots can dampen anyone’s comfort food dreams. After years of perfecting, I’ve finally cracked the code to the ultimate Skillet Tater Tot Hotdish where every single tot is golden and gloriously crisp. This recipe isn’t just a meal; it’s a trusty, one-pan solution for busy weeknights, delivering savory satisfaction without the usual mushy disappointment.
Why This Skillet Tater Tot Hotdish Will Be Your New Favorite
This isn’t just another hotdish recipe; it’s a testament to simple techniques that yield extraordinary results. We’re transforming a beloved classic into a perfectly balanced symphony of textures and flavors. Prepare to impress everyone at the table with this hearty and satisfying dish.
The “No More Mushy Tots!” Revolution
The single most frustrating aspect of traditional tater tot casseroles is the inevitable sogginess. Our recipe employs a clever layering strategy that ensures your tater tots remain perfectly crisp on top, offering a delightful crunch with every bite.
Get Our Best Recipes Weekly!
Join thousands of food lovers and get delicious recipes delivered to your inbox.
To ensure yours never turns out that way, check out this Cheesy Tater Tot Casserole recipe for a truly crisp delight.
We create a protective barrier and position the tots to receive direct heat, allowing them to crisp up beautifully instead of steaming in the sauce. This simple trick is a game-changer for any fan of golden brown tots.
More Potato Goodness
If you’re a fan of potatoes, you’ll want to explore these other potato dishes.
- For another way to enjoy potatoes baked until tender, check out this Cheesy Potato Gratin recipe that promises a crispy finish.
- If you liked the idea of potatoes baked to perfection, this Cheesy Potato Gratin is also a fantastic option for a rich potato bake.
A One-Skillet Wonder for Busy Nights
Embrace the convenience of a meal that cooks entirely in one pan. From sautéing the savory ground beef to baking in the oven, this Skillet Tater Tot Hotdish significantly reduces cleanup.
It’s the ideal choice for quick weeknight dinners or fuss-free weekend gatherings, allowing you more time to enjoy your meal and less time scrubbing pots.
Hearty, Cheesy, and Utterly Satisfying Comfort
Beyond its crispy crown, this hotdish delivers on classic comfort. A rich, spiced ground beef base is generously coated with a duo of melted cheeses, creating a truly satisfying experience.
Each spoonful offers a delicious blend of textures and deeply savory flavors, making it the ultimate comfort food classic for any occasion.
Gather Your Gear: Essential Tools for Hotdish Success
Having the right tools on hand makes the cooking process smooth and enjoyable. For this ultimate hotdish recipe, a few key pieces of kitchen equipment are essential to achieve perfection.
The Star of the Show: An Oven-Safe Skillet
An oven-safe skillet, particularly a cast iron one, is indispensable for this recipe. Its ability to go from stovetop to oven seamlessly is crucial for building deep flavors and achieving proper cooking.
Cast iron provides excellent heat retention and even cooking, ensuring your meat base browns beautifully and the entire dish bakes uniformly.
Supporting Cast: Basic Kitchen Essentials
-
Wooden Spoon or Spatula: Perfect for breaking up ground beef and stirring ingredients without scratching your skillet.
-
Measuring Cups and Spoons: Essential for accurate ingredient proportions, ensuring a balanced and flavorful hotdish every time.
-
Cutting Board and Sharp Knife: For safely and efficiently preparing your onion, garlic, and fresh parsley.
-
Cheese Grater: While pre-shredded works, freshly grated cheese melts more smoothly and offers superior flavor.
The Building Blocks: Ingredients for Your Ultimate Hotdish
Every ingredient in this Skillet Tater Tot Hotdish plays a vital role in its flavor, texture, and overall success. Selecting quality ingredients ensures a truly delicious outcome.
Savory Foundation: The Meat & Aromatics
Lean Ground Beef: Opt for lean ground beef to build a robust and savory base without excessive grease. This ensures a cleaner, richer flavor profile for your hotdish.
Small Onion: Finely chopped onion adds a foundational sweetness and aromatic depth as it caramelizes gently with the beef.
Garlic: Freshly minced garlic provides a pungent, aromatic kick that is essential for a well-rounded savory dish.
Olive Oil: A touch of olive oil helps to brown the meat and sauté the aromatics, kickstarting the flavor development.
Spice Rack Superstars: Chili Powder, Cumin, & Oregano
Chili Powder: This blend brings warmth and a classic, comforting flavor profile to the meat mixture.
Ground Cumin: Cumin adds an earthy, slightly smoky note that perfectly complements the beef and other spices.
Dried Oregano: Oregano contributes a Mediterranean aromatic quality, enhancing the savory depth of the hotdish sauce.
Richness & Body: Tomato Paste and Beef Broth
Tomato Paste: A small amount of tomato paste deepens the umami flavor and slightly thickens the sauce, creating a rich base.
Beef Broth: Beef broth provides the necessary liquid for the sauce, helping to deglaze the skillet and infuse the dish with even more beefy flavor.
The Crispy Crown: Frozen Tater Tots
Frozen Tater Tots: These are the star of the show. It’s crucial to use them directly from the freezer; do not thaw them. This ensures they cook up extra crispy and golden on top.
Melted Magic: Duo of Cheeses
Shredded Sharp Cheddar Cheese: Sharp cheddar delivers a bold, tangy flavor and a classic, gooey melt, embodying the spirit of a true comfort food.
Shredded Monterey Jack Cheese: Monterey Jack offers a milder flavor and an incredibly smooth, creamy melt, creating that irresistible cheesy pull.
Fresh Finish: Parsley for Garnish
Fresh Parsley: A sprinkling of fresh chopped parsley at the end adds a bright, herbaceous note and a pop of color, elevating the presentation of your hotdish.
Your Path to Skillet Tater Tot Hotdish Perfection: A Detailed Guide
Follow these precise steps to create a truly exceptional Skillet Tater Tot Hotdish, ensuring maximum flavor and those coveted crispy tater tots.
-
Prepping the Oven and Skillet
Preheat Oven: Begin by preheating your oven to 375°F (190°C). This ensures the oven is at the correct temperature for even cooking and crisping the tots.
Heat Olive Oil: Add one tablespoon of olive oil to a large, oven-safe cast iron skillet over medium-high heat. Allow the oil to shimmer, indicating it’s ready for cooking.
-
Building the Savory Meat Base
Brown Ground Beef: Add one pound of lean ground beef to the hot skillet. Cook, breaking it up with a wooden spoon, until it’s completely browned and no pink remains.
Drain Excess Fat: Carefully drain any excess fat from the skillet. This step is crucial for preventing a greasy hotdish and allows the other flavors to shine through.
Sauté Onion: Add the finely chopped small onion to the skillet with the beef. Cook, stirring occasionally, for about 5 minutes until it softens and becomes translucent, releasing its sweet aromas.
Infuse with Spices: Stir in the minced garlic, chili powder, ground cumin, and dried oregano. Cook for just 1 minute more, stirring constantly, until the spices become fragrant. This brief cooking “blooms” the spices, intensifying their flavor.
-
Crafting the Rich Sauce
Cook Tomato Paste: Stir in the tomato paste and cook for another minute. This helps to deepen its flavor and remove any raw taste.
Add Beef Broth and Simmer: Pour in the beef broth, making sure to scrape up any browned bits from the bottom of the skillet. These “fond” bits are packed with flavor and will enrich your sauce.
Thicken the Sauce: Bring the mixture to a simmer, then reduce the heat to low and let it gently bubble for 5-7 minutes. This allows the sauce to thicken slightly and for the flavors to meld beautifully.
Season to Taste: Taste the sauce and season generously with salt and black pepper as needed. Remember, proper seasoning is key to a delicious hotdish.
-
The Crispy Tot Secret: Strategic Layering
Remove from Heat: Take the skillet off the heat. This prevents the tots from cooking too quickly from below and ensures better crisping later.
First Cheese Layer: Evenly spread about half of the shredded sharp cheddar and Monterey Jack cheeses over the savory meat mixture. This creates a protective barrier for the tots.
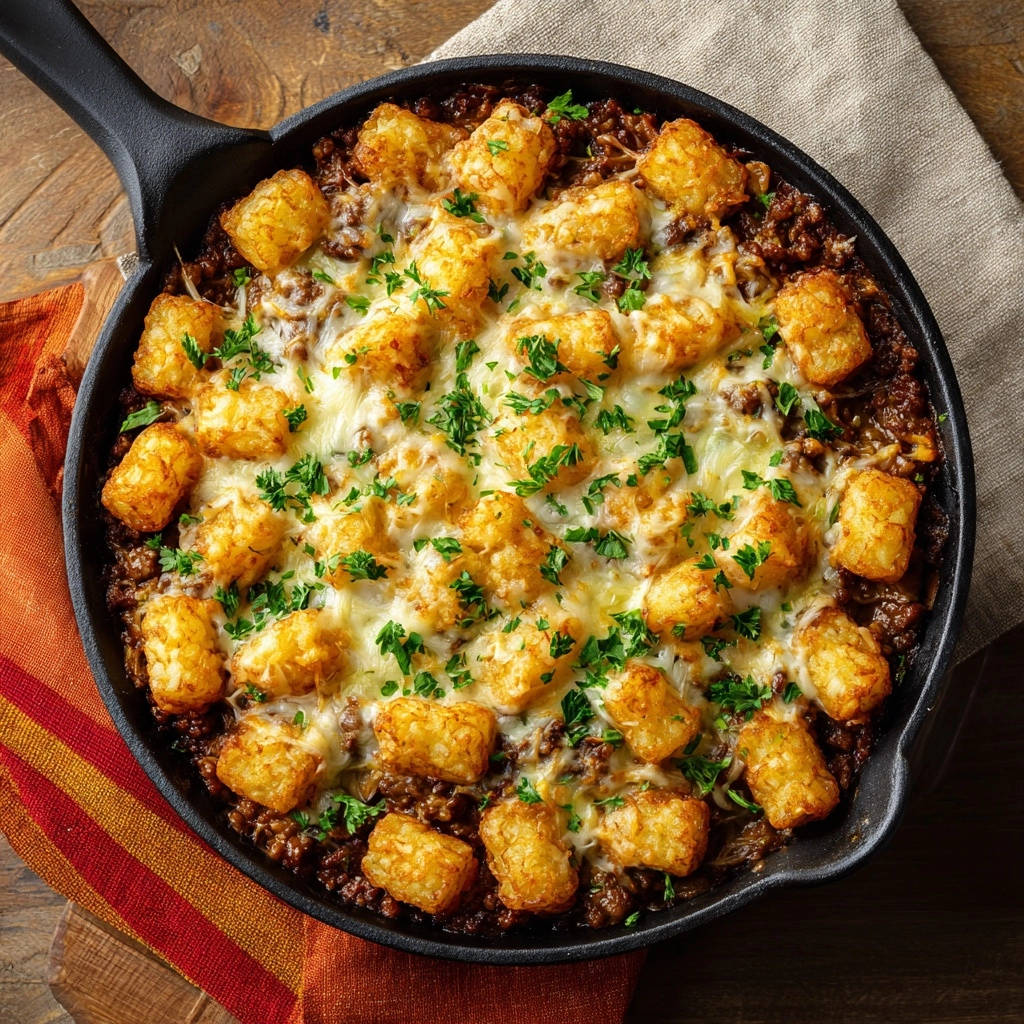
Arrange Frozen Tater Tots: Carefully arrange the frozen tater tots in a single layer over the cheese and meat base. This is the ultimate hotdish recipe’s secret: ensure the tots are exposed to the top heat and not submerged in the sauce.
This strategic placement allows the tots to get direct heat and crisp up perfectly, rather than becoming soggy. Do not overlap them if possible.
-
Baking to Golden, Bubbly Perfection
Initial Bake: Transfer the skillet to the preheated oven and bake for 20 minutes. During this time, the tots will begin to cook and firm up.
Add Remaining Cheese: After 20 minutes, remove the skillet from the oven and sprinkle the remaining shredded cheeses over the partially crisped tater tots.
Final Bake: Return the hotdish to the oven and bake for an additional 15-20 minutes. Continue baking until the tater tots are beautifully golden brown and crispy, and the cheese is fully melted and bubbly.
-
The Optional Broiler Boost for Extra Crunch
Broil for Maximum Crispiness: For an extra boost of crunch and a deeper golden color, you can finish the hotdish under the broiler for 2-3 minutes.
Keep a very close eye on it during this stage, as cheese can burn quickly. Remove immediately once the desired crispiness is achieved.
-
Resting and Garnish: The Final Touches
Rest Before Serving: Let the hotdish rest for a few minutes after removing it from the oven. This allows the flavors to settle and the sauce to thicken slightly, making it easier to serve.
Garnish with Parsley: Just before serving, sprinkle with fresh chopped parsley. The vibrant green adds a touch of freshness and a beautiful visual appeal to your masterpiece.
Chef’s Secrets: Elevate Your Skillet Tater Tot Hotdish Game
These expert tips will help you customize and perfect your Skillet Tater Tot Hotdish, making it truly your own signature dish.
-
Spice it Up or Tone it Down
For an extra kick, add a pinch of cayenne pepper or a dash of your favorite hot sauce to the meat mixture. If you prefer a milder flavor, slightly reduce the amount of chili powder.
Smoked paprika can also add a delightful smoky depth without increasing the heat, enhancing the overall savory profile.
-
Meat & Veggie Variations for Custom Hotdish
Feel free to experiment with different ground meats; ground turkey or chicken can be used as leaner alternatives. Ensure you adjust cooking times and seasoning accordingly.
Boost your veggie intake by stirring in frozen corn, peas, or diced bell peppers into the meat mixture during the last few minutes of simmering the sauce. This adds extra nutrients and flavor.
-
The Ultimate Cheese Blend Experiment
While cheddar and Monterey Jack are a classic combination, don’t be afraid to experiment! Colby Jack offers a mild, creamy melt, or for a smoky twist, try some smoked gouda.
If you enjoy a creamy texture, you might also love this cheesy chicken bake.
If you love a little heat, a sprinkle of Pepper Jack cheese will add a pleasant zing to your cheesy casserole.
-
Achieving Next-Level Crispy Tots (Beyond the Secret!)
Beyond our secret layering technique, ensure your oven rack is in the upper-middle position for optimal browning. Also, avoid overcrowding the skillet; an even, single layer is paramount for airflow around each tot.
For truly maximum crispness, you can lightly spray the tops of the tots with cooking spray before baking. This encourages a golden, crunchy exterior.
-
Perfect Pairings: What to Serve Alongside
This hearty hotdish pairs wonderfully with light, fresh sides. A crisp green salad with a vinaigrette dressing provides a refreshing contrast to the richness of the hotdish.
Steamed green beans or roasted asparagus are also excellent choices, offering a touch of vibrant green and a healthy balance to this comforting meal.
Hotdish Hurdles? Common Problems & Quick Fixes
Even expert cooks encounter occasional challenges. Here are solutions to common hotdish issues, ensuring your Skillet Tater Tot Hotdish is always a triumph.
“My Skillet Tater Tot Hotdish is Too Greasy!”
Ensure you’re using lean ground beef, as higher fat content will yield more grease. Most importantly, thoroughly drain the excess fat from the skillet after browning the beef.
A quick blot with paper towels after draining can also help absorb any remaining oil before adding the other ingredients.
“My Tots Aren’t as Crispy as I Hoped!”
Revisit the critical “Crispy Tot Secret” step: ensure the tater tots are placed in a single, exposed layer directly over the cheese, not submerged in sauce. Make sure they are frozen when they go in the oven.
Check your oven temperature with an oven thermometer to ensure it’s accurate, as an underheated oven can hinder crisping. Don’t skip the optional broiler step for that final crunch.
“The Sauce is Too Thin/Thick!”
If your sauce is too thin, simply simmer it for a few extra minutes uncovered, allowing more liquid to evaporate and thicken. You can also mix a tiny bit of cornstarch with cold water to create a slurry and stir it in.
If it’s too thick, stir in an additional splash of beef broth, one tablespoon at a time, until you reach your desired consistency.
“The Flavor Feels a Bit Flat”
Taste and adjust your seasoning carefully. Sometimes a little more salt and freshly ground black pepper can make a world of difference. A dash of Worcestershire sauce or a splash of red wine vinegar can also deepen the savory notes.
Consider blooming your spices a bit longer, or adding a pinch more chili powder or cumin to boost their presence.
Your Skillet Tater Tot Hotdish Questions, Answered!
Here are answers to some common questions about preparing and storing this delicious ground beef hotdish.
Can I prepare Skillet Tater Tot Hotdish ahead of time?
Yes, you can prepare the meat and sauce base a day in advance. Cook it completely, let it cool, then store it in an airtight container in the refrigerator.
When ready to bake, spread the chilled meat mixture in your skillet, top with cheese and frozen tater tots, then proceed with the baking instructions. You might need a few extra minutes in the oven since it’s starting cold.
How should I store leftovers? And can I freeze it?
Store any leftover Skillet Tater Tot Hotdish in an airtight container in the refrigerator for up to 3-4 days. Reheat in the oven or microwave.
While you can freeze the cooked hotdish for up to 2-3 months, be aware that the tater tots may lose some of their crispiness upon thawing and reheating. Wrap tightly in foil and then in plastic wrap.
What kind of skillet is best for this recipe?
A 10-inch or 12-inch cast iron skillet is ideal due to its excellent heat retention and oven-safe properties. It helps achieve a beautiful sear on the beef and even baking.
A heavy-bottomed, oven-safe stainless steel skillet can also work effectively. Ensure whatever skillet you choose can safely withstand oven temperatures up to 375°F (190°C).
Can I make this Skillet Tater Tot Hotdish gluten-free?
Yes, this recipe is naturally quite adaptable to be gluten-free. Most tater tot brands are gluten-free, but always check the label to be certain.
Ensure your beef broth is certified gluten-free, and confirm that your chili powder, cumin, and oregano do not contain any hidden gluten-containing ingredients.
Ready to Impress? Share Your Skillet Tater Tot Hotdish!
Now that you’re armed with the secret to perfectly crispy tater tots, it’s time to create your own amazing Skillet Tater Tot Hotdish! This recipe truly is a game-changer for anyone craving that classic, comforting experience without the usual pitfalls.
Dive in, enjoy the process, and get ready to savor every cheesy, meaty, crunchy bite. Don’t forget to share your golden-brown creations and tell us how much you loved banishing those mushy tot woes forever!

Skillet Tater Tot Hotdish
Course: Main CourseCuisine: AmericanDifficulty: easy4
servings25
minutes40
minutes750
kcal60
minutesTired of soggy Tater Tot casseroles? This Skillet Tater Tot Hotdish cracks the code for perfectly crispy tots every time with a simple trick. Enjoy a cheesy, meaty, crunchy comfort food that’s guaranteed to be a hit!
Ingredients
1 tablespoon olive oil
1 pound lean ground beef
1 small onion, finely chopped
2 cloves garlic, minced
1 tablespoon chili powder
1 teaspoon ground cumin
1/2 teaspoon dried oregano
1/4 cup tomato paste
1 cup beef broth
Salt and black pepper to taste
1 (32 ounce) bag frozen Tater Tots
1.5 cups shredded sharp cheddar cheese
1 cup shredded Monterey Jack cheese
Fresh parsley, chopped, for garnish
Directions
- Preheat oven to 375F (190C).
- Heat olive oil in a large oven-safe cast iron skillet over medium-high heat. Add ground beef and cook, breaking it up with a spoon, until browned. Drain any excess fat.
- Add chopped onion to the skillet and cook until softened, about 5 minutes. Stir in minced garlic, chili powder, cumin, and oregano, cooking for 1 minute until fragrant.
- Stir in tomato paste and cook for another minute. Pour in beef broth, scraping up any browned bits from the bottom of the skillet. Bring to a simmer, then reduce heat and let it gently bubble for 5-7 minutes, allowing the sauce to thicken slightly. Season with salt and pepper to taste.
- THE CRISPY TOT SECRET: Remove the skillet from heat. Evenly spread about half of the shredded cheddar and Monterey Jack cheeses over the meat mixture. Carefully arrange the frozen Tater Tots in a single layer over the cheese and meat, making sure they are exposed to the top heat and not submerged in the sauce. This ensures maximum crispiness.
- Bake for 20 minutes. Then, sprinkle the remaining shredded cheeses over the Tots. Return to the oven and bake for an additional 15-20 minutes, or until the Tater Tots are golden brown and crispy, and the cheese is melted and bubbly.
- For extra crispiness, you can finish under the broiler for 2-3 minutes, watching carefully to prevent burning.
- Let the hotdish rest for a few minutes before serving. Garnish with fresh chopped parsley.
Notes
- The key to crispy tots is arranging them on top of the cheese layer, exposed to the oven’s heat, not submerged in sauce.