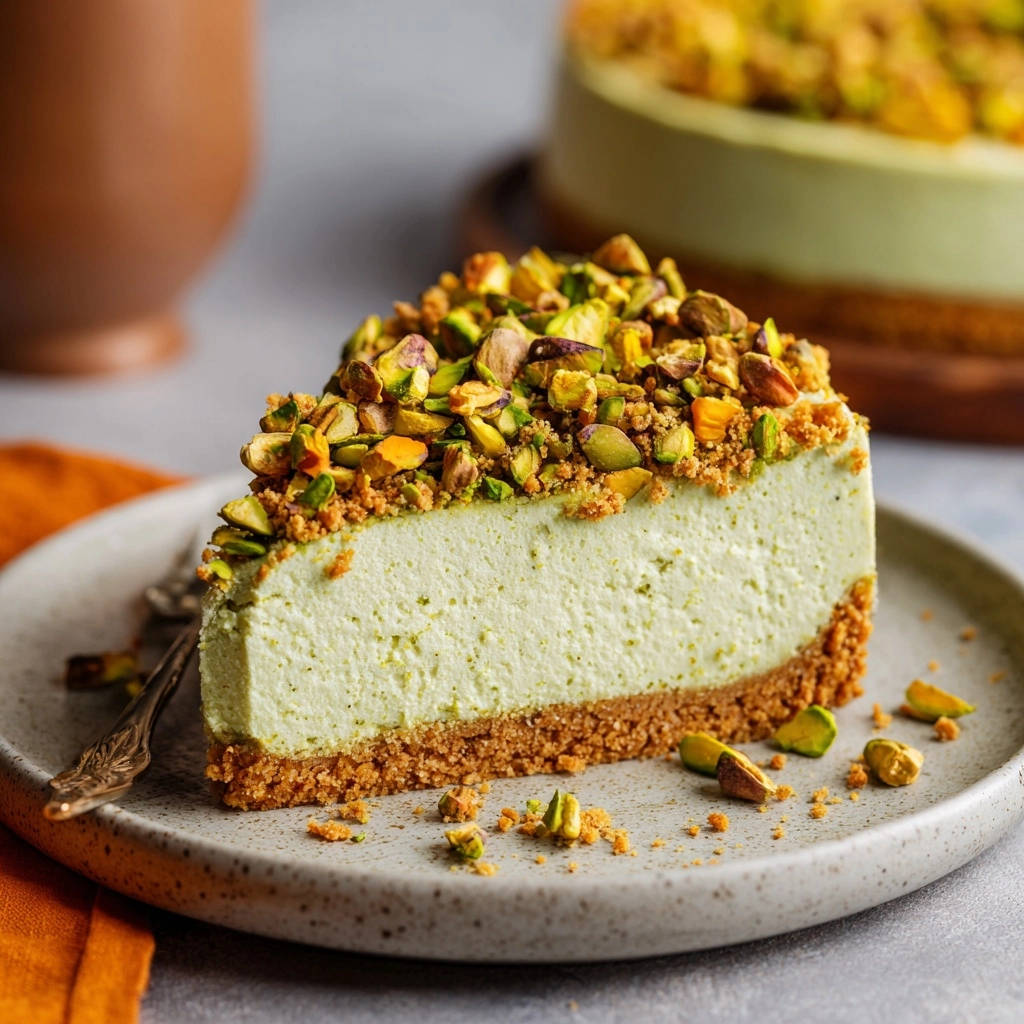
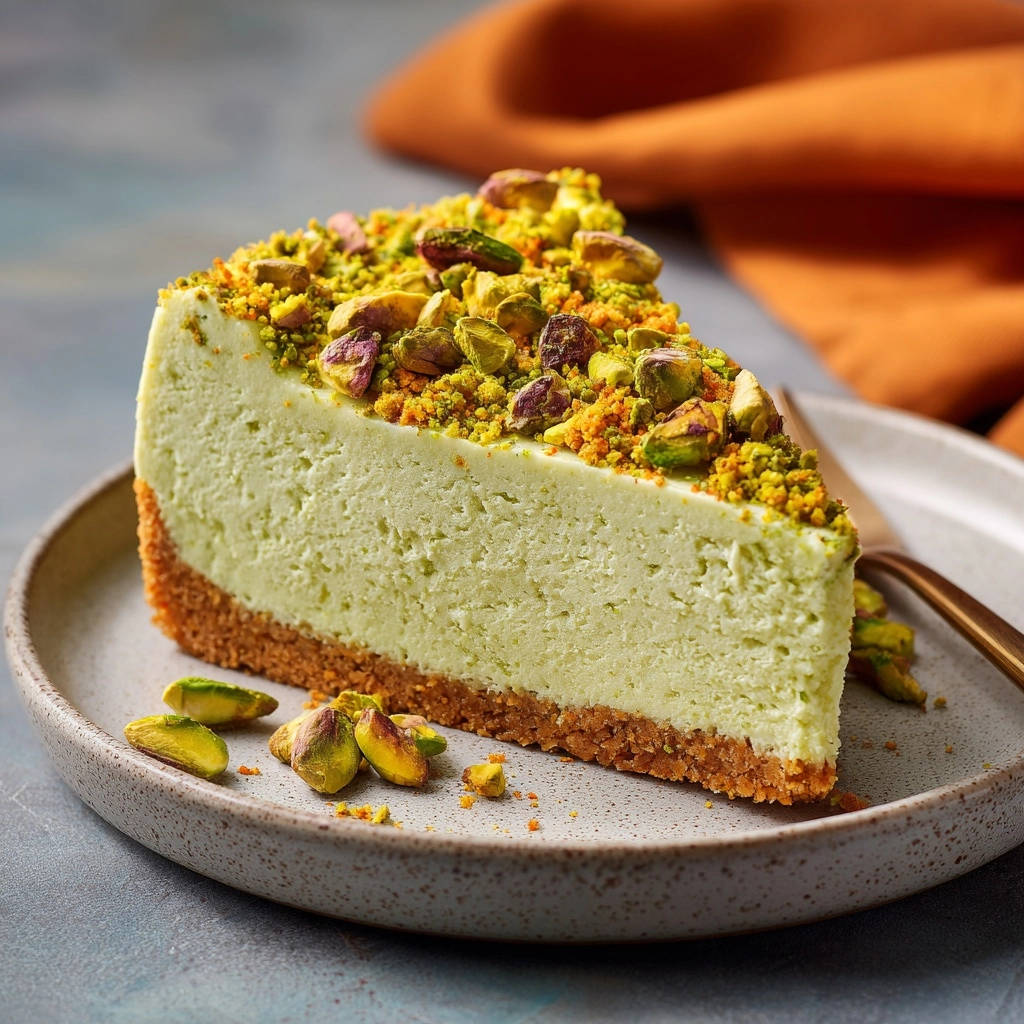
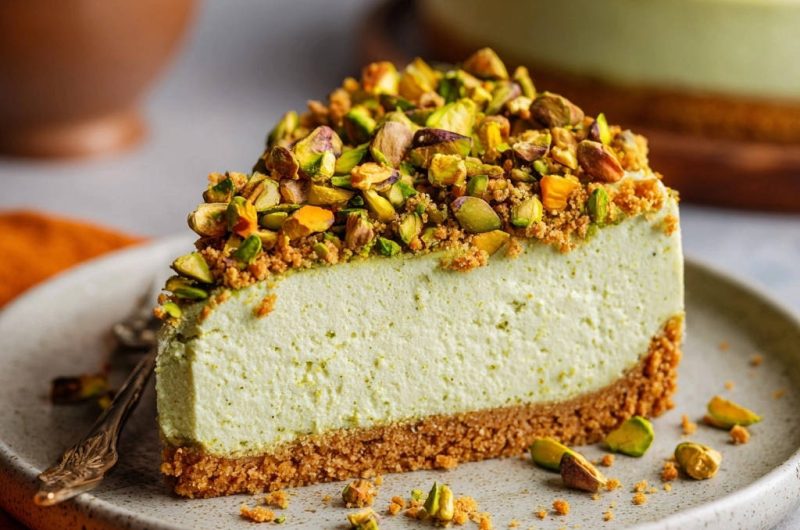
Pistachio Dream Cheesecake: Guaranteed Firm & Flawless
There’s nothing quite like the disappointment of a wobbly, unsliceable no-bake cheesecake. I’ve been there, but I discovered a simple trick to consistently achieve that bakery-perfect, firm slice every time. This Pistachio Dream Cheesecake recipe is your secret weapon for a luscious, beautifully set dessert that holds its shape flawlessly.
Get ready to impress with a velvety smooth filling, vibrant pistachio flavor, and a guaranteed clean cut that makes this dessert an absolute showstopper.
Why This No-Bake Pistachio Cheesecake Will Become Your Go-To
Say Goodbye to Wobbly Cheesecake Woes
Many no-bake cheesecakes fall flat, literally, when sliced. This can be incredibly frustrating after investing time and ingredients.
Get Our Best Recipes Weekly!
Join thousands of food lovers and get delicious recipes delivered to your inbox.
For similar results, explore these pumpkin cheesecake bars for a firm, delightful finish.
Our recipe specifically tackles this common issue, ensuring your cheesecake holds its structure from the very first cut.
The Secret to a Perfectly Firm, Sliceable Treat
The key to this recipe’s success lies in a simple yet often overlooked technique that guarantees firmness. You’ll achieve clean, elegant slices with ease, transforming your dessert presentation.
No more crumbling or spreading; just pristine portions every single time.
A Symphony of Creamy Pistachio Perfection
Beyond its impeccable structure, this Pistachio Dream Cheesecake offers an exquisite flavor and texture profile. It’s incredibly smooth, rich, and bursting with the earthy, sweet notes of pistachio.
Each bite delivers a creamy, melt-in-your-mouth experience balanced by a delightful crust.
Your Kitchen Arsenal: Essential Tools for Cheesecake Success
-
The Unsung Hero: Springform Pan
A 9-inch springform pan is absolutely essential for this recipe. Its removable sides allow for easy release without damaging your pristine cheesecake.
Unlike regular pans, a springform ensures your beautiful dessert slides out effortlessly, ready for presentation.
-
Mixing Mastery: Bowls and Whisks
You’ll need several mixing bowls, including one that can be chilled, for various stages of preparation. Sturdy whisks are vital for combining ingredients smoothly.
Different sizes will accommodate the crust, cream cheese filling, and whipped cream components efficiently.
-
Powering Up: Electric Mixer
An electric mixer, whether handheld or a stand mixer, is crucial for achieving the perfect textures. It effortlessly beats cream cheese until smooth and whips heavy cream to stiff peaks.
This tool significantly reduces effort and ensures consistent, airy results.
-
Precision Matters: Measuring Cups and Spoons
Accurate measurements are paramount for the success of this Pistachio Dream Cheesecake. This is especially true for the gelatin component, where precision ensures the correct set.
Reliable measuring cups and spoons guarantee consistency and optimal texture.
-
Smoothing Things Over: Spatulas
Rubber spatulas are indispensable for gently folding delicate whipped cream into the filling mixture. They also allow you to smoothly spread the cheesecake filling into the pan.
A good spatula ensures a professional finish without deflating your airy components.
The Building Blocks: Ingredients for Your Pistachio Dream Cheesecake
Crafting the Crunchy Crust Foundation
Graham Cracker Crumbs: These form the classic, buttery, and slightly sweet base of our cheesecake. Digestive biscuits or vanilla wafers can be excellent alternatives if graham crackers are unavailable.
If you’re enjoying this pistachio flavor, check out this ultimate pistachio cake for another great option.
Granulated Sugar: A small amount of sugar enhances the sweetness of the crust, complementing the graham crackers beautifully.
Unsalted Butter, Melted: This binds the crumbs together, creating a firm, cohesive crust that won’t crumble. Unsalted butter allows you to control the overall sodium content of your dessert.
Unveiling the Velvety Pistachio Filling
Full-Fat Cream Cheese: The cornerstone of a rich, creamy cheesecake. Ensure it’s fully softened to room temperature for a lump-free, velvety smooth filling.
Granulated Sugar: Sweetens the cream cheese base, balancing its tanginess to create a harmonious flavor profile.
Pistachio Paste (or Extract): This is where the vibrant pistachio flavor truly shines. Paste offers a richer, more authentic taste, while extract provides a convenient alternative that can be enhanced with green food coloring for visual appeal.
Vanilla Extract: A touch of vanilla elevates and rounds out all the other flavors, adding a warm, inviting aroma.
Heavy Cream, Very Cold: Whipped to stiff peaks, cold heavy cream contributes significant lightness and volume to the filling. This creates the airy, yet firm, texture essential for this cheesecake.
Unflavored Gelatin Powder: This is the crucial ingredient that guarantees your Pistachio Dream Cheesecake will set perfectly firm without baking. It provides the necessary structure.
Hot Water: Absolutely essential for properly dissolving the gelatin powder. The hot temperature activates the gelatin’s setting power, ensuring a smooth and effective binding agent.
The Perfect Pistachio Garnish
Chopped Pistachios: These add a beautiful, vibrant green visual appeal to the finished cheesecake. They also provide a wonderful textural contrast and an extra burst of nutty pistachio flavor.
Step-by-Step: Crafting Your Firm Pistachio Dream Cheesecake
-
Laying the Foundation: The Perfect Crust
Combine and Press: In a medium bowl, combine graham cracker crumbs and granulated sugar. Pour in the melted butter and mix until all crumbs are thoroughly moistened. Press this mixture firmly into the bottom of a 9-inch springform pan.
Use the back of a spoon or the bottom of a glass to compact it tightly. This firm pressing is vital for a stable crust that will not crumble when sliced and forms a solid foundation.
Chill for Success: Place the prepared crust in the refrigerator. This pre-chilling allows the butter to solidify, creating a sturdy base and preventing a soggy crust once the filling is added.
-
Unlocking the Firmness: Gelatin Mastery
The “Firmness Secret” Revealed: Sprinkle the unflavored gelatin powder evenly over 1/4 cup of hot water in a small bowl. Whisk immediately and continuously until the gelatin is fully dissolved and there are absolutely no lumps. It should appear as a clear liquid.
Cooling Caution: Set this dissolved gelatin mixture aside to cool slightly. It must not be hot when added to the cream cheese, but also ensure it doesn’t set completely into a jelly. This careful dissolving and cooling is the game-changer for a firm, smooth, non-rubbery cheesecake texture.
-
Building the Velvety Cream Cheese Base
Smooth and Creamy: In a large bowl, beat the softened full-fat cream cheese with 1/2 cup of granulated sugar using an electric mixer until it’s perfectly smooth and creamy. Starting with truly softened cream cheese is key to avoiding any lumps.
Pistachio Infusion: Add the pistachio paste (or pistachio extract and a few drops of green food coloring) and vanilla extract to the cream cheese mixture. Mix until all ingredients are fully combined and the mixture is evenly colored with that beautiful pistachio hue.
-
The Whipped Cream Wonder
Stiff Peak Perfection: In a separate, thoroughly chilled bowl, whip the very cold heavy cream with an electric mixer on medium-high speed. Continue whipping until stiff peaks form, indicating it’s perfectly airy and structured.
Avoid Overbeating: Be vigilant not to overbeat the heavy cream, as this can cause it to become grainy. Achieving stiff peaks ensures the cheesecake has a light, airy texture and contributes significantly to its overall structure.
-
The Gentle Fold: Combining for Structure
Integrating the Gelatin: Gradually pour the slightly cooled, dissolved gelatin mixture into the cream cheese mixture while beating on low speed. Mix just until combined, ensuring the gelatin is evenly distributed without overworking the mixture.
Folding in the Whipped Cream: Using a rubber spatula, gently fold the whipped heavy cream into the cream cheese mixture. Use an upward motion until no streaks remain, taking great care not to deflate the cream. This gentle folding technique is crucial for maintaining the light yet firm texture of your Pistachio Dream Cheesecake.
-
Assembling Your Masterpiece
Layering for Delight: Carefully pour the luscious filling mixture over the chilled crust in the springform pan. Use a spatula to gently smooth the top surface, creating an even layer.
Pistachio Garnish: Sprinkle generously with chopped pistachios over the top of the cheesecake. This adds both beautiful visual appeal and a delightful contrasting texture.
-
The Patience Play: Chilling for Perfection
Non-Negotiable Chill Time: Place the assembled cheesecake in the refrigerator. Chill for a minimum of 6 hours, or preferably overnight. This extended chilling time is absolutely non-negotiable for achieving that guaranteed firm, perfectly sliceable cheesecake you desire.
Resist the Urge: Do not be tempted to cut the cheesecake early. Insufficient chilling will result in a wobbly, unset dessert that lacks the desired firmness and clean slices.
-
The Grand Reveal: Slicing and Serving
Careful Release: Once thoroughly chilled and completely firm, carefully remove the cheesecake from the springform pan. Running a thin, warm knife around the edge before releasing the spring can help ensure a pristine finish.
Perfect Portions: Slice your perfectly firm, absolutely delicious Pistachio Dream Cheesecake into elegant portions. It’s now ready to be served and enjoyed, guaranteed to impress every guest!
Chef’s Secrets: Elevate Your Pistachio Dream Cheesecake Game
-
Mastering the Gelatin Activation
The core secret to a firm cheesecake without baking is perfectly dissolved gelatin. Always sprinkle the powder over hot water, then whisk immediately and continuously until every last lump is gone. Any undissolved gelatin will result in a grainy texture and a less firm set.
-
Temperature is Your Friend (and Foe!)
Ensure your cream cheese is at room temperature and truly softened before beating to achieve a silky smooth filling. Conversely, heavy cream should be very cold, along with a chilled mixing bowl, to whip up quickly and hold stiff peaks effectively. These temperature contrasts are crucial for success.
-
Don’t Deflate the Dream: The Art of Folding
Once your heavy cream is whipped, its airy volume is delicate. When combining it with the cream cheese mixture, use gentle, slow, upward folding motions with a spatula. Overmixing or vigorous stirring will knock out the air, leading to a denser, less appealing cheesecake texture.
-
Pistachio Power: Flavor Intensity
For the most authentic and vibrant pistachio flavor, invest in good quality pistachio paste. If using extract, remember its potency can vary, so taste and adjust as you go. Add a few drops of green food coloring if you desire that signature, eye-catching hue.
-
Patience is a Virtue (Especially for Chilling)
The recommended 6-hour minimum chill time is not a suggestion but a requirement for that guaranteed firm set. Overnight chilling is always the best option. A sufficiently long chill time allows the gelatin to fully activate and the cheesecake to stabilize completely, ensuring clean slices.
-
Perfect Slices Every Time
To achieve clean, professional-looking slices, use a sharp, thin knife. Before each cut, run the knife under hot water and wipe it completely dry. This prevents the filling from sticking and creates beautifully defined portions.
Troubleshooting Your Pistachio Dream Cheesecake
“My cheesecake is still wobbly after chilling!”
This issue almost invariably stems from one of two things: insufficient chilling time or improperly activated gelatin. Reconfirm you’ve given it the full 6 hours, ideally overnight, for the gelatin to fully set.
For gelatin, ensure your hot water was indeed hot and that you whisked continuously until every granule was completely clear and dissolved.
“The crust is crumbling when I slice it.”
The primary reason for a crumbling crust is not pressing it firmly enough into the pan. Use the back of a spoon or the bottom of a glass to compact the crumbs tightly. Ensuring enough melted butter was incorporated is also key for binding the crust effectively.
“My filling is grainy or lumpy.”
Lumps in your filling typically indicate that your cream cheese was not sufficiently softened to room temperature before beating. Ensure it’s very soft. Graininess can sometimes result from overwhipping the heavy cream or if the gelatin wasn’t completely dissolved into a clear liquid.
“The whipped cream deflated when I folded it in.”
This common problem occurs when the whipped cream is either overmixed initially, making it fragile, or when it’s folded into the cream cheese mixture too vigorously. Always use gentle, upward folding motions with a rubber spatula to preserve all that precious air.
Pistachio Dream Cheesecake FAQs
Can I make this cheesecake ahead of time?
Absolutely! This Pistachio Dream Cheesecake is an ideal make-ahead dessert. An overnight chill is actually recommended for achieving the best firm set and allowing the flavors to fully meld. You can confidently prepare it 1-2 days in advance of serving.
How long does this cheesecake last in the refrigerator?
When stored properly in an airtight container or tightly covered with plastic wrap in the refrigerator, your cheesecake will remain fresh and delicious for 3-4 days. Always ensure it’s well-sealed to prevent it from absorbing any unwanted odors.
Can I freeze Pistachio Dream Cheesecake?
Yes, freezing is a great option! For optimal results, freeze the entire cheesecake (without the chopped pistachio topping) until firm. Then, wrap it tightly in plastic wrap, followed by a layer of aluminum foil, and it will keep well for up to 1 month. Thaw it overnight in the refrigerator before serving, and then sprinkle with fresh chopped pistachios.
What can I use if I don’t have pistachio paste?
If authentic pistachio paste is unavailable, you can substitute it with 1 1/2 teaspoons of pistachio extract for the flavor. To replicate the signature green color, simply add a few drops of green food coloring to the filling until you achieve your desired hue. The flavor profile will be slightly different but still delightful.
Is this recipe gluten-free friendly?
This recipe can be easily adapted to be gluten-free. Just swap out the traditional graham cracker crumbs for your favorite gluten-free graham cracker crumbs or another suitable gluten-free cookie crumb. Always double-check that all other ingredients you use are certified gluten-free.
Beyond the Slice: Serving and Storage Suggestions
Elegant Serving Ideas
Showcase the beauty of your Pistachio Dream Cheesecake by serving each pristine slice on its own. For an extra touch of luxury, consider adding a delicate dollop of lightly sweetened whipped cream or a few fresh raspberries. A light drizzle of white chocolate sauce can also create a visually stunning and complementary flavor pairing.
What to Pair with Your Cheesecake
Completing your meal with a savory dish that complements the richness of your pistachio cheesecake is a great idea. Consider these options for a well-rounded experience.
- For a satisfying morning meal, try this Hearty Sausage & Cheese Breakfast Bake, which offers a savory contrast.
- If you’re planning a dinner, the Cheesy Chicken & Rice Bake provides a comforting and flavorful option.
Proper Storage for Lasting Freshness
To maintain its freshness and prevent drying out, always store any leftover cheesecake in an airtight container. If you don’t have an airtight container large enough, cover it tightly with plastic wrap. Keep it refrigerated and avoid leaving it at room temperature for prolonged periods to preserve its quality.
Making Ahead: Your Stress-Free Secret Weapon
Embrace the convenience of this make-ahead dessert. Preparing your cheesecake the day before your event allows it ample time to chill overnight, guaranteeing perfect firmness and flavor development. This strategic planning frees up your day of serving, letting you relax and enjoy your guests.
Ready to Create Your Pistachio Dream Cheesecake Masterpiece?
Now that you’re equipped with all the essential secrets, the right tools, and expert tips, you are perfectly poised to create an unforgettable Pistachio Dream Cheesecake. Trust in the process, follow these meticulous steps, and revel in the joy of crafting a dessert that is not only visually stunning but also flawlessly firm and incredibly delicious.
We’d love to see your culinary triumphs! Please share your gorgeous cheesecake creations with us and tag us on social media. Happy no-baking!
Pistachio Dream Cheesecake
Course: DessertCuisine: American CuisineDifficulty: easy12
servings30
minutes360
minutesAmerican Cuisine
Ingredients
For the Crust:
1 1/2 cups graham cracker crumbs
1/4 cup granulated sugar
1/2 cup unsalted butter, melted
For the Filling:
2 blocks (16 ounces) full-fat cream cheese, softened
1/2 cup granulated sugar
1/4 cup pistachio paste (or 1 1/2 teaspoons pistachio extract and a few drops green food coloring if preferred)
1 teaspoon vanilla extract
1 3/4 cups heavy cream, very cold
1 packet (7 grams) unflavored gelatin powder
1/4 cup hot water
For the Topping:
1/2 cup chopped pistachios
Directions
- Prepare the Crust: In a medium bowl, combine graham cracker crumbs and 1/4 cup granulated sugar. Pour in the melted butter and mix until all crumbs are moistened. Press the mixture firmly into the bottom of a 9-inch springform pan. Use the back of a spoon or the bottom of a glass to really compact it. Place the pan in the refrigerator while you prepare the filling. This firm pressing is key for a stable crust that won’t crumble apart.
- Activate the Gelatin (The Firmness Secret!): In a small bowl, sprinkle the gelatin powder over the 1/4 cup hot water. Whisk immediately and continuously until the gelatin is fully dissolved and there are no lumps. It should be a clear liquid. Set aside to cool slightly, but make sure it doesn’t set. This careful dissolving is the absolute game changer for a firm cheesecake without a rubbery texture.
- Make the Filling Base: In a large bowl, beat the softened cream cheese with the 1/2 cup granulated sugar until smooth and creamy. Add the pistachio paste (or extract and food coloring) and vanilla extract, mixing until fully combined and evenly colored.
- Whip the Cream: In a separate, chilled bowl, whip the very cold heavy cream with an electric mixer on medium-high speed until stiff peaks form. Be careful not to overbeat, as it can turn grainy. Stiff peaks are crucial for the cheesecake’s overall structure and airy texture.
- Combine for Firmness: Gradually pour the slightly cooled, dissolved gelatin mixture into the cream cheese mixture while beating on low speed. Mix until just combined. Gently fold the whipped heavy cream into the cream cheese mixture using a spatula. Fold until no streaks remain, being careful not to deflate the cream. The gentle folding prevents air from being lost, which helps maintain that perfect light yet firm texture.
- Assemble and Chill: Pour the filling over the chilled crust in the springform pan. Smooth the top with a spatula. Sprinkle generously with chopped pistachios.
- Chill Thoroughly: Place the cheesecake in the refrigerator and chill for a minimum of 6 hours, or preferably overnight. This extended chilling time is non-negotiable for achieving that guaranteed firm, sliceable cheesecake you crave. Resist the urge to cut it early!
- Serve: Once fully chilled and firm, carefully remove the cheesecake from the springform pan. Slice and serve your perfectly firm, absolutely delicious Pistachio Dream Cheesecake!
Notes
- The use of gelatin and thorough chilling are key to achieving a perfectly firm, sliceable cheesecake.