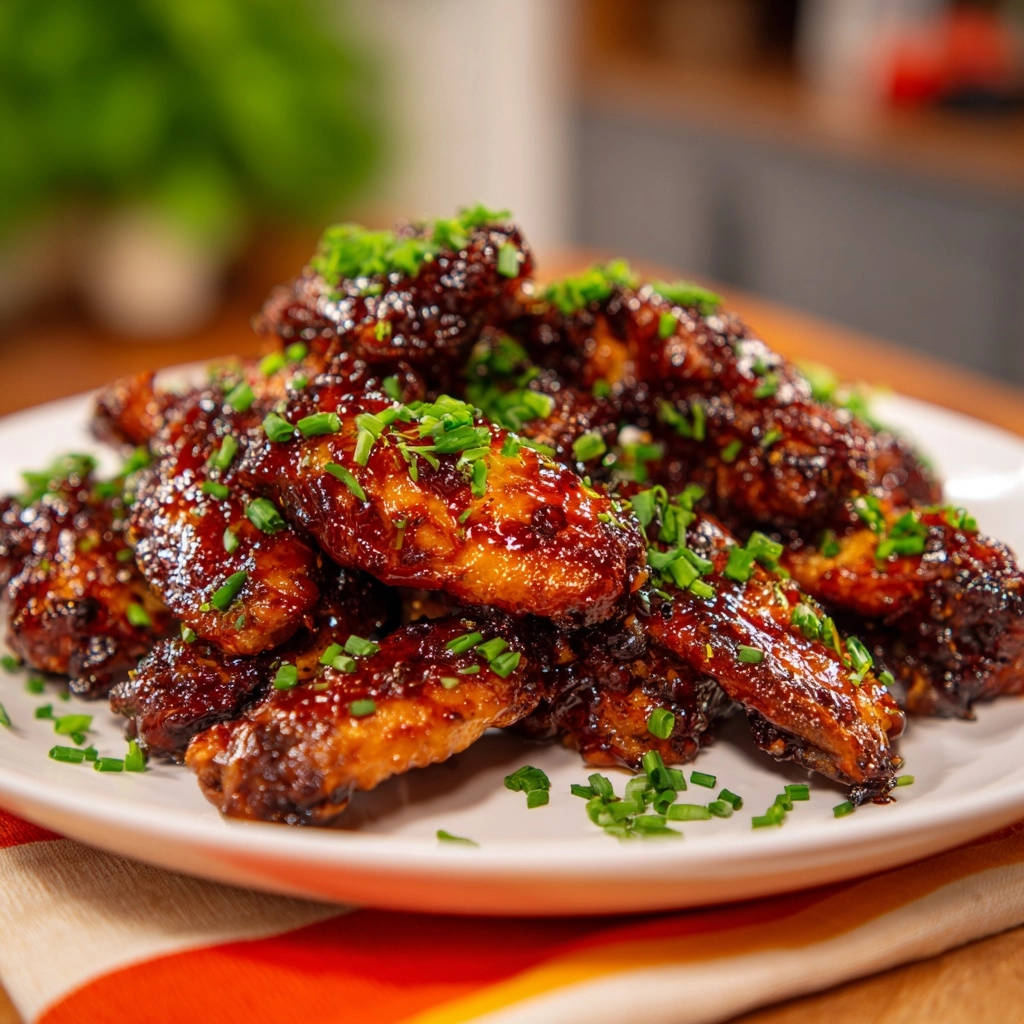
Sticky Garlic Ginger Wings: Foolproof Glaze Perfection
Ever found yourself dreaming of restaurant-quality wings-crispy skin, enveloped in a glossy, unbelievably sticky sauce-only to end up with a sad, watery drizzle at home? We’ve all faced the disappointment of a glaze that just won’t cling.
Those days are officially over with my recipe for Sticky Garlic Ginger Wings, featuring a truly foolproof glaze that clings beautifully to every succulent bite. Get ready to master those irresistible, Asian-inspired wings that promise a burst of sweet and savory flavor, impeccably dressed to impress!
Beyond Basic: Why Our Sticky Garlic Ginger Wings Win Every Time
Unlocking the Foolproof Glaze Mystery
The secret to a glaze that truly sticks isn’t magic; it’s a simple, expert technique. Our recipe demystifies the process by introducing a perfectly balanced cornstarch slurry.
Get Our Best Recipes Weekly!
Join thousands of food lovers and get delicious recipes delivered to your inbox.
This ensures the sauce thickens into a beautiful, syrupy consistency that coats every wing evenly, refusing to drip or become watery.
The Science of Seriously Crispy Skin
Achieving that coveted crispy wing skin is fundamental for superior glaze adherence and texture. We emphasize crucial steps like thoroughly patting the chicken dry.
Baking on a wire rack at the ideal temperature ensures optimal airflow, rendering fat, and delivering that golden, crunchy exterior every time.
A Symphony of Sweet, Savory, and Zingy Flavors
These Sticky Garlic Ginger Wings are a masterclass in flavor balance. The rich umami of low-sodium soy sauce meets the deep caramel notes of brown sugar.
Bright rice vinegar, pungent fresh garlic, and zesty ginger create a harmonious blend that’s both comforting and exciting, leaving you craving more.
Building Blocks of Bliss: What You’ll Need for Your Sticky Garlic Ginger Wings
The Star: Perfect Chicken Wings
Begin with about two pounds of high-quality chicken wings, typically sold pre-separated into drumettes and flats. Ensure they are completely thawed if frozen, as excess moisture is the enemy of crispiness.
Patting them thoroughly dry before seasoning is perhaps the most crucial preparatory step for achieving that desired crunchy texture.
Crafting the Unforgettable Glaze: Essentials
The glaze for these Sticky Garlic Ginger Wings relies on a few pantry staples for its incredible depth. Low-sodium soy sauce provides the savory backbone without overwhelming saltiness.
Packed brown sugar contributes sweetness and a molasses depth, perfectly balanced by the tang of rice vinegar. Freshly grated ginger and minced garlic infuse the sauce with aromatic warmth and a zesty kick.
Our “secret weapon” for foolproof stickiness is cornstarch, expertly combined with cold water to create a slurry that transforms the simmering sauce into a glossy, clingy masterpiece.
Fresh Finishes: Garnish for Flavor and Flair
Finely chopped fresh chives are indispensable for adding a vibrant pop of color and a subtle oniony freshness. They cut through the richness of the glaze beautifully.
For an extra layer of texture and a nutty aroma, a sprinkle of toasted sesame seeds can also elevate these irresistible wings.
Complete Ingredient List:
- 2 pounds chicken wings, separated into drumettes and flats
- 1 tablespoon olive oil
- 1/2 teaspoon salt
- 1/4 teaspoon black pepper
- 1/2 cup low sodium soy sauce
- 1/4 cup packed brown sugar
- 2 tablespoons rice vinegar
- 1 tablespoon freshly grated ginger
- 2 cloves garlic, minced
- 1 tablespoon cornstarch
- 2 tablespoons cold water
- Fresh chives, finely chopped, for garnish
Gear Up for Greatness: Essential Kitchen Tools for Your Wings
Must-Have Equipment for Crispy & Coated Perfection
-
Large Baking Sheet: Crucial for providing ample space for your wings. Lining it with parchment paper or foil makes cleanup a breeze.
-
Oven-Safe Wire Rack: Essential for allowing air to circulate around each wing. This promotes even cooking and unparalleled crispiness, preventing soggy bottoms.
-
Large Mixing Bowls: You’ll need one for tossing the seasoned wings and another for generously coating the hot wings in their sticky glaze.
-
Medium Saucepan: The perfect vessel for simmering your glaze. Choose a heavy-bottomed pan to ensure even heat distribution and prevent scorching.
-
Whisk: Indispensable for creating a smooth cornstarch slurry and ensuring your glaze thickens without lumps.
-
Tongs: Absolutely necessary for flipping wings during baking and, most importantly, for evenly tossing them in that glorious, sticky sauce.
Your Journey to Sticky Garlic Ginger Wing Mastery: A Detailed Guide
-
Oven Prep and Tray Setup
Preheat your oven to a steady 400°F (200°C) to ensure a hot cooking environment from the start. Line a large baking sheet with parchment paper or aluminum foil for effortless cleanup, saving you scrubbing time later.
Place an oven-safe wire rack directly on top of the prepared baking sheet. This setup is fundamental for allowing hot air to circulate completely around each wing, which is key for maximum crispiness.
-
Achieving Peak Crispiness: Drying and Seasoning
This step is non-negotiable for crispy wings: thoroughly pat the chicken wings dry with paper towels. Removing surface moisture is crucial; wet skin steams instead of crisps.
In a large bowl, toss the impeccably dried wings with olive oil, salt, and black pepper, ensuring each piece is lightly coated. Arrange the seasoned wings in a single layer on the wire rack, giving each wing its own space without touching, to further promote even crisping.
-
Bake to Golden Perfection
Bake the wings for 40-45 minutes, flipping them halfway through the cooking time to ensure even browning on all sides. You’re looking for a beautiful golden-brown color and thoroughly cooked chicken.
For an extra level of irresistible crispiness, you can broil the wings for the last 2-3 minutes. Keep a very close eye on them during this stage, as they can go from perfectly crisp to burnt in a flash.
-
The Glaze Genesis: Simmering the Flavor Base
While your wings are baking, it’s time to craft the star of the show: the foolproof sticky glaze. In a medium saucepan, combine the low sodium soy sauce, packed brown sugar, rice vinegar, freshly grated ginger, and minced garlic.
Bring this aromatic mixture to a gentle simmer over medium heat, stirring continuously until the brown sugar has completely dissolved. This ensures a smooth, luscious glaze base.
-
The Sticky Secret: Cornstarch Slurry Magic
Allow the sauce to continue simmering gently for 8-10 minutes; you’ll notice it beginning to naturally reduce and thicken slightly. This concentration of flavor is important.
In a small separate bowl, whisk together the cornstarch and cold water until you have a completely smooth slurry, free of any lumps. This step is critical for a smooth glaze.
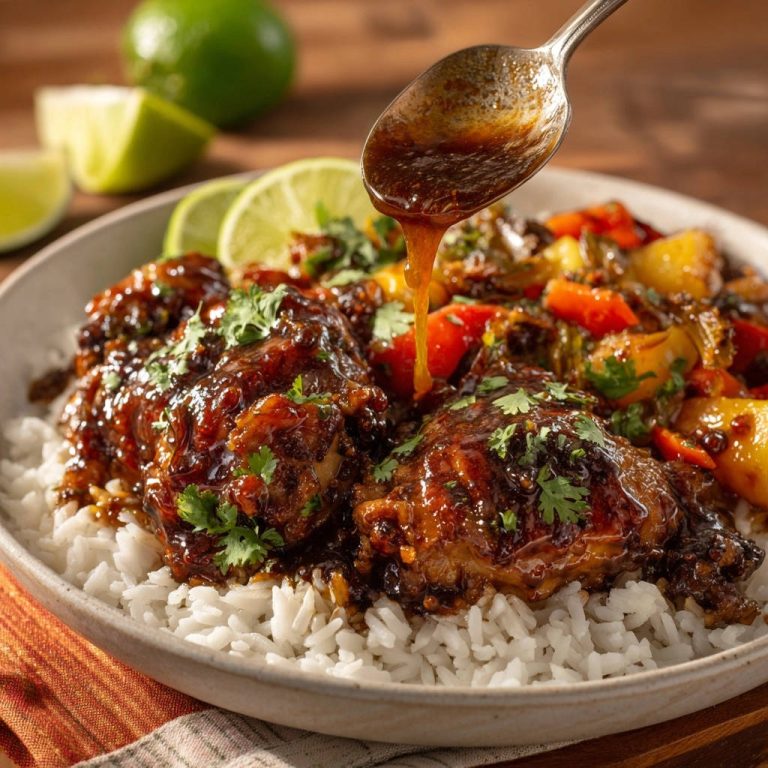
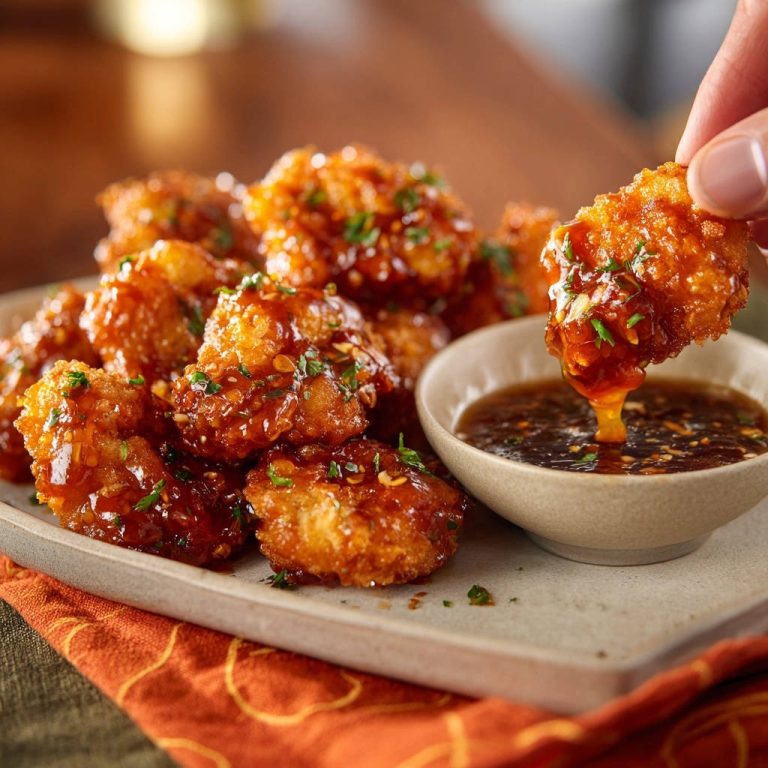
Pour the cornstarch slurry into the simmering sauce, whisking constantly and vigorously to prevent lumps from forming. Continue to simmer and stir for another 1-2 minutes until the sauce transforms into a beautiful, syrupy consistency that coats the back of a spoon with a rich, glossy finish-it should be thick and never watery. Remove from heat immediately once thickened.
-
The Grand Finale: Tossing and Coating
Once your wings are hot and beautifully baked, promptly transfer them directly into a large, clean mixing bowl. This immediate transfer is key to successful coating.
Pour all of the hot, thickened glaze generously over the wings. Using tongs, toss the wings thoroughly and quickly, ensuring every single piece is evenly coated in that magnificent, glossy, sticky sauce. The residual heat from the wings and the warmth of the glaze will help it set perfectly.
-
Presentation Perfect: Garnish and Serve
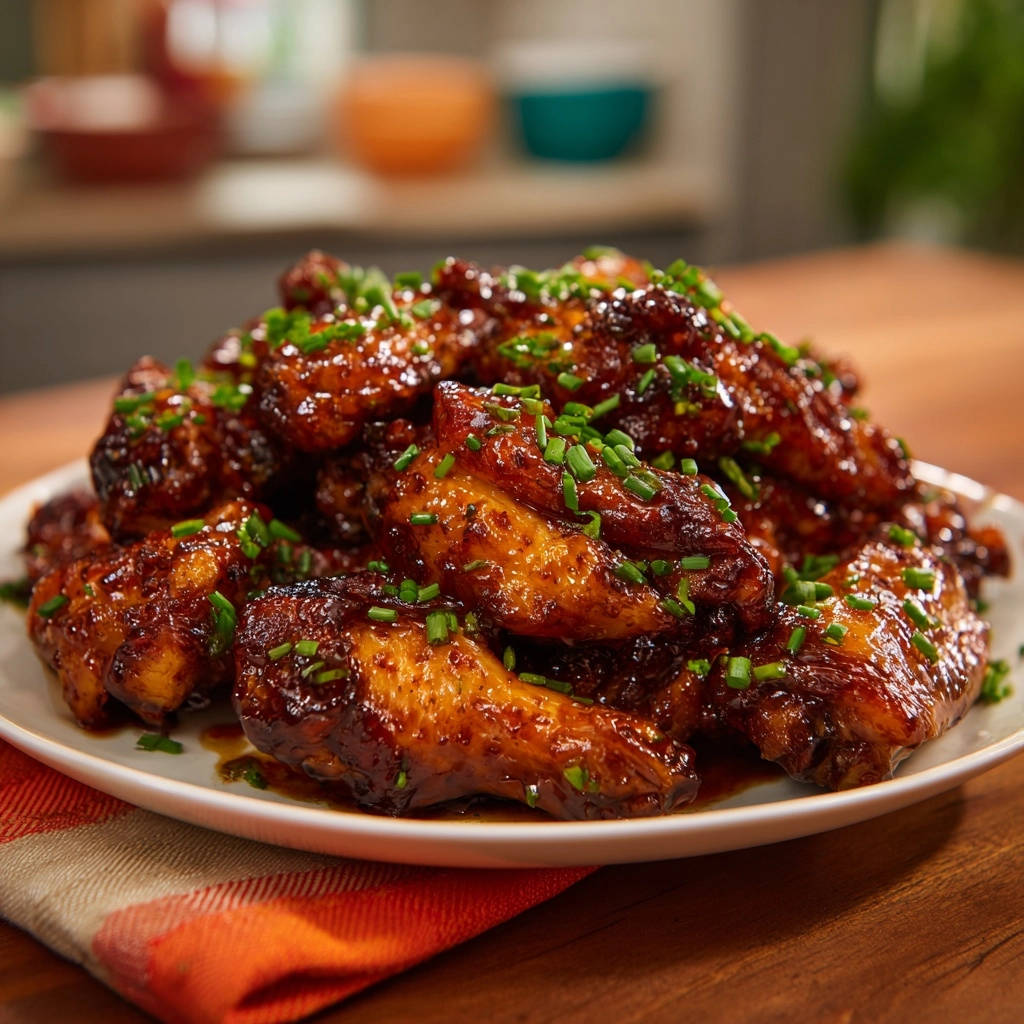
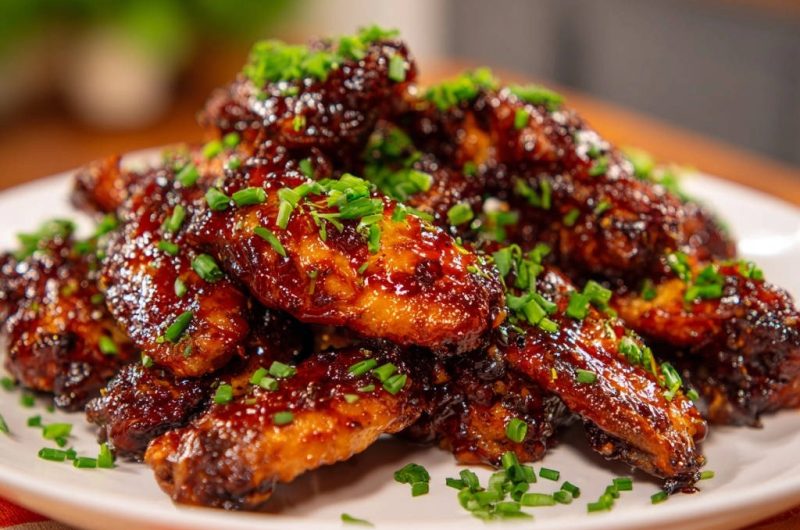
Transfer the gloriously glazed Sticky Garlic Ginger Wings to a serving platter. Generously sprinkle with finely chopped fresh chives, which add a delightful pop of color and a fresh, aromatic counterpoint to the rich sauce.
Serve these irresistible Asian-inspired wings immediately, ensuring they are enjoyed while the glaze is at its stickiest and the wings are at their crispiest. Prepare for them to disappear quickly!
Elevate Your Game: Expert Tips & Tricks for Sticky Garlic Ginger Wings
Don’t Skimp on Drying Your Wings!
Achieving truly crispy skin, which is paramount for the glaze to adhere beautifully, starts with an extremely dry surface. After patting, you can even arrange the raw wings on the wire rack and refrigerate them uncovered for 1-2 hours (or overnight) to air-dry further.
This extra drying time promotes maximum crispness by allowing even more surface moisture to evaporate, ensuring your wings are perfectly primed for baking and coating.
Mastering the Glaze Consistency
The perfect glaze should be thick enough to cling but still pourable. You’ll know it’s right when it coats the back of a spoon thickly, without running off easily, and has a beautiful, glossy sheen.
If your glaze is too thin after adding the slurry, simmer it for another minute or two, stirring constantly. If it becomes too thick, you can whisk in a tablespoon of hot water or chicken broth at a time until the desired consistency is achieved.
Flavor Boosters and Creative Variations
For those who love a bit of heat, consider adding a pinch of red pepper flakes to the glaze mixture along with the ginger and garlic. A squeeze of fresh lime juice just before serving can brighten the entire dish.
Elevate the garnish beyond chives with a sprinkle of toasted white or black sesame seeds for added crunch and a nutty flavor. You can also incorporate a teaspoon of sesame oil into the finished glaze for an extra layer of aromatic richness.
Make-Ahead & Storage Savvy
You can prepare the glaze up to two days in advance; simply store it in an airtight container in the refrigerator and gently reheat it over low heat, whisking until smooth, before tossing with the freshly baked wings.
Leftover Sticky Garlic Ginger Wings can be stored in an airtight container in the refrigerator for up to 3 days. Reheat them gently in a 300°F (150°C) oven or air fryer until warmed through, which helps re-crisp the skin slightly and reactivate the glaze.
Wing Worries No More: Troubleshooting Common Issues
My Glaze Isn’t Sticky Enough!
A watery glaze typically means it hasn’t simmered long enough to reduce, or the cornstarch slurry wasn’t fully activated. Ensure you let the initial sauce simmer for the recommended 8-10 minutes to reduce.
After adding the slurry, whisk constantly for the full 1-2 minutes over medium heat, allowing the cornstarch to fully thicken. If still too thin, mix a tiny additional cornstarch slurry (1/2 tsp cornstarch with 1 tsp cold water) and whisk it in, simmering for another minute.
My Wings Aren’t Crispy!
The primary culprit for non-crispy wings is insufficient drying-make sure they are bone dry before seasoning. Overcrowding the baking sheet also prevents proper air circulation, leading to steaming instead of crisping.
Ensure your oven is accurately preheated to 400°F, and don’t hesitate to use the broil function for the last few minutes (with extreme vigilance!) if they need an extra boost of crispiness.
Sauce Burning in the Pan
Scorched sauce usually indicates the heat was too high or it wasn’t stirred frequently enough. Always use medium heat for simmering, and stir often, especially when the sauce begins to thicken.
Using a heavy-bottomed saucepan helps distribute heat more evenly and reduces hot spots, minimizing the risk of burning and ensuring your glaze remains smooth and delicious.
Your Sticky Garlic Ginger Wings Questions Answered
Can I Use Frozen Wings for This Recipe?
Yes, you can absolutely use frozen chicken wings, but they must be completely thawed first. Thaw them overnight in the refrigerator or in a cold water bath.
After thawing, it’s even more crucial to pat them thoroughly dry to remove any excess moisture from the thawing process, which ensures they crisp up perfectly.
What Are the Best Side Dishes to Serve with These Wings?
These flavorful wings pair beautifully with a variety of simple sides. Classic choices include steamed white or jasmine rice to soak up extra sauce.
Complementary Bites
Round out your meal with these other chicken and beef ideas.
- For another sticky glaze adventure, explore these Sticky Ginger Lime Chicken recipes, featuring similar bright, tangy notes.
- If you enjoy slow-cooked richness, consider the Asian-Style Braised Beef Short Ribs for a tender, savory contrast.
A refreshing coleslaw, a crisp green salad with a light vinaigrette, or some quickly steamed vegetables like broccoli or snap peas provide a lovely balance to the rich, savory flavors.
Can I Make a Larger Batch for a Party?
Yes, this recipe scales well for a crowd! For larger batches, you may need to use multiple baking sheets to ensure the wings are always in a single layer without overcrowding.
Baking in separate batches or using two ovens simultaneously will prevent steaming and ensure every wing gets crispy. Scale the glaze ingredients proportionally.
Is There a Gluten-Free Alternative for the Soy Sauce?
Absolutely! To make these Sticky Garlic Ginger Wings gluten-free, simply substitute the low-sodium soy sauce with an equal amount of Tamari.
Coconut aminos are another excellent gluten-free option that also offers a slightly sweeter, less salty flavor profile, perfect for this Asian-inspired dish.
Ready to Impress? Share Your Sticky Garlic Ginger Wings Masterpiece!
You now hold the secret to truly spectacular Sticky Garlic Ginger Wings – a recipe designed for foolproof results and maximum flavor. Say goodbye to sad, watery sauces and hello to perfectly crispy, gloriously coated wings that will be the highlight of any meal or gathering.
Don’t wait to bring this incredible recipe to your kitchen! Try it tonight, savor every sticky, garlicky, gingery bite, and then come back and tell me all about your delicious success in the comments below!
Sticky Garlic Ginger Wings
Course: AppetizerCuisine: Asian cuisineDifficulty: easy4
servings20
minutes45
minutes60
minutesAsian cuisine
Ingredients
2 pounds chicken wings, separated into drumettes and flats
1 tablespoon olive oil
1/2 teaspoon salt
1/4 teaspoon black pepper
1/2 cup low sodium soy sauce
1/4 cup packed brown sugar
2 tablespoons rice vinegar
1 tablespoon freshly grated ginger
2 cloves garlic, minced
1 tablespoon cornstarch
2 tablespoons cold water
Fresh chives, finely chopped, for garnish
Directions
- Preheat your oven to 400°F (200°C). Line a large baking sheet with parchment paper or foil for easy cleanup. Place an oven-safe wire rack on top of the baking sheet.
- Pat the chicken wings thoroughly dry with paper towels. This step is crucial for getting crispy skin, which helps the glaze stick! In a large bowl, toss the dried wings with olive oil, salt, and black pepper. Arrange the wings in a single layer on the wire rack, ensuring they are not touching.
- Bake for 40-45 minutes, flipping halfway through, until the wings are golden brown and cooked through. For extra crispiness, you can broil for the last 2-3 minutes, watching carefully to prevent burning.
- While the wings bake, prepare your foolproof sticky glaze. In a medium saucepan, combine the soy sauce, brown sugar, rice vinegar, grated ginger, and minced garlic. Bring the mixture to a simmer over medium heat, stirring until the brown sugar is dissolved.
- HERE’S THE SECRET TO THE STICKY GLAZE: Let the sauce continue to simmer gently for 8-10 minutes, stirring occasionally. You’ll notice it start to thicken. In a small bowl, whisk together the cornstarch and cold water until smooth. Pour this cornstarch slurry into the simmering sauce, whisking constantly. Continue to simmer and stir for another 1-2 minutes until the sauce has thickened to a beautiful, syrupy consistency that coats the back of a spoon. It should be thick and glossy, not watery. Remove from heat.
- Once the wings are done baking and are hot, transfer them directly into a large clean bowl. Pour all of the hot, thickened glaze over the wings.
- Using tongs, toss the wings thoroughly until every single piece is evenly coated in that gorgeous, sticky sauce. The heat from the wings and the sauce will help the glaze set perfectly.
- Transfer the glazed wings to a serving platter and generously sprinkle with fresh chopped chives for a pop of color and freshness. Serve immediately and watch them disappear!
Notes
- Pat wings thoroughly dry for crispy skin and optimal glaze adhesion.