Fluffy Chiffon Cake Bites: The Secret to Never-Fail Rise
As a seasoned baker, few things are as disheartening as watching a perfectly puffed chiffon cake slowly deflate out of the oven. I’ve been there, and after years of perfecting, I can confidently say these Fluffy Chiffon Cake Bites are your ultimate solution for an impossibly light, cloud-like texture that truly holds its majestic rise.
This recipe isn’t just about baking; it’s about mastering a simple, ingenious trick that guarantees your chiffon cake stays sky-high and beautifully tender, ready to impress with every delicate bite.
Say Goodbye to Sinking Cakes: Why This Recipe Works Wonders
Achieving that iconic, airy chiffon cake texture without the heartbreak of collapse is a baker’s dream. This recipe for Fluffy Chiffon Cake Bites delivers on that promise, offering a foolproof method for consistent success.
Get Our Best Recipes Weekly!
Join thousands of food lovers and get delicious recipes delivered to your inbox.
The Chiffon Magic: Lightness Without Collapse
Chiffon cake’s appeal lies in its unique hybrid nature, combining the richness of butter cakes with the lightness of sponge cakes. Our recipe amplifies this inherent magic, ensuring an incredibly tender crumb that practically melts in your mouth.
You’ll experience an airy structure that’s robust enough to support itself, creating that coveted cloud-like sensation. It’s a testament to balanced ingredients and precise technique.
The Inversion Advantage: Our Genius No-Sink Trick
The true genius behind our never-fail Fluffy Chiffon Cake Bites lies in one critical, yet often overlooked, step: immediate inversion. As soon as the cake leaves the oven, it must be flipped upside down.
This technique prevents the delicate, air-filled structure from compressing under its own weight as it cools. By allowing the cake to hang, gravity actually helps to stretch and set the cell walls, locking in that magnificent volume and preventing any disheartening sinking.
Gathering Your Cloud-Bite Components: Key Ingredients
Every exceptional cake begins with quality ingredients, and Fluffy Chiffon Cake Bites are no exception. Understanding each component’s role elevates your baking from good to extraordinary.
The Dry Foundation: Flour, Sugar, and Leavening
All-purpose flour provides the essential structure for your cake. Its protein content balances tenderness with strength.
Granulated sugar is divided, contributing sweetness and moisture to the batter, while also stabilizing the meringue.
Baking powder is your chemical leavener, providing an initial lift in the oven. Salt enhances all the flavors, balancing the sweetness.
Enriching Liquids: Yolks, Oil, and Flavor
Egg yolks are crucial for richness, contributing to the cake’s golden hue and moist crumb. They add a depth of flavor that’s distinctly chiffon.
Vegetable oil is key to chiffon’s signature tenderness and moistness. Unlike butter, oil remains liquid at room temperature, keeping the cake soft and pliable.
Water hydrates the flour and helps create the right consistency. Vanilla extract infuses a classic, comforting aroma and taste, a perfect complement to the airy texture.
The Meringue’s Might: Egg Whites and Cream of Tartar
Egg whites are the primary leavener, whipped into a stable meringue that traps air, providing the bulk of the cake’s incredible lift and lightness. Their freshness is paramount.
Cream of tartar is an acidic stabilizer. It helps the egg whites whip faster, achieve greater volume, and form a more stable meringue that won’t easily collapse, even under the stress of folding.
Sweet Accoutrements: Whipped Cream Essentials
Heavy cream, when very cold, whips into a luscious, airy topping that perfectly complements the cake’s texture. Its high fat content allows it to hold its shape.
Powdered sugar sweetens the cream subtly and helps stabilize it without adding grit. A touch of vanilla extract enhances the cream’s flavor, mirroring the cake’s notes.
Essential Gear for Fluffy Chiffon Cake Bites Success
Having the right tools is just as important as the right ingredients when baking delicate cakes like chiffon. These key pieces of equipment ensure your success.
The Right Pan Makes All the Difference
An ungreased 10-inch tube pan with a removable bottom is absolutely non-negotiable for Fluffy Chiffon Cake Bites. The batter needs to cling to the ungreased sides to climb and achieve its maximum height during baking.
Many tube pans come with small feet, specifically designed to keep the cake suspended when inverted, which is critical for cooling.
Mixing Up Perfection: Your Kitchen Companions
An electric mixer (either stand or hand-held) is essential for whipping egg whites to stiff peaks, a task that would be arduous by hand. Its consistent power ensures optimal aeration.
You’ll need several large mixing bowls to keep wet and dry ingredients separate before combining, and a very clean bowl for the egg whites. A flexible spatula is indispensable for gentle folding, preserving precious air.
A sturdy whisk is perfect for combining dry ingredients and initial wet ingredient mixing, ensuring a smooth, lump-free base.
Mastering the Fluffy Chiffon Cake Bites Method: Step-by-Step
Follow these detailed steps closely to achieve perfect, never-sinking Fluffy Chiffon Cake Bites every time. Precision is key to chiffon success!
- Prepare Your Dry Ingredients:
Preheat your oven to 325F (160C). In a large bowl, whisk together the all-purpose flour, 3/4 cup of the granulated sugar, baking powder, and salt. This ensures uniform distribution for an even rise and prevents pockets of leavener.
- Combine Wet Ingredients:
In a separate medium bowl, whisk together the vegetable oil, egg yolks, water, and vanilla extract until well combined. Aim for a homogenous mixture with no streaks of yolk.
- Unite Wet and Dry:
Pour the wet ingredients into the dry ingredients and whisk until just smooth. Mix only until the flour is incorporated, avoiding overmixing to prevent gluten development, which can lead to a dense cake.
- Whip the Egg Whites to Perfection:
In a very clean, dry large bowl, beat the egg whites with an electric mixer on medium speed until foamy. Add the cream of tartar and continue beating until soft peaks form.
Gradually add the remaining 3/4 cup of granulated sugar, one tablespoon at a time, beating on high speed until stiff, glossy peaks form. Be careful not to overbeat, as this can make the meringue dry and difficult to fold.
- Gently Fold the Meringue:
Gently fold about one-third of the egg white mixture into the batter to lighten it. This initial incorporation helps to temper the heavier batter, making subsequent folding easier and preventing shock to the delicate meringue.
Carefully fold in the remaining egg whites in two additions until just combined. Use a gentle cutting and folding motion with your spatula, always preserving the air bubbles for maximum fluffiness and lightness.
- Prepare for Baking:
Pour the batter into an ungreased 10-inch tube pan (with a removable bottom). Remember, the batter needs to cling to the sides to climb and rise effectively; greasing will prevent this. Smooth the top gently with your spatula.
- Bake to Golden Perfection:
Bake for 50-60 minutes, or until the top springs back when lightly touched and a wooden skewer inserted into the center comes out clean. An underbaked cake will sink more easily, so ensure it’s fully cooked.
- The Critical Inversion Step:
Immediately after removing the cake from the oven, invert the pan. Use the pan’s feet if it has them, or carefully invert it over the neck of a sturdy glass bottle to suspend it.
Let the cake hang upside down and cool completely for at least 1 1/2 to 2 hours. This crucial step prevents the delicate, airy structure from compressing under its own weight as it cools, ensuring a never-sinking result.
- Release and Prepare for Serving:
Once completely cool, run a thin, sharp knife around the edges of the pan and the center tube to release the cake. Then, push up the removable bottom to free the cake completely.
- Whip Up the Cream:
For the whipped cream, combine the very cold heavy cream, powdered sugar, and vanilla extract in a chilled bowl. Beat with an electric mixer on high speed until firm peaks form. Chill until ready to serve.
- Serve Your Fluffy Bites:
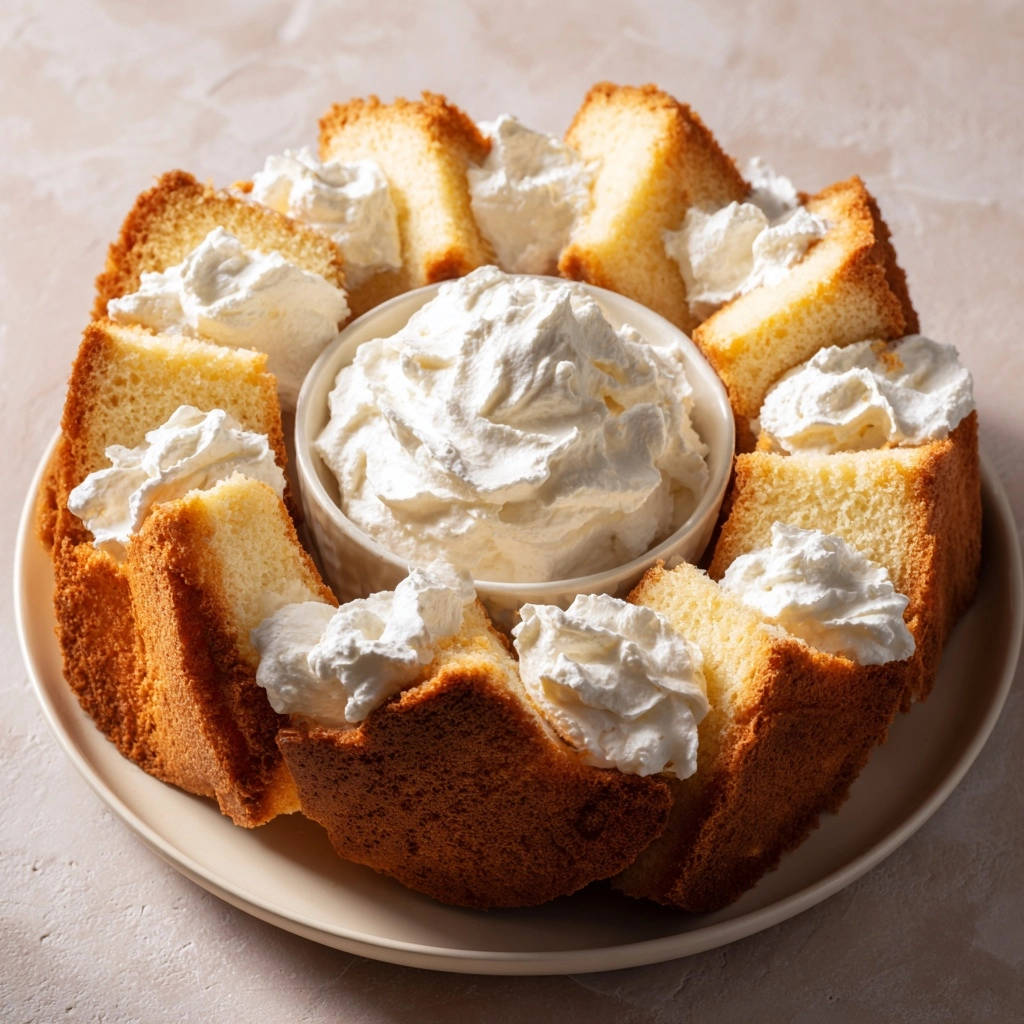
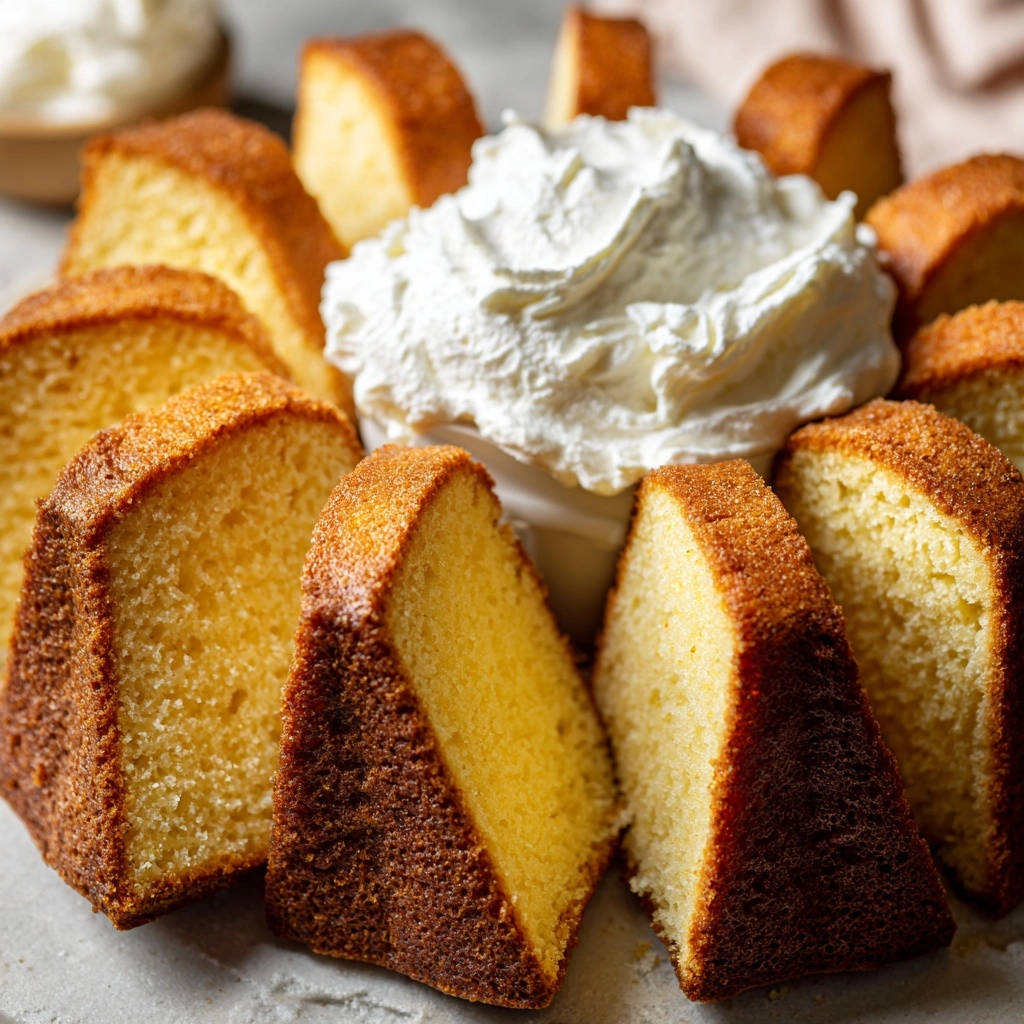
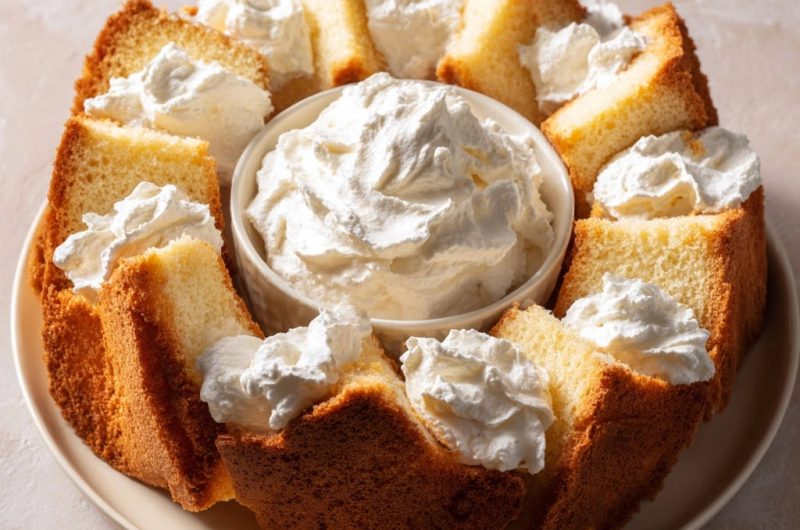
Cut the chiffon cake into slices or wedges, arrange on a platter with a bowl of whipped cream in the center, and dollop extra whipped cream on each slice. Enjoy your perfectly risen, never-sinking Fluffy Chiffon Cake Bites!
Chef’s Secrets for Irresistible Fluffy Chiffon Cake Bites
Achieving the perfect Fluffy Chiffon Cake Bites involves a few expert insights that make all the difference. These tips will elevate your baking game.
Meringue Mastery: Achieving Stiff, Glossy Peaks
Always start with a meticulously clean, dry bowl, free of any grease, as fat can prevent egg whites from whipping properly. Gradual addition of sugar, a tablespoon at a time, allows it to dissolve evenly and create a stable, glossy meringue.
Beat until the peaks hold their shape firmly when the beaters are lifted, but stop just before they look dry or crumbly. Overbeating can cause the meringue to break and lose its airy structure.
The Art of Folding: Keeping Your Batter Light
Folding is a gentle technique designed to incorporate the meringue into the batter without deflating the trapped air. Use a wide, flexible spatula, cutting down through the center of the batter, then gently bringing it up and over.
Work quickly but delicately, turning the bowl as you fold. Stop as soon as the meringue is just combined, as continued folding will only compress the air and lead to a denser cake.
Don’t Grease That Pan! Understanding Chiffon’s Climb
This is a fundamental rule for chiffon cake. Unlike other cakes, chiffon needs to climb the sides of the pan to achieve its signature towering height and airy texture. A greased surface would prevent the batter from clinging, causing it to slip back down.
The ungreased tube pan provides the necessary friction and support for the cake to expand upwards during baking, crucial for these Fluffy Chiffon Cake Bites.
Cooling Upside Down: Patience is a Virtue (and a Necessity!)
The immediate inversion and complete cooling, typically for 1.5 to 2 hours, is non-negotiable. During cooling, the cake’s delicate, warm structure is still fragile and susceptible to collapsing under its own weight.
Hanging it upside down allows gravity to pull the cake downwards, gently stretching and setting its cell walls as it cools. This action reinforces the airy structure, ensuring your cake maintains every bit of its impressive rise.
Common Challenges & Simple Solutions for Chiffon Cake Bites
Even expert bakers encounter hiccups. Here are common chiffon cake challenges and straightforward solutions to ensure your Fluffy Chiffon Cake Bites are always a triumph.
Why Did My Cake Sink After Cooling?
This is often the most heartbreaking challenge. The most common cause is not inverting the cake immediately after removing it from the oven, or not allowing it to cool completely in the inverted position.
An underbaked cake also lacks sufficient structure, making it prone to sinking. Additionally, opening the oven door too early can cause a sudden temperature drop, leading to collapse.
My Meringue Won’t Form Stiff Peaks!
Meringue failure is usually due to fat contamination. Ensure your mixing bowl and beaters are impeccably clean and dry, as even a tiny speck of egg yolk or grease can prevent the whites from whipping.
Not enough cream of tartar or beating at too low a speed can also be culprits. Overbeating the whites past stiff peaks can cause them to become dry and brittle, losing their stability.
The Cake Texture is Dense or Gummy
A dense or gummy texture points to issues with aeration or gluten development. Overmixing the batter, especially after adding the flour, develops too much gluten, leading to toughness.
Deflating the meringue during the folding process means you’ve lost critical air bubbles. Ensure your baking temperature is accurate; too low, and the cake won’t set properly, leading to a heavy texture.
Serving, Storing, and Enjoying Your Fluffy Chiffon Cake Bites
Once you’ve mastered these Fluffy Chiffon Cake Bites, you’ll want to enjoy them at their best. Here’s how to serve, store, and even prepare them ahead of time.
Complementary Dishes
To round out your meal with the Fluffy Chiffon Cake Bites, consider these satisfying options.
- For a comforting and complete meal, try this Classic Chicken Pot Pie, offering a savory contrast to your sweet treat.
- Enjoy a hearty start to your day or a late-night bite with the Hearty Sausage & Cheese Breakfast Bake, which shares a focus on achieving a fluffy texture.
Creative Serving Ideas for Delightful Bites
While classic whipped cream is delightful, these Fluffy Chiffon Cake Bites are wonderfully versatile. Consider serving them with a vibrant fresh berry compote, or a tangy lemon curd for a burst of flavor.
A dusting of cocoa powder or a drizzle of melted chocolate adds elegance, or infuse them with a tropical twist using passion fruit glaze. They are also exquisite with a simple fruit compote or even a light dusting of powdered sugar.
Keeping Your Chiffon Fresh: Storage Tips
To maintain their ethereal lightness, store Fluffy Chiffon Cake Bites in an airtight container at room temperature for up to 2 days if not frosted. If topped with whipped cream, they must be refrigerated.
When refrigerated, the cake should be covered loosely to prevent it from drying out, and consumed within 3-4 days. Allow refrigerated cake to come to room temperature briefly for optimal texture.
Can I Make Fluffy Chiffon Cake Bites Ahead of Time?
Absolutely! The chiffon cake itself, unfrosted, can be baked a day in advance and stored at room temperature in an airtight container. This actually allows the flavors to meld beautifully.
The whipped cream is best made fresh, no more than a few hours before serving, and kept chilled. This ensures its peak fluffiness and stability, providing the perfect accompaniment to your Fluffy Chiffon Cake Bites.
Your Fluffy Chiffon Cake Bites Questions Answered
Let’s address some common questions to empower you with confidence in baking your Fluffy Chiffon Cake Bites.
What Kind of Pan is Best for Chiffon Cake?
The ideal pan is a 10-inch aluminum tube pan with a removable bottom. The ungreased aluminum surface allows the cake batter to cling and climb, achieving maximum height.
Avoid non-stick or glass pans, as they don’t provide the necessary grip. Pans with small “feet” are a bonus, making the essential inversion step much easier.
Can I Make This Gluten-Free?
Yes, you can substitute a good quality 1:1 gluten-free baking flour blend for the all-purpose flour. Be aware that the texture might be slightly different, perhaps a touch more delicate or crumbly.
Ensure your chosen blend contains xanthan gum, or add 1/2 teaspoon per cup of flour, to help with structure.
Why Do I Need Cream of Tartar?
Cream of tartar is a crucial acidic component that helps stabilize the egg whites. It prevents them from collapsing, allowing them to whip up faster and achieve higher, more stable peaks that hold their form.
This stability is essential for creating the light, airy structure of Fluffy Chiffon Cake Bites that won’t deflate.
Can I Flavor My Fluffy Chiffon Cake Bites Differently?
Certainly! Feel free to experiment. You can add citrus zest (lemon, orange, or lime) to the batter for a bright note, or a different extract like almond or coconut for a unique twist.
For a subtle change, infuse the water with your favorite tea, or swirl in a tablespoon of cocoa powder for a delicate chocolate chiffon cake. Always taste and adjust to your preference!
Ready to Bake? Share Your Fluffy Chiffon Cake Bites Masterpiece!
Now that you’re equipped with all the secrets and strategies, it’s time to create your own show-stopping Fluffy Chiffon Cake Bites. Experience the sheer delight of pulling a perfectly risen cake from the oven, knowing it will never sink.
This recipe isn’t just about baking; it’s about building confidence and sharing joy. Go ahead, bake a batch, dollop with creamy sweetness, and watch as these cloud-like treats bring smiles to everyone’s faces!
Fluffy Chiffon Cake Bites
Course: DessertCuisine: American CuisineDifficulty: easy12
servings30
minutes55
minutes180
minutesAmerican Cuisine
Ingredients
For the Chiffon Cake:
1 1/2 cups all-purpose flour
1 1/2 cups granulated sugar, divided
1 tablespoon baking powder
1/2 teaspoon salt
1/2 cup vegetable oil
6 large egg yolks
3/4 cup water
1 teaspoon vanilla extract
8 large egg whites
1/2 teaspoon cream of tartar
For the Whipped Cream:
1 1/2 cups heavy cream, very cold
1/4 cup powdered sugar
1/2 teaspoon vanilla extract
Directions
- Preheat your oven to 325F (160C). In a large bowl, whisk together the flour, 3/4 cup of the granulated sugar, baking powder, and salt.
- In a separate medium bowl, whisk together the vegetable oil, egg yolks, water, and vanilla extract until well combined. Pour the wet ingredients into the dry ingredients and whisk until just smooth. Set aside.
- In a very clean, dry large bowl, beat the egg whites with an electric mixer on medium speed until foamy. Add the cream of tartar and continue beating. Gradually add the remaining 3/4 cup of granulated sugar, one tablespoon at a time, beating on high speed until stiff, glossy peaks form. Be careful not to overbeat.
- Gently fold about one-third of the egg white mixture into the batter to lighten it, then carefully fold in the remaining egg whites in two additions until just combined, being careful not to deflate the mixture.
- Pour the batter into an ungreased 10-inch tube pan (with a removable bottom). Do not grease the pan; the batter needs to cling to the sides to climb and rise. Smooth the top gently.
- Bake for 50-60 minutes, or until the top springs back when lightly touched and a wooden skewer inserted comes out clean.
- THIS IS THE CRITICAL STEP TO PREVENT SINKING: Immediately after removing the cake from the oven, invert the pan. Many tube pans have little feet for this purpose, or you can invert it over the neck of a bottle. Let the cake hang upside down and cool completely for at least 1 1/2 to 2 hours. This prevents the delicate, airy structure from compressing under its own weight as it cools.
- Once completely cool, run a thin knife around the edges of the pan and the center tube to release the cake.
- For the whipped cream, combine the cold heavy cream, powdered sugar, and vanilla extract in a chilled bowl. Beat with an electric mixer on high speed until firm peaks form.
- Cut the chiffon cake into slices or wedges, arrange on a platter with a bowl of whipped cream in the center, and dollop extra whipped cream on each slice. Enjoy your perfectly risen, never-sinking chiffon cake!
Notes
- The critical step to prevent sinking is to invert the cake immediately after baking and cool completely upside down.