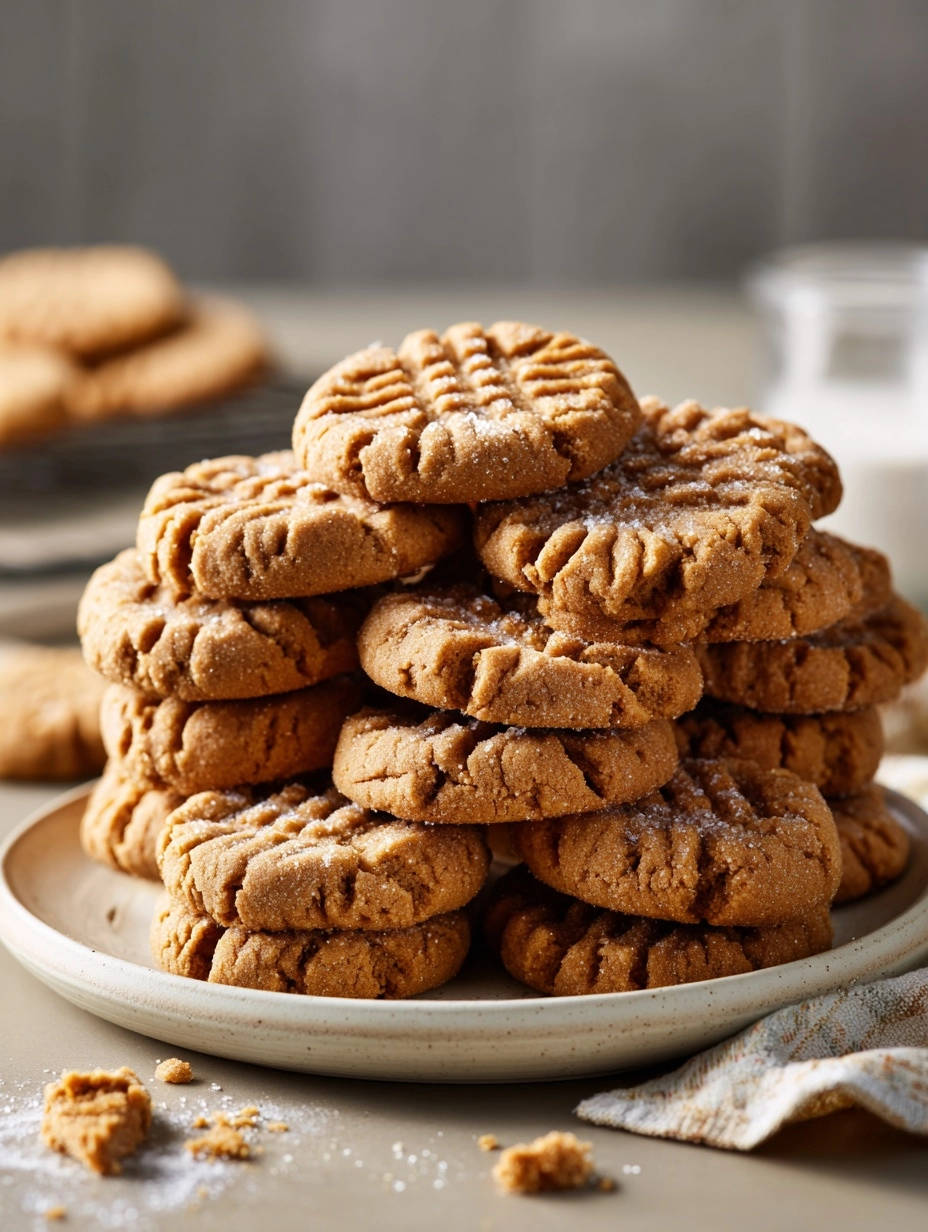
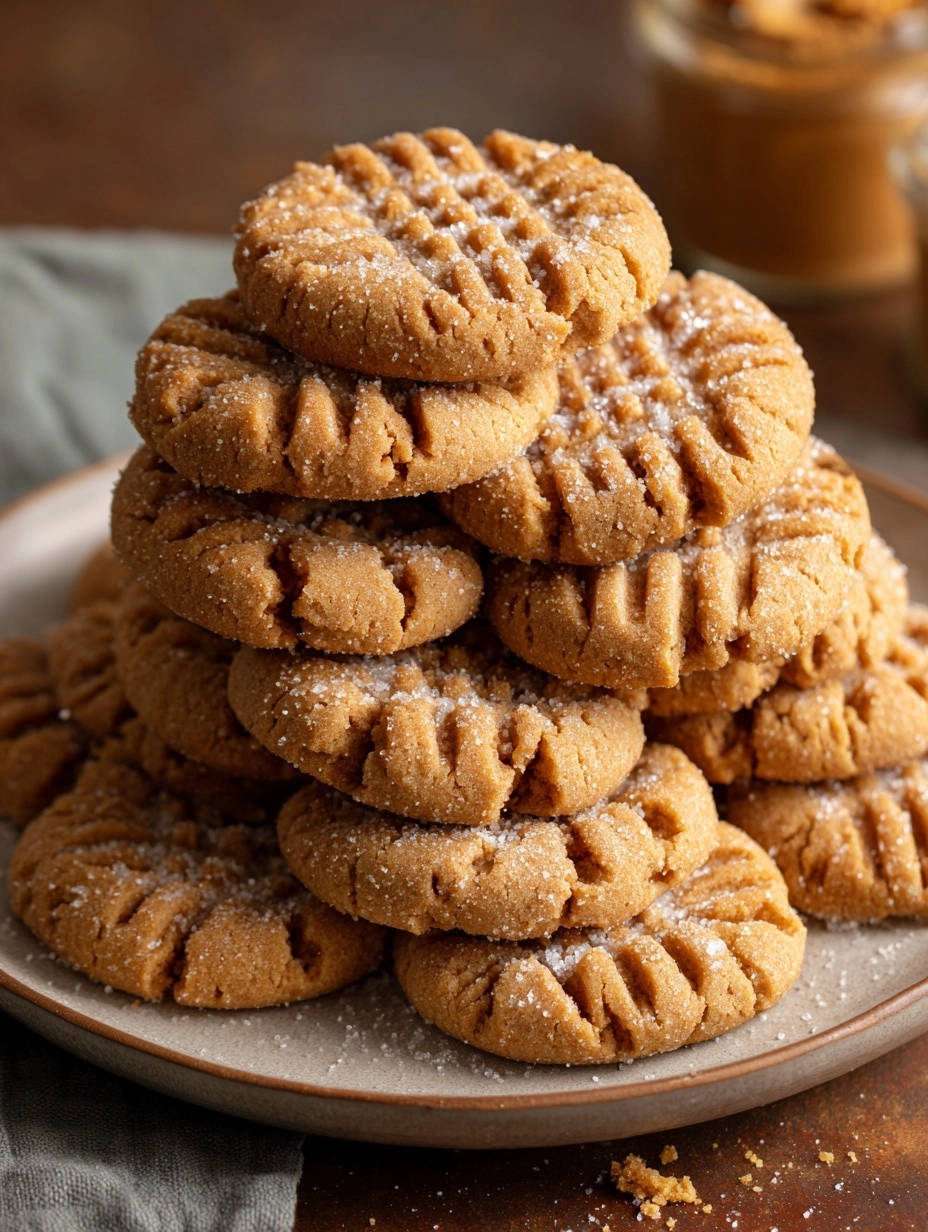
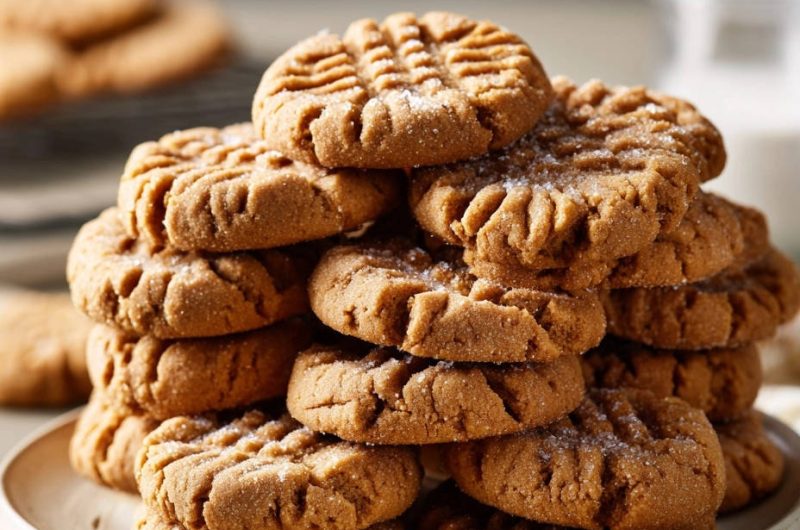
Classic Peanut Butter Cookies: Perfectly Soft & Chewy Every Time
Have you ever baked a batch of Classic Peanut Butter Cookies only to find them dry, crumbly, or disappointingly flat? We’ve all been there, but that ends today!
This foolproof recipe delivers an unbelievably soft, perfectly chewy, melt-in-your-mouth texture every single time, transforming your homemade Classic Peanut Butter Cookies into an instant family favorite.
Why This Classic Peanut Butter Cookies Recipe Is Your New Go-To
This isn’t just another cookie recipe; it’s a meticulously crafted method designed for consistent success. We focus on specific techniques that elevate these simple ingredients into something truly extraordinary.
Get Our Best Recipes Weekly!
Join thousands of food lovers and get delicious recipes delivered to your inbox.
Guaranteed Soft and Chewy, Never Dry or Crumbly
The secret lies in balancing ingredients and precise timing. We ensure that our cookies retain maximum moisture through careful dough preparation and strategic baking cues, preventing the dreaded dry and crumbly outcome.
Each bite offers that satisfying chewiness combined with a tender, soft interior, making these Classic Peanut Butter Cookies truly irresistible.
Mastering the Melt-in-Your-Mouth Texture: Our Proven Method
Achieving that coveted melt-in-your-mouth quality requires attention to detail. Our method emphasizes the crucial step of proper creaming, which incorporates essential air for a lighter crumb.
We also highlight the importance of chilling the dough to control spread and enhance chewiness, alongside precise baking times that ensure the perfect set without over-drying.
Unlocking Rich, Authentic Peanut Butter Flavor
This recipe celebrates the pure, comforting taste of peanut butter. By using a generous amount of creamy peanut butter and complementing it with vanilla, we allow its nutty depth to shine through beautifully.
The balance of sugars further enhances the flavor profile, creating a truly authentic and satisfying peanut butter cookie experience.
Gather Your Essentials: Simple Ingredients, Spectacular Flavor
High-quality ingredients are the foundation of any great cookie. Here’s what you’ll need and why each plays a vital role in our Classic Peanut Butter Cookies.
Dairy & Sweeteners: The Foundation of Texture and Sweetness
Unsalted Butter (softened): This provides richness and moisture. Softened butter creams beautifully with sugar, incorporating air that contributes to a light, tender crumb.
Granulated Sugar: Beyond sweetness, granulated sugar helps create a slightly crisp edge and aids in spreading the cookies just enough.
Light Brown Sugar (packed): The molasses in brown sugar is key for chewiness and moisture, adding depth of flavor and keeping the cookies soft for longer.
The Star of the Show: Creamy Peanut Butter
Creamy Peanut Butter: A full cup of creamy peanut butter is the heart of these cookies. Its smooth texture is essential for the soft, uniform consistency we’re aiming for.
For this specific recipe, we advise against natural or crunchy peanut butter, as their oil separation and chunky texture can alter the final spread and softness.
Dry Goods: Structure, Lift, and Balance
All-Purpose Flour: This provides the necessary structure for the cookies, giving them shape and stability.
Baking Soda: Our leavening agent, baking soda, reacts with the brown sugar to provide lift, contributing to the cookie’s soft, slightly puffy texture.
Salt: A small amount of salt is crucial for balancing the sweetness and enhancing all the other flavors, making the peanut butter taste even more prominent.
A Touch of Warmth: Vanilla Extract
Vanilla Extract: Vanilla is a powerful flavor enhancer. It deepens the overall warmth and aroma of the cookies, complementing the peanut butter beautifully.
Your Baking Toolkit: Essential Equipment for Success
Electric Mixer (Stand or Handheld): Indispensable for achieving light and fluffy creamed butter and sugars, crucial for texture.
Large Mixing Bowls (x2): For separating wet and dry ingredients effectively and for comfortable mixing.
Whisk: To evenly combine dry ingredients, preventing clumps.
Rubber Spatula: Essential for scraping down bowls and ensuring thorough incorporation of all ingredients.
Measuring Cups and Spoons: For accurate ingredient proportions, which is key to consistent results.
Parchment Paper: Prevents sticking, ensures even baking, and makes cleanup a breeze.
Baking Sheets: The stage for your cookies; have at least two for efficient baking.
Wire Cooling Rack: Crucial for proper air circulation, allowing cookies to cool completely and set.
Dinner Fork: For creating that iconic crisscross pattern, a hallmark of classic peanut butter cookies.
Crafting Perfection: A Step-by-Step Guide to Classic Peanut Butter Cookies
Follow these detailed steps to create your most perfect batch of homemade peanut butter cookies yet.
- Cream Butter and Sugars Until Fluffy:
In a large mixing bowl, combine the softened unsalted butter, 1/2 cup granulated sugar, and 1/2 cup packed light brown sugar.
Using an electric mixer on medium speed, cream them together for 2-3 minutes until the mixture is light, fluffy, and visibly paler.
This careful creaming process is crucial as it incorporates air pockets, which are vital for achieving the soft, melt-in-your-mouth texture that defines these cookies.
- Incorporate Wet Ingredients:
Beat in the large egg until well combined with the creamed mixture.
Next, add the 1 cup of creamy peanut butter and 1 teaspoon of vanilla extract, beating until smooth and thoroughly incorporated.
Remember to scrape down the sides of the bowl with a rubber spatula to ensure all ingredients are evenly mixed.
- Combine Dry and Wet Ingredients (No Overmixing!):
In a separate, medium-sized bowl, whisk together the 1 1/4 cups all-purpose flour, 1/2 teaspoon baking soda, and 1/4 teaspoon salt.
Gradually add these dry ingredients to the wet mixture, mixing on low speed with your electric mixer until just combined.
This step is critical: do not overmix! Overmixing develops gluten, which will lead to tough, dense cookies instead of the desired soft and chewy texture. Stop mixing as soon as no dry streaks remain.
- Chill the Dough: The Secret to Thick, Chewy Cookies:
Cover the bowl of cookie dough with plastic wrap and refrigerate it for at least 30 minutes, or up to 2 hours.
This chilling period is the essential secret step that prevents your cookies from spreading too much during baking, ensuring they bake up thick, chewy, and perfectly lock in moisture and flavor.
- Preheat Oven & Prepare Baking Sheets:
Preheat your oven to 375°F (190°C).
Line baking sheets with parchment paper; this step prevents sticking and promotes even baking.
- Roll, Press, and Garnish:
Remove the chilled dough from the refrigerator and roll it into uniform 1-inch balls.
Place the dough balls about 2 inches apart on the prepared baking sheets.
Using a fork, gently press down on each cookie ball in a classic crisscross pattern. For an extra touch of sweetness and sparkle, lightly dust the top of each pressed cookie with a little granulated sugar.
- Bake to Golden Perfection (Don’t Overbake!):
Bake for 8-10 minutes, or until the edges are lightly golden and set, but the centers still look slightly soft.
This precise baking time is crucial for chewiness; pulling them out when the centers still appear a bit soft prevents them from drying out. They will continue to set and firm up on the baking sheet.
- Cool Completely for Best Texture:
Let the baked cookies cool on the baking sheets for 5 minutes before carefully transferring them to a wire rack.
Allow them to cool completely on the wire rack. This final cooling process allows the cookies to fully set and achieve their perfect soft and chewy texture. Enjoy your perfectly baked Classic Peanut Butter Cookies!
Beyond the Recipe: Expert Tips for Your Best Peanut Butter Cookies Yet
Take your peanut butter cookie baking to the next level with these expert insights.
The Art of Proper Creaming: Don’t underestimate the initial creaming step. Aim for a mixture that’s truly light, airy, and pale in color. This process creates essential air pockets that contribute significantly to the soft, tender crumb.
Avoid the Gluten Trap: As mentioned in the directions, overmixing flour develops gluten, leading to tough cookies. Mix only until the ingredients are just combined, and no dry flour streaks remain. A slightly lumpy dough is perfectly fine.
Embrace the Chill Time: The refrigerator chilling isn’t optional; it’s a game-changer. It solidifies the butter, preventing excessive spreading, and allows the flavors to meld beautifully, resulting in thicker, chewier, and more flavorful cookies.
Perfect Baking Cues: Always look for cookies that have lightly golden edges but still appear slightly underdone or soft in the center when removed from the oven. They will continue to firm up on the hot baking sheet, ensuring optimal chewiness.
Temperature Precision: Ensure your butter is truly softened, not melted or too cold. Butter that’s too warm can make the dough greasy and lead to flat cookies, while cold butter won’t cream properly.
The Fork Technique: For a clean, classic crisscross pattern, lightly flour your fork tines between each cookie press. This prevents sticking and ensures a crisp impression.
Cookie Conundrums Solved: Troubleshooting Your Classic Peanut Butter Cookies
Even experienced bakers encounter hiccups. Here’s how to troubleshoot common issues with Classic Peanut Butter Cookies.
My Cookies Are Too Flat or Spread Too Much!
This often happens if your butter was too soft or even melted. Ensure your butter is just softened, not greasy.
Insufficient chilling time is another culprit. The dough needs to be firm for proper baking and minimal spread.
Also double-check your leavening agents; old or incorrect baking soda can affect cookie rise.
My Cookies Came Out Dry or Hard!
Overmixing the dough is a primary cause of tough, dry cookies. Gluten develops quickly with too much agitation, so mix until just combined.
Overbaking is another common issue. Remember, the centers should still look slightly soft when you remove them from the oven; they’ll finish baking on the hot sheet.
The Dough is Too Sticky to Roll into Balls!
Your dough likely needs more chill time. Colder dough is significantly firmer and much easier to handle.
In extremely humid conditions, you might consider adding an extra tablespoon of flour, but only as a last resort and very carefully.
My Fork Crisscross Pattern Isn’t Defined!
Lightly flouring your fork tines between each cookie will prevent sticking and create a much cleaner, sharper impression.
Ensure your dough is adequately chilled. A firm, cold dough holds its shape better when pressed.
Enjoying & Preserving Your Peanut Butter Masterpiece
You’ve baked perfection; now learn how to enjoy and keep your Classic Peanut Butter Cookies fresh.
Creative Serving Ideas for Peak Enjoyment
These Classic Peanut Butter Cookies are divine on their own, but truly shine with a tall, cold glass of milk.
For an extra treat, try making ice cream sandwiches with a scoop of vanilla ice cream, or enjoy them alongside your favorite warm cup of coffee or tea.
More Sweet and Savory Ideas
After enjoying these peanut butter cookies, you might crave something hearty or a different kind of baked treat.
- For a comforting main course, consider the Classic Chicken Pot Pie, featuring tender chicken and vegetables in a creamy sauce.
- If you’re thinking about breakfast or brunch, the Hearty Sausage & Cheese Breakfast Bake offers a satisfying start to the day.
Proper Storage for Maximum Freshness
Once completely cooled, store your baked peanut butter cookies in an airtight container at room temperature.
They will maintain their delightful soft and chewy texture for up to 3-5 days.
Make-Ahead & Freezing Tips for Future Cravings
To prepare ahead, you can freeze unbaked dough balls. Simply roll, press with a fork, and freeze on a baking sheet before transferring to a freezer-safe bag for up to 3 months. Bake from frozen, adding 2-4 minutes to the baking time.
Fully baked and cooled cookies can also be frozen in an airtight container for up to 2 months. Thaw at room temperature for a quick treat.
Your Burning Questions Answered: Classic Peanut Butter Cookies FAQs
Let’s address some common questions to ensure your baking journey is seamless.
Can I Use Natural Peanut Butter Instead of Creamy?
For this specific recipe, we strongly advise against using natural peanut butter. Its tendency to separate oil and its often firmer consistency will significantly alter the dough’s texture and the cookies’ final spread and chewiness.
Stick to a processed, creamy peanut butter for guaranteed soft and chewy results.
What if I Don’t Have an Electric Mixer?
While an electric mixer makes creaming much easier, you can achieve similar results with a sturdy whisk and plenty of elbow grease.
Be prepared for a more strenuous workout and ensure you cream the butter and sugars for longer, until truly light and fluffy, to incorporate enough air.
How Can I Make These Gluten-Free?
To make these Classic Peanut Butter Cookies gluten-free, substitute the all-purpose flour with a high-quality 1:1 gluten-free all-purpose flour blend.
Be aware that some blends might absorb liquid differently, so you might experience slight texture variations or need a touch more chilling time.
Can I Add Chocolate Chips or Other Mix-ins?
Absolutely! Get creative with your additions. You can fold in about 1/2 to 3/4 cup of chocolate chips, mini chocolate candies, or even chopped nuts after all other ingredients are just combined.
Add them during the final moments of mixing to ensure even distribution without overworking the dough.
Are These Cookies Nut-Free Friendly for Allergies?
No, this recipe contains a significant amount of peanuts and is explicitly not suitable for individuals with peanut or other nut allergies.
For a nut-free alternative, you would need to explore recipes specifically designed for sunbutter or other seed butter substitutes.
Ready to Bake? Share Your Classic Peanut Butter Cookie Success!
We’ve armed you with all the knowledge and precise steps to bake the most perfectly soft, irresistibly chewy Classic Peanut Butter Cookies of your life. Say goodbye to dry, crumbly batches and hello to a guaranteed favorite!
We can’t wait to see your delightful creations! Share your peanut butter cookie masterpieces with us on social media and tag us in your posts. For more comforting, tried-and-true baking recipes, don’t forget to explore our other sweet treat guides.
Classic Peanut Butter Cookies
Course: DessertCuisine: American CuisineDifficulty: easy4
about 24 cookies40
minutes10
minutes50
minutesAmerican Cuisine
Ingredients
1/2 cup (1 stick) unsalted butter, softened
1/2 cup granulated sugar, plus extra for rolling
1/2 cup packed light brown sugar
1 large egg
1 cup creamy peanut butter
1 teaspoon vanilla extract
1 1/4 cups all-purpose flour
1/2 teaspoon baking soda
1/4 teaspoon salt
Directions
- In a large mixing bowl, cream together the softened butter, 1/2 cup granulated sugar, and 1/2 cup brown sugar with an electric mixer on medium speed until light and fluffy, about 2-3 minutes. This careful creaming creates air pockets vital for a softer texture.
- Beat in the egg, then the creamy peanut butter and vanilla extract, until well combined. Scrape down the sides of the bowl to ensure everything is incorporated.
- In a separate bowl, whisk together the all-purpose flour, baking soda, and salt. Gradually add the dry ingredients to the wet ingredients, mixing on low speed until just combined. Do not overmix! Overmixing develops gluten, leading to tougher cookies.
- Cover the dough and chill it in the refrigerator for at least 30 minutes, or up to 2 hours. This is the secret step to preventing your cookies from spreading too much and ensures they bake up thick and chewy, locking in moisture.
- Preheat your oven to 375°F (190°C). Line baking sheets with parchment paper.
- Roll the chilled dough into 1-inch balls. Place about 2 inches apart on the prepared baking sheets. Using a fork, gently press down on each cookie ball in a crisscross pattern. For an extra touch of sweetness, lightly dust the top of each pressed cookie with a little granulated sugar.
- Bake for 8-10 minutes, or until the edges are lightly golden and set, but the centers still look slightly soft. This is crucial for chewiness. Pulling them out when they look just done prevents them from drying out. They will continue to set on the baking sheet.
- Let the cookies cool on the baking sheets for 5 minutes before transferring them to a wire rack to cool completely. Enjoy your perfectly soft and chewy cookies!
Notes
- Chilling the dough is the secret step to preventing spreading and ensures thick, chewy cookies.