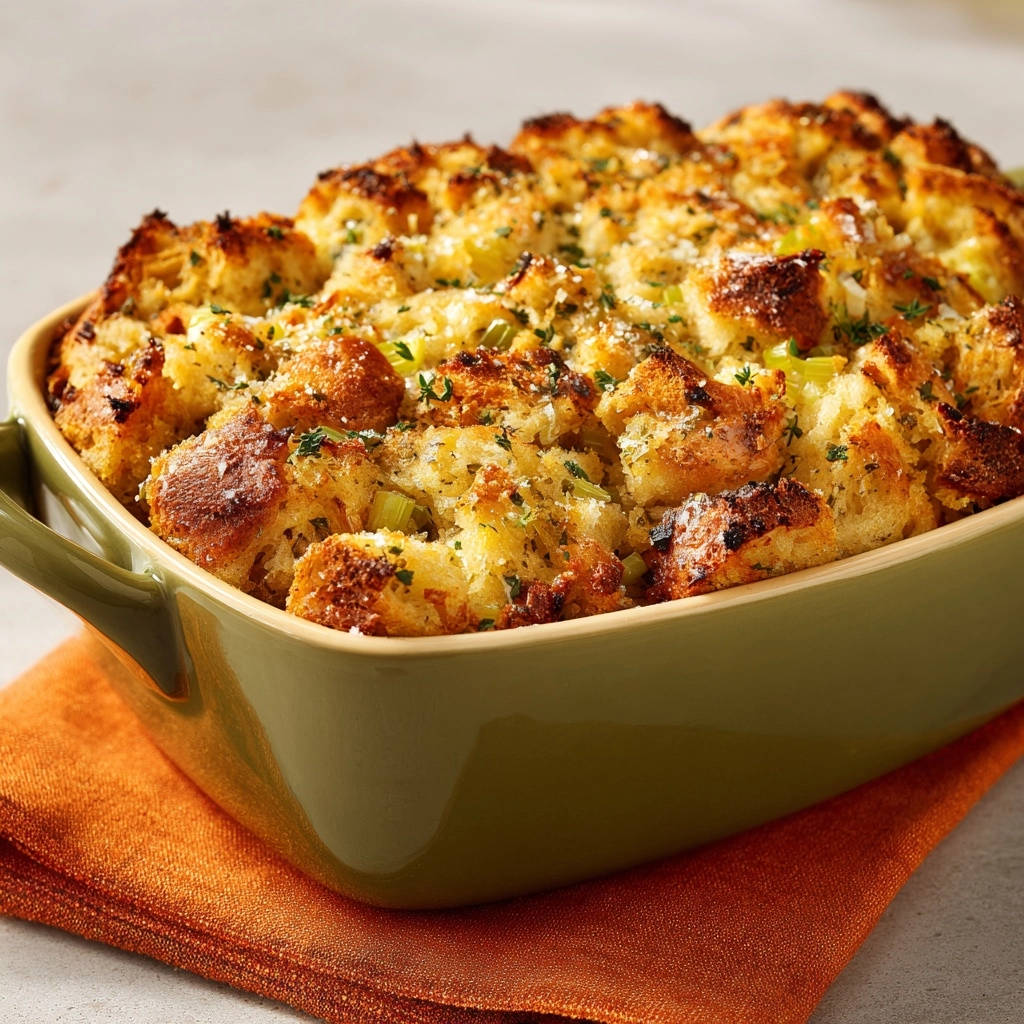
Classic Herb Stuffing: Perfectly Moist & Crispy
There’s nothing quite like the aroma of Classic Herb Stuffing filling the kitchen, a true hallmark of cozy gatherings. For years, I perfected countless stuffing recipes, battling the common nemesis of dry, crumbly results. This recipe is the culmination of that journey, promising a consistently moist interior with that irresistible, golden-crisp top every single time.
Forget the fear of bland or dry stuffing; this method guarantees a show-stopping side dish your family and guests will rave about. It’s the ultimate Classic Herb Stuffing, designed to build trust and deliver pure culinary delight.
Your Search Ends Here: The Secret to Never-Dry Classic Herb Stuffing
Many home cooks dread making stuffing, fearing a dry, flavorless outcome. This particular Classic Herb Stuffing recipe eliminates those worries entirely. It’s engineered for perfection, focusing on techniques that lock in moisture while developing incredible flavor and texture.
Get Our Best Recipes Weekly!
Join thousands of food lovers and get delicious recipes delivered to your inbox.
Why This Recipe Guarantees Moisture & Flavor
The secret lies in a two-pronged approach: proper bread preparation and meticulous liquid management. By starting with adequately dried bread, each cube is ready to absorb broth evenly without turning mushy.
Gradually adding broth ensures the bread is perfectly hydrated, preventing any dry pockets. This deliberate process creates a tender, flavorful interior that truly defines a great stuffing.
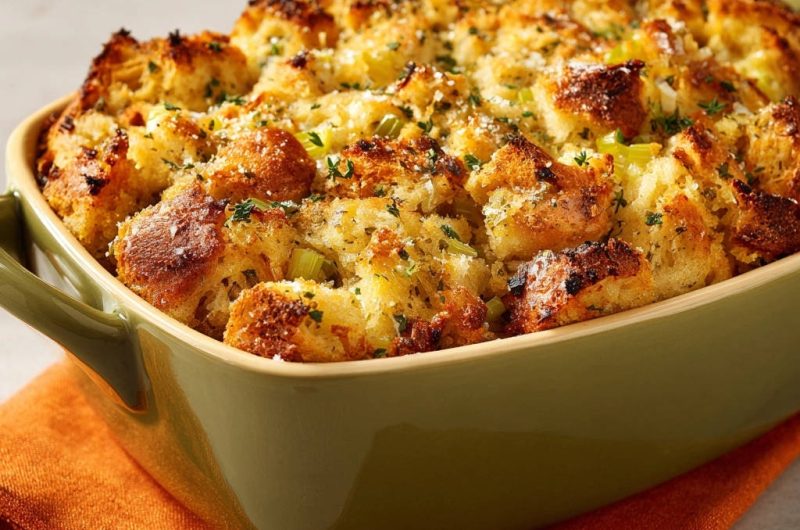
The Irresistible Crispy Top Explained
Achieving that coveted golden-brown, crispy top is a highlight of this recipe. It comes from an essential two-stage baking process.
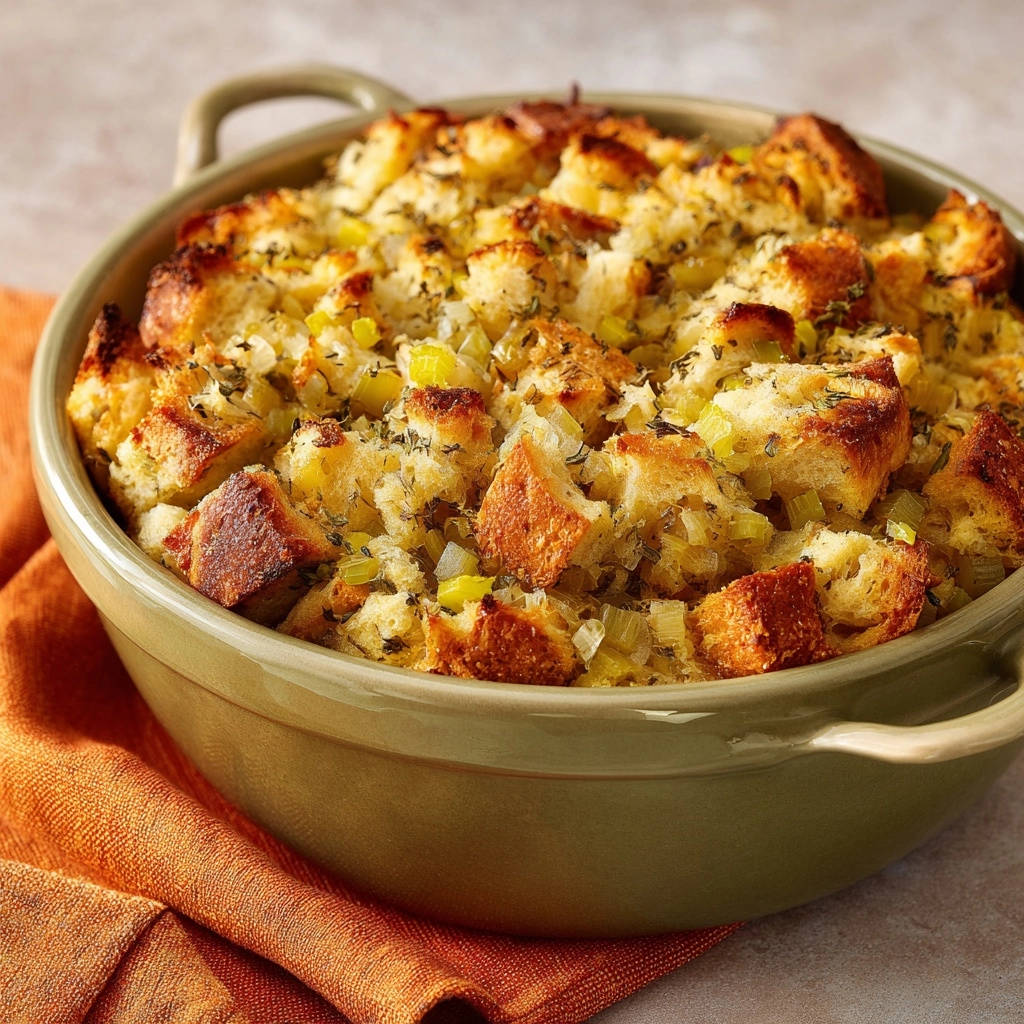
First, the stuffing bakes covered to trap steam and promote internal moisture. Then, uncovering the dish for the final 20-25 minutes allows the top layer to beautifully brown and crisp, creating a delightful textural contrast.
A Holiday Table Essential, Reimagined
Classic Herb Stuffing is more than just a side dish; it’s a symbol of warmth and tradition. This reimagined recipe honors that tradition while elevating it to new heights of flavor and texture.
It brings comfort and joy to any meal, making it an indispensable part of your holiday spread or even a special Sunday dinner. Prepare for appreciative murmurs around the table with this exceptional dish.
The Heart of Flavor: Essential Ingredients for Your Stuffing
Every ingredient in this Classic Herb Stuffing plays a vital role in achieving its renowned flavor and texture. Selecting quality components ensures the best possible outcome.
Bread: The Foundation of Texture (1 loaf day-old white or sourdough)
Day-old bread is crucial for preventing a soggy stuffing. Its slightly dried texture allows it to absorb the broth without disintegrating, providing structure and a fluffy mouthfeel.
While white bread offers a classic, neutral base, sourdough adds a subtle tang that beautifully complements the herbs. Either choice delivers excellent results when properly prepped.
Aromatic Vegetables: Building a Flavorful Base (celery, yellow onion)
Sautéed celery and yellow onion form the aromatic heart of this Classic Herb Stuffing. They release natural sugars and moisture, creating a deeply savory and fragrant foundation.
These vegetables soften during cooking, integrating seamlessly into the bread mixture and adding layers of essential flavor.
Fresh Herbs: The Signature Taste (parsley, thyme)
Fresh parsley and thyme are non-negotiable for that authentic “classic herb” profile. Their vibrant, earthy notes infuse the stuffing with a brightness that dried herbs simply cannot replicate.
These herbs provide the signature aroma and taste, making every bite of this stuffing truly memorable.
Broth & Butter: The Moisture Makers (vegetable/chicken broth, unsalted butter)
Unsalted butter adds rich, foundational flavor and helps sauté the aromatics beautifully. Its richness contributes to the stuffing’s overall succulence.
Broth is the primary source of moisture, hydrating the bread cubes to perfection. Using vegetable broth keeps it vegetarian, while chicken broth offers a traditional, savory depth.
Seasoning & Optional Topping (salt, pepper, Parmesan cheese)
Salt and black pepper are essential for seasoning, enhancing all the other flavors without overpowering them. They bring balance and depth to the stuffing.
A sprinkle of grated Parmesan cheese is an optional but highly recommended addition, lending a savory, nutty note and contributing to that desirable crispy crust.
Gear Up for Success: Essential Stuffing Tools
Having the right tools makes the stuffing process smooth and enjoyable. These kitchen essentials will ensure your Classic Herb Stuffing comes out perfectly.
Baking Sheets & Dishes
A sturdy baking sheet is ideal for drying bread cubes, allowing for even toasting. A 9×13-inch baking dish is the perfect size for baking and serving this recipe, ensuring good surface area for crisping.
Skillets & Bowls
A large skillet or Dutch oven is needed for sautéing the aromatics. Its ample size ensures even cooking and easy mixing. A very large mixing bowl is indispensable for combining all the ingredients without spillage.
Measuring Tools & Utensils
Standard measuring cups and spoons are necessary for accurate ingredient proportions. A large mixing spoon, or your clean hands, will be crucial for gently tossing the bread and liquid, ensuring even coating.
Your Recipe for Success: A Step-by-Step Stuffing Guide
-
Step 1: Preparing Your Bread (The Moisture Foundation)
Begin by cutting your day-old bread into uniform 1-inch cubes. If using fresh bread, spread the cubes in a single layer on a baking sheet and bake at 300°F (150°C) for 15-20 minutes.
This drying step is crucial; it allows the bread to absorb moisture from the broth without becoming mushy, forming a tender, not soggy, foundation. Let the dried bread cool completely before proceeding.
-
Step 2: Sautéing Aromatics for Depth
Melt the unsalted butter in a large skillet or Dutch oven over medium heat. Add the chopped celery and yellow onion to the melted butter.
Cook, stirring occasionally, for 8-10 minutes, or until the vegetables have softened and become translucent. This step creates a fragrant, savory base, infusing the stuffing with essential flavor and natural moisture.
-
Step 3: Infusing Fresh Herbs and Seasoning
Remove the skillet from the heat immediately after the vegetables are softened. Stir in the fresh chopped parsley, fresh chopped thyme, salt, and black pepper.
Removing it from heat prevents the delicate herbs from overcooking and ensures their vibrant flavors are perfectly preserved and distributed throughout the mixture.
-
Step 4: Combining & Liquid Control (Anti-Dryness Insurance)
In a very large mixing bowl, combine the dried bread cubes with the cooked aromatic mixture. Gradually pour in 3 cups of the vegetable or chicken broth, tossing gently with your hands or a large spoon.
The goal is to moisten all the bread cubes evenly without saturating them. Continuously assess the texture; the bread should feel damp but not soaking wet. If it still seems dry, add the remaining 1 cup of broth, a little at a time, until the mixture is uniformly damp and tender.
This careful addition of liquid is your anti-dryness insurance, ensuring a perfectly moist Classic Herb Stuffing.
-
Step 5: Baking Covered for Tenderness
Lightly grease a 9×13-inch baking dish. Transfer the moist stuffing mixture to the prepared dish, spreading it evenly across the bottom.
Cover the baking dish tightly with aluminum foil. Bake for 30 minutes at 375°F (190°C). Baking covered is key to trapping steam, which ensures the stuffing’s interior remains incredibly moist and cooks through without drying out.
-
Step 6: Uncovering for That Golden Crisp
After the initial covered baking, remove the aluminum foil. If using, sprinkle the optional grated Parmesan cheese evenly over the top of the stuffing.
Continue baking uncovered for another 20-25 minutes, or until the top is golden brown and delightfully crispy. This crucial uncovered phase allows the surface to develop its irresistible crunch, creating a wonderful textural contrast.
-
Step 7: The All-Important Rest
Once baked to perfection, remove the Classic Herb Stuffing from the oven. Let it rest for 10 minutes before serving.
This resting period allows the flavors to meld and the internal structure to set, resulting in a more cohesive and even more delicious stuffing. Enjoy your perfectly moist and crispy creation!
Mastering Your Stuffing: Expert Tips for Unforgettable Flavor & Texture
-
Choosing the Right Bread
While white or sourdough are excellent, don’t shy away from other options. Brioche offers a richer, slightly sweeter stuffing, while a hearty whole wheat can add a nutty depth. The key is always to dry it thoroughly, regardless of the type, for optimal absorption in your Classic Herb Stuffing.
-
Don’t Skimp on Fresh Herbs
Fresh herbs provide unparalleled aroma and flavor compared to dried. For an elevated Classic Herb Stuffing, consider adding a touch of fresh sage, rosemary, or marjoram alongside the parsley and thyme. Chop them finely to ensure even distribution and maximum impact.
-
The Art of Broth Absorption
When adding broth, look for a visual cue: the bread cubes should glisten and feel slightly spongy when squeezed, but no liquid should pool at the bottom of the bowl. Trust your instincts and the texture; it’s better to add less and then a little more, rather than over-saturating the mixture, ensuring a moist stuffing.
-
Customizing Your Stuffing
Personalize your Classic Herb Stuffing with delicious additions. Sautéed mushrooms, finely diced apples, toasted pecans or walnuts, or even cooked and crumbled crispy bacon can add wonderful layers of flavor and texture.
-
Achieving the Perfect Crispy Crust
For an extra-crispy top, you can lightly brush the uncovered stuffing with a little melted butter or mist it with cooking spray before the final baking phase. A brief stint under the broiler (watch carefully!) can also create a beautifully browned crust, but be mindful not to burn it.
-
Seasoning to Perfection
Always taste your stuffing mixture before baking, adjusting salt and pepper as needed. Remember that the broth can add some saltiness, so taste a small amount after mixing everything, then adjust for truly perfect seasoning.
Stuffing Solutions: Common Issues & How to Fix Them
Problem: My Stuffing is Too Dry
If your Classic Herb Stuffing comes out dry, gently warm about 1/2 cup of extra broth and drizzle it over the baked stuffing. Cover it tightly with foil and return to the oven for 10-15 minutes at a lower temperature (300°F/150°C) to allow the moisture to absorb.
When reheating leftovers, always cover them tightly or add a splash of broth to prevent further drying.
Problem: My Stuffing is Mushy or Soggy
This usually indicates the bread wasn’t dried enough, or too much liquid was added. To prevent it, ensure your bread cubes are genuinely dry and firm before mixing. When adding broth, always do so gradually and stop when the bread is moist but not saturated.
If already baked and mushy, try uncovering it and baking for a longer period, possibly increasing the temperature slightly, to help dry it out. A quick broil can also help evaporate some moisture from the top layer.
Problem: My Classic Herb Stuffing Lacks Flavor
Ensure you’re using fresh, vibrant herbs and sautéing your aromatics thoroughly. If flavor is lacking, stir in a bit more fresh chopped herbs, a pinch of poultry seasoning, or a dash of lemon zest or apple cider vinegar to brighten the taste.
Always taste and adjust your seasoning before baking; sometimes, a little more salt and pepper is all that’s needed.
Problem: The Top Isn’t Crispy Enough
The key to crispiness is adequate uncovered baking time. Make sure you allow at least 20-25 minutes uncovered, or even a bit longer, until it achieves a deep golden brown.
You can also increase the oven temperature to 400°F (200°C) for the last 5-10 minutes, or use the broiler for 1-2 minutes (watching constantly to prevent burning) to achieve that desired crunch.
Beyond the Bird: Creative Ways to Serve Your Classic Herb Stuffing
While often associated with holidays, this Classic Herb Stuffing is versatile enough for many occasions. Its robust flavor makes it a star in various culinary contexts.
Round Out Your Meal
To complement your herb stuffing, consider these hearty main dishes.
- For a comforting main, try this Classic Chicken Pot Pie, featuring tender chicken and vegetables under a golden crust.
- If you’re craving something robust, this Ultimate Pot Roast offers incredibly tender beef that pairs well with savory flavors.
Traditional Holiday Pairings
This perfectly moist and crispy Classic Herb Stuffing is an indispensable companion to roasted turkey, chicken, or prime rib during holiday feasts. Its rich, herbaceous notes beautifully complement any succulent main protein.
It also pairs wonderfully with roasted root vegetables or a vibrant green bean casserole, creating a well-rounded and comforting meal.
Stuffing for Weeknight Meals
Don’t reserve this delicious Classic Herb Stuffing just for special occasions. Serve it alongside a simple roasted chicken breast or pork tenderloin for an elevated weeknight dinner.
It can also be a hearty vegetarian meal when paired with a fresh green salad or a medley of roasted seasonal vegetables, offering comfort any day of the week.
Repurposing Leftovers
Leftover Classic Herb Stuffing is a treasure! Transform it into crispy stuffing cakes by pan-frying individual portions until golden brown.
Stuffing also makes an incredible sandwich filling, or you can add it to omelets or frittatas for a savory breakfast or brunch. Get creative and enjoy every last bite!
Plan Ahead & Preserve: Make-Ahead and Storage Tips
Preparing this Classic Herb Stuffing in advance can be a lifesaver, especially during busy holiday seasons. Proper storage ensures freshness and flavor.
Make-Ahead Instructions
You can prepare the entire stuffing mixture, including the bread, sautéed aromatics, herbs, and broth, up to two days in advance. Combine all ingredients as directed through Step 4.
Transfer the unbaked mixture to your greased baking dish, cover tightly with plastic wrap or foil, and refrigerate. On baking day, let it sit at room temperature for 30 minutes before baking as instructed.
Proper Storage for Freshness
Store any leftover baked Classic Herb Stuffing in an airtight container in the refrigerator for up to 3-4 days. For longer storage, freeze baked stuffing in a freezer-safe container or tightly wrapped portions for up to 3 months.
Ensure it’s completely cooled before refrigerating or freezing to prevent bacterial growth and maintain texture.
Reheating for Optimal Results
To reheat refrigerated stuffing, cover it with foil and bake at 350°F (175°C) until warmed through, usually 20-30 minutes. Remove the foil for the last 5-10 minutes to re-crisp the top.
For frozen stuffing, thaw overnight in the refrigerator, then reheat as above. For smaller portions, a microwave can work, but for best texture, oven reheating is preferred, perhaps with a splash of broth.
Your Stuffing Questions Answered: FAQs
Can I use fresh bread instead of day-old for this Classic Herb Stuffing recipe?
While day-old bread is ideal for its moisture absorption capabilities, you can use fresh bread. Simply cut it into cubes and spread it on a baking sheet. Bake at 300°F (150°C) for 15-20 minutes, or until lightly toasted and dry, then let it cool completely before using.
What’s the best type of broth to use for Classic Herb Stuffing?
Vegetable broth is excellent for a vegetarian version and provides a clean, savory base. Chicken broth offers a richer, more traditional flavor that many prefer. Always opt for low-sodium broth to control the seasoning precisely, adjusting salt to taste.
Can I add meat to this Classic Herb Stuffing?
Absolutely! Cooked and crumbled breakfast sausage, crispy bacon bits, or even ground turkey can be added for extra flavor and heartiness. Sauté any meat thoroughly before adding it to the bread mixture. Be mindful that meat can absorb some moisture, so you might need a tiny splash more broth.
Is this Classic Herb Stuffing recipe suitable for baking inside a turkey?
For food safety, it’s generally recommended to bake stuffing outside the turkey. If you choose to bake it inside, ensure the stuffing reaches an internal temperature of 165°F (74°C). Baking it separately guarantees even cooking and allows for that perfect crispy top this recipe is known for.
How can I make this Classic Herb Stuffing gluten-free?
To make this recipe gluten-free, simply substitute the regular bread with a good quality gluten-free bread, ensuring it is dried out as per the instructions. Double-check that your vegetable or chicken broth and any optional additions are also certified gluten-free.
Ready to Delight? Your Ultimate Classic Herb Stuffing Awaits!
You now possess the expert knowledge and a foolproof recipe to create the most incredible Classic Herb Stuffing. Say goodbye to dry, uninspired sides and hello to a moist, flavorful, and perfectly crispy masterpiece.
Don’t wait for a special occasion; bring this exceptional dish to your table soon. Try it, share it with loved ones, and savor the joy of creating truly unforgettable food memories!
Classic Herb Stuffing
Course: Side DishCuisine: American CuisineDifficulty: easy8
servings30
minutes1
hour60
minutesAmerican Cuisine
Ingredients
1 loaf (1 pound) day-old white bread or sourdough, cut into 1-inch cubes
1 cup unsalted butter
2 cups chopped celery (about 4 stalks)
1 1/2 cups chopped yellow onion (about 1 large)
1/4 cup fresh parsley, chopped
2 tablespoons fresh thyme, chopped
1 teaspoon salt
1/2 teaspoon black pepper
4 cups vegetable broth (or chicken broth)
1/4 cup grated Parmesan cheese (optional, for topping)
Directions
- Prep Your Bread (The Foundation of Moisture): The key to absorbing all that delicious liquid without becoming mushy is using dried bread. If your bread isn’t day-old, spread the cubes in a single layer on a baking sheet and bake at 300°F (150°C) for 15-20 minutes, or until lightly toasted and dry but not browned. Let cool completely. This crucial step prevents a soggy bottom and allows for even liquid absorption.
- Melt the butter in a large skillet or Dutch oven over medium heat. Add the chopped celery and onion and cook until softened, about 8-10 minutes. This creates a fragrant base and adds natural moisture.
- Remove from heat and stir in the fresh parsley, thyme, salt, and pepper.
- In a very large bowl, combine the dried bread cubes with the cooked vegetable mixture.
- Add Liquid Judiciously (Your Anti-Dryness Insurance): Gradually pour in 3 cups of the vegetable broth, tossing gently with your hands or a large spoon until all the bread cubes are evenly moistened. This is where you prevent dryness! The bread should be moist, but not soaking wet. If it still feels dry, add the remaining 1 cup of broth, a little at a time, until the mixture is uniformly damp.
- Lightly grease a 9×13-inch baking dish. Transfer the stuffing mixture to the prepared dish, spreading it evenly.
- Cover & Bake for Ultimate Tenderness: Cover the baking dish tightly with aluminum foil. Bake for 30 minutes at 375°F (190°C). Baking covered traps steam, ensuring the interior of your stuffing stays incredibly moist and cooks through without drying out.
- Uncover & Crisp for Perfection: Remove the foil and sprinkle with Parmesan cheese, if using. Continue baking for another 20-25 minutes, or until the top is golden brown and delightfully crispy. The uncovered baking phase is essential for that irresistible texture contrast.
- Let the stuffing rest for 10 minutes before serving. Enjoy your perfectly moist and crispy stuffing, guaranteed!
Notes
- Ensure bread is truly dry before mixing for the best texture.