Cutie Coconut Shrimp: Crispy, Juicy, & Irresistible!
There’s a special kind of magic that happens when you bite into a perfectly made coconut shrimp-that incredible crunch giving way to a sweet, tender interior. But let’s be honest, achieving that ideal balance can often feel like a culinary challenge! I’ve spent years perfecting this recipe, ensuring every single Cutie Coconut Shrimp is flawlessly crispy, incredibly juicy, and utterly irresistible.
Get ready to transform your appetizer game and impress everyone with these adorable, delicious bites!
Why This Cutie Coconut Shrimp Recipe Belongs in Your Favorites List
This isn’t just another coconut shrimp recipe; it’s a meticulously crafted guide designed for consistent perfection. We’re tackling the common pitfalls of dry shrimp and soggy coatings head-on, delivering a dish that truly stands out.
Get Our Best Recipes Weekly!
Join thousands of food lovers and get delicious recipes delivered to your inbox.
The Secret to Consistently Juicy, Tender Shrimp
The key to succulent shrimp lies in precise temperature control and swift cooking. This recipe guides you to a frying method that ensures the shrimp cooks through just enough to be tender, never dry or rubbery.
We’ll avoid overcooking, preserving the shrimp’s natural moisture for an unbelievably juicy bite every time.
Achieving That Unforgettable Crispy, Golden Coating
Our secret to an exceptional coating involves a strategic double-dredging technique and a crucial pre-fry chill. These steps create a robust, flavorful crust that adheres beautifully and stays incredibly crispy.

Say goodbye to coatings that fall off, and hello to a golden, crunchy exterior that complements the tender shrimp perfectly.
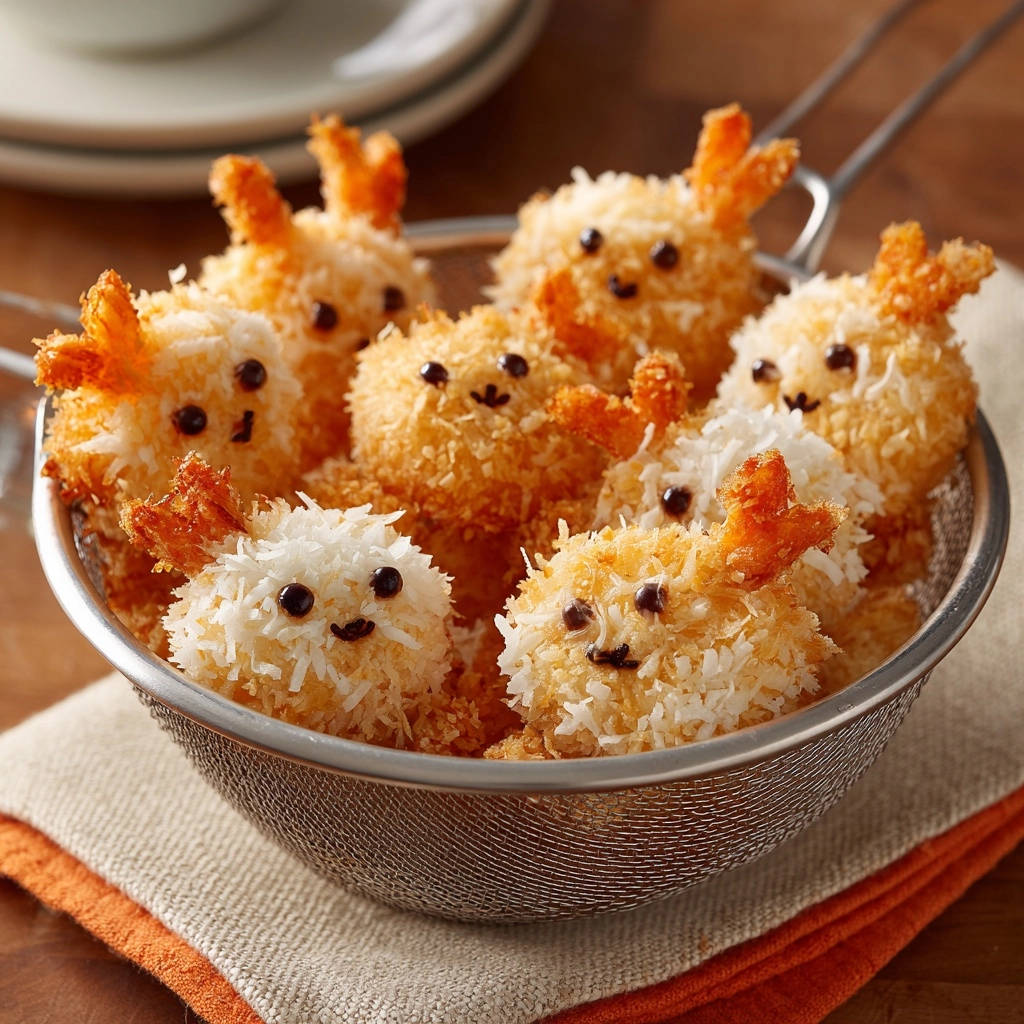
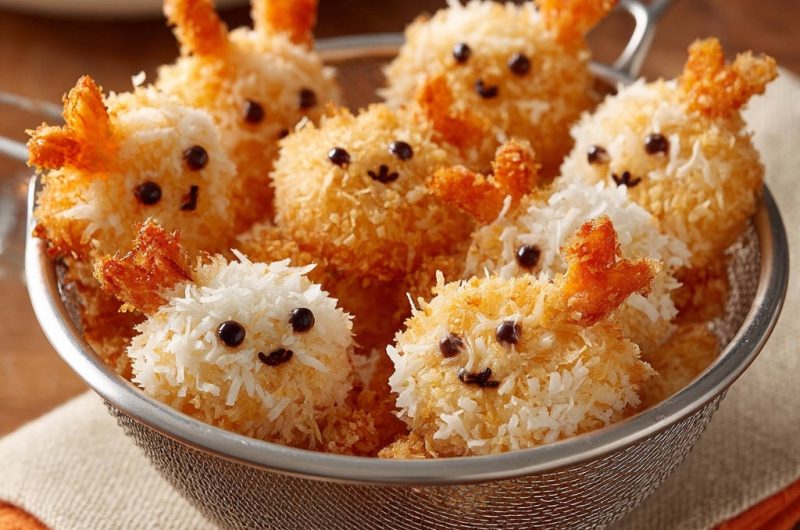
More Than Just Delicious: The “Cutie” Factor!
Beyond the amazing taste and texture, this recipe offers an optional, delightful twist. Adding simple chocolate adornments transforms each shrimp into an adorable “cutie” that brings a smile to every face.
It’s a fantastic way to add a playful touch, making these Cutie Coconut Shrimp perfect for parties, family meals, or special occasions.
Gathering Your Culinary Arsenal: Essential Tools for Success
Having the right tools makes all the difference in achieving perfect fried seafood. These essentials ensure an efficient and successful frying experience.
Kitchen Essentials for Frying
A heavy-bottomed pot or Dutch oven is crucial for maintaining consistent oil temperature, leading to even frying. Three shallow dishes simplify the breading process, creating an organized assembly line.
Reliable tongs or a metal slotted spoon are indispensable for safely handling shrimp in hot oil and efficiently transferring them.
Smart Additions for Precision Frying
A kitchen thermometer is your absolute best friend for deep frying. It guarantees the oil reaches and maintains the ideal temperature, preventing greasy or burnt results.
A wire rack placed over paper towels is essential for draining. It allows air circulation around the shrimp, ensuring maximum crispness and preventing sogginess from excess oil.
The Building Blocks of Flavor: Inside Your Cutie Coconut Shrimp
Every ingredient plays a vital role in crafting these irresistible coconut shrimp. Quality and proper preparation are paramount for the best results.
Star of the Show: The Shrimp Selection
Use large (21/25 count) shrimp, as they offer a substantial, satisfying bite. Fresh shrimp are ideal, but high-quality frozen shrimp, properly thawed, work wonderfully.
Ensure they are peeled, deveined, and crucially, tail-on. The tail provides a convenient handle for eating and adds to the elegant presentation of your Cutie Coconut Shrimp.
Crafting the Ultimate Crispy Coating
All-purpose flour creates the initial dry layer, crucial for the egg wash to adhere effectively. Panko breadcrumbs are essential for an airy, extra-crispy texture, far superior to standard breadcrumbs.
Shredded unsweetened coconut forms the signature flavor and texture. Using unsweetened coconut prevents premature burning in the hot oil and allows you to control the dish’s overall sweetness.
The Binding Agent: Perfecting the Egg Wash
Lightly beaten eggs, thinned with a tablespoon of water, create the perfect egg wash. This mixture acts as the ‘glue,’ ensuring the panko and coconut mixture sticks firmly to the floured shrimp.
The water helps create a thinner, more even coating, which is vital for a light, crispy crust.
Frying Oil and Flavor Enhancers
Vegetable or canola oil are ideal for frying due to their neutral flavor and high smoke point. These oils allow the delicious coconut and shrimp flavors to shine through.
A simple seasoning of salt and black pepper added to the flour provides a fundamental flavor base that enhances the entire dish, creating a balanced savory-sweet profile.
The “Cutie” Adornments (Optional)
For that adorable touch, mini chocolate chips serve as perfect eyes, while a small amount of melted chocolate can be piped for a charming smile. This turns each shrimp into a truly unique and playful treat.
Your Path to Cutie Coconut Shrimp Perfection: A Detailed Guide
Follow these steps closely, and you’ll achieve perfectly crispy, juicy Cutie Coconut Shrimp every time. Precision at each stage guarantees success.
-
Prep Your Shrimp for Optimal Adhesion
Thoroughly pat each shrimp dry with paper towels. This seemingly simple step is absolutely critical; any excess moisture will create a barrier, preventing the breading from sticking properly.
A truly dry surface ensures maximum adhesion for a consistently crispy coating.
-
Setting Up the Breading Assembly Line
Prepare three shallow dishes for your breading stations. In the first, combine the flour, salt, and pepper, mixing well to distribute the seasoning evenly.
In the second dish, whisk the eggs with water until well combined to create your egg wash. The third dish will hold the panko breadcrumbs and shredded coconut, thoroughly mixed for an even coating.
-
Mastering the Double-Dip for Maximum Crunch
Dredge each dry shrimp first in the seasoned flour, shaking off any excess. Next, dip it completely into the egg wash, allowing any extra to drip away for a thin, even coat.
Finally, press the shrimp firmly into the panko and coconut mixture, ensuring it’s fully coated on all sides. This firm pressing and the double-dip method are essential for a beautiful, adhering crust.
For best results, place the breaded shrimp on a wire rack and chill them in the refrigerator for at least 15-20 minutes. This chilling period helps the coating set, preventing it from falling off during frying.
-
Oil Temperature: Your Frying Success Metric
Pour about 2-3 inches of vegetable or canola oil into a heavy-bottomed pot. Heat the oil over medium-high heat until it reaches a precise 350-375°F (175-190°C).
Using a kitchen thermometer here is a game-changer. Maintaining this correct oil temperature is the “secret” to perfectly cooked shrimp with a super crispy, golden coating, avoiding both greasiness and burning.
-
The Art of Frying: Golden Brown Perfection
Carefully add 3-4 breaded shrimp at a time to the hot oil, ensuring not to overcrowd the pot. Overcrowding significantly drops the oil temperature, leading to soggy, greasy results.
Fry for approximately 1 to 1.5 minutes per side, flipping once, until the coating is a beautiful golden brown and the shrimp inside are opaque and cooked through. Total cooking time is typically 2-3 minutes.
This quick frying time at the ideal temperature ensures your shrimp remain incredibly juicy and tender, avoiding the common rubbery texture of overcooked fried shrimp.
-
Draining for Ultimate Crispness and Less Oil
Using a slotted spoon or metal spider, transfer the cooked shrimp to a clean wire rack set over paper towels. This allows excess oil to drip away while air circulates around the shrimp.
Proper draining on a wire rack is crucial for maintaining maximum crispness, preventing the bottom of the shrimp from becoming soggy.
-
Adding the Adorable “Cutie” Faces (Optional)
Once the shrimp have cooled slightly, you can add their charming faces. Use mini chocolate chips for the eyes, gently pressing them into the coating.
For the smiles, use a small amount of melted chocolate piped with a toothpick or a small plastic bag with a tiny corner snipped off. This adds that unique, delightful “cutie” factor!
Chef’s Secrets: Elevate Your Cutie Coconut Shrimp Game
These expert tips will ensure your Cutie Coconut Shrimp are always restaurant-quality, packed with flavor and perfect texture.
The Power of Patting Shrimp Bone-Dry
This cannot be overstated: moisture is the enemy of a crispy coating. By ensuring your shrimp are absolutely dry, you create the ideal surface for the flour and egg wash to adhere, forming a strong, durable crust.
Don’t Skip the Pre-Fry Chill Time!
Chilling the breaded shrimp for at least 15-20 minutes allows the coating ingredients to fully set and bond. This firming action significantly reduces the chance of the delicious coconut-panko crust detaching during frying.
Frying Oil Temperature is Non-Negotiable
Invest in a good kitchen thermometer. Oil that is too cool results in greasy shrimp as the coating absorbs oil, while oil that is too hot burns the coconut before the shrimp cooks, leading to dry insides.
Maintaining the 350-375°F (175-190°C) range ensures a perfectly crispy, golden exterior and tender, juicy shrimp.
Avoid Overcrowding: Fry in Batches
Dropping too many shrimp into the oil at once drastically lowers its temperature. This leads to uneven cooking, a soggy coating, and greasy shrimp. Always fry in small batches to keep the oil temperature stable.
Serve Immediately for Peak Deliciousness
Coconut shrimp are at their absolute best when fresh out of the fryer. The coating is incredibly crispy, and the shrimp are at their juiciest. If serving later, a quick reheat in an oven or air fryer will help revive their crispness.
Troubleshooting Common Coconut Shrimp Conundrums
Even seasoned cooks can encounter issues. Here are solutions to common problems, ensuring your Cutie Coconut Shrimp turn out perfectly.
My Coconut Coating is Falling Off!
The most common culprit is insufficient drying of the shrimp. Ensure they are bone-dry before breading. Also, press the panko-coconut mixture firmly onto the shrimp, and don’t skip the crucial pre-fry chill time-it helps the coating adhere.
My Shrimp are Dry and Rubbery!
This indicates overcooking, often due to oil that’s too hot or frying for too long. Use a thermometer to maintain the correct oil temperature (350-375°F / 175-190°C) and fry only for the recommended 1-1.5 minutes per side.
The Coating Isn’t Crispy Enough (or it’s Soggy)
An oil temperature that’s too low will lead to a soggy, oil-logged coating. Ensure the oil is hot enough and avoid overcrowding the pot. Always drain the fried shrimp on a wire rack, not directly on paper towels, to allow air to circulate.
My Shrimp are Greasy!
Greasy shrimp are usually a sign that your frying oil wasn’t hot enough. When the oil is too cool, the coating absorbs it rather than forming a quick, crisp seal. Proper oil temperature and draining on a wire rack will prevent this.
Serving Suggestions & Flavor Pairings
Elevate your Cutie Coconut Shrimp experience with these delicious accompaniments.
Classic Dipping Sauces to Complement the Sweetness
A classic sweet chili sauce offers a delightful balance of sweet and spicy. For a tangy twist, a vibrant orange marmalade or a homemade lime aioli provides a zesty counterpoint to the coconut’s richness.
Side Dishes That Complete the Meal
Fluffy jasmine rice is a perfect absorbent base for any stray sauce. A fresh, crisp green salad with a light vinaigrette cuts through the richness of the fried shrimp, while roasted asparagus or broccoli adds a healthy, complementary texture.
Completing Your Meal
Round out your coconut shrimp with these flavorful rice dishes.
- For a vibrant and flavorful rice option, check out this Skillet Jambalaya-Style Rice, which offers a delightful complement to the shrimp’s sweetness.
- If you’re looking for a heartier rice preparation, the Hearty Jambalaya provides a robust flavor that pairs well with the crispy shrimp.
Beverage Pairings for the Perfect Balance
Pair these shrimp with a crisp Sauvignon Blanc or a light Pinot Grigio. For beer lovers, a refreshing lager or a tropical-inspired IPA works well. Non-alcoholic options like a sparkling pineapple soda or a fresh limeade are also excellent choices.
Make-Ahead, Storage, and Reheating Tips
Planning ahead makes entertaining easier, and these tips help you enjoy your Cutie Coconut Shrimp even after the initial serving.
Can I Prepare Cutie Coconut Shrimp Ahead of Time?
Absolutely! You can bread the shrimp up to 4 hours in advance. Arrange them in a single layer on a wire rack-lined baking sheet, uncovered, and refrigerate. This even helps the coating adhere better.
Storing Leftover Coconut Shrimp
Store any leftover coconut shrimp in an airtight container in the refrigerator. They will remain fresh and delicious for up to 2-3 days.
Reheating for Best Results
To restore their crispness, reheat leftover coconut shrimp in a preheated oven at 375°F (190°C) for 8-10 minutes, or in an air fryer at 350°F (175°C) for 5-7 minutes. This method ensures they become crispy again without becoming soggy.
Cutie Coconut Shrimp FAQs
Got more questions about making the perfect Cutie Coconut Shrimp? Here are some common queries answered by an expert.
What kind of shrimp should I use for this recipe?
For the best results, use large shrimp, typically a 21/25 count per pound. This size offers a satisfying bite and cooks perfectly. While fresh is ideal, high-quality frozen shrimp, properly thawed, are an excellent and convenient alternative. Always keep the tails on for easy handling and an attractive presentation.
Can I bake or air fry these instead of deep frying?
Yes, you can! For baking, preheat your oven to 400°F (200°C), lightly spray the breaded shrimp with oil, and bake for 12-15 minutes, flipping halfway. For air frying, preheat to 375°F (190°C), spray with oil, and cook for 8-10 minutes, flipping halfway. While these methods are healthier, deep frying will always yield the crispiest coating.
Can I make these Cutie Coconut Shrimp gluten-free?
Certainly! To make this recipe gluten-free, simply substitute the all-purpose flour with a gluten-free all-purpose flour blend. Additionally, use gluten-free panko breadcrumbs, which are widely available and maintain that desirable crispy texture.
What’s the best oil for frying and can I reuse it?
Canola oil, vegetable oil, or peanut oil are excellent choices for frying due to their high smoke points and neutral flavors. You can typically reuse frying oil 2-3 times if you strain it after each use to remove food particles and store it in a cool, dark place. Discard oil if it becomes dark, smokes excessively, or develops an off odor.
Why use unsweetened shredded coconut instead of sweetened?
Unsweetened shredded coconut is preferred because sweetened coconut, with its added sugars, tends to burn very quickly at the high temperatures required for frying. Using unsweetened coconut allows the shrimp to cook and the coating to become golden brown without scorching, giving you full control over the final sweetness of the dish.
Ready to Create Your Own Cutie Coconut Shrimp Masterpiece?
You now hold the secrets to creating truly exceptional Cutie Coconut Shrimp-crispy, juicy, and utterly adorable. This recipe isn’t just about frying shrimp; it’s about mastering a technique that delivers pure culinary joy.
With these expert tips and a detailed guide, you’re more than ready to conquer the kitchen and create a dish that will have everyone asking for more. Don’t hesitate to dive in and experience the magic yourself!
I can’t wait to hear about your culinary triumphs! Share your delicious creations and let’s celebrate the joy of homemade goodness together.
Cutie Coconut Shrimp
Course: AppetizerCuisine: AmericanDifficulty: easy4
servings35
minutes30
minutes550
kcal60
minutesAchieve perfectly crispy, juicy coconut shrimp every time with this foolproof recipe. Learn the secrets to a tender interior and a golden, crunchy coating that won’t fall off. Get ready for applause!
Ingredients
1 lb large shrimp, peeled, deveined, tail-on
1 cup all-purpose flour
2 large eggs, lightly beaten with 1 tablespoon water
1 cup panko breadcrumbs
1 1/2 cups shredded unsweetened coconut
1 teaspoon salt
1/2 teaspoon black pepper
Vegetable oil or canola oil for frying
Mini chocolate chips or melted chocolate for decorating (optional)
Directions
- Prep Your Shrimp for Success: Start by thoroughly patting your shrimp dry with paper towels. This is a critical first step! Make sure they’re as dry as possible to ensure maximum adhesion for your breading. Any excess moisture will prevent the coating from sticking properly.
- Set Up Breading Stations: Create three shallow dishes. In the first, combine the flour, salt, and pepper. In the second, whisk the eggs with water to form an egg wash. In the third, combine the panko breadcrumbs and shredded coconut, mixing well to ensure an even distribution.
- The Double-Dip for Ultimate Crispiness: Dredge each dry shrimp first in the seasoned flour, shaking off any excess. Then, dip it into the egg wash, letting any extra drip off. Finally, press the shrimp firmly into the panko and coconut mixture, making sure it’s completely coated on all sides. This firm pressing and the use of both flour and egg wash helps the coconut adhere beautifully and forms the foundation for a truly crispy coating that stays on! Place the breaded shrimp on a wire rack or baking sheet and for best results, chill them in the refrigerator for at least 15-20 minutes. This helps the coating set and adhere even better during frying.
- Heat Your Oil Right: Pour about 2-3 inches of vegetable or canola oil into a heavy-bottomed pot or Dutch oven. Heat the oil over medium-high heat until it reaches 350-375F (use a thermometer if you have one, it’s a game-changer!). Maintaining the correct oil temperature is the “secret” to perfectly cooked shrimp and a super crispy, golden coating without burning the delicate coconut. Too low and your shrimp will be greasy; too high and the coating burns before the shrimp cooks through.
- Fry to Perfection: Carefully add 3-4 shrimp at a time to the hot oil, being careful not to overcrowd the pot. Overcrowding drops the oil temperature. Fry for about 1 to 1.5 minutes per side, flipping once, until the coating is a beautiful golden brown and the shrimp inside are opaque and cooked through. The total cooking time will be approximately 2-3 minutes. This quick frying time at the precisely right temperature ensures your shrimp stay incredibly juicy and tender inside, avoiding that common dry, rubbery texture that ruins fried shrimp.
- Drain and Serve: Use a slotted spoon or metal spider to transfer the cooked shrimp to a clean wire rack set over paper towels to drain any excess oil. This allows air to circulate, maintaining maximum crispness. Serve immediately for peak deliciousness!
- Optional Fun Faces: If desired, once cooled slightly, use mini chocolate chips for eyes and a small amount of melted chocolate piped with a toothpick or small bag for the smiles to create those adorable faces like in the picture.
Notes
- Chilling breaded shrimp before frying helps the coating adhere better and ensures maximum crispiness.