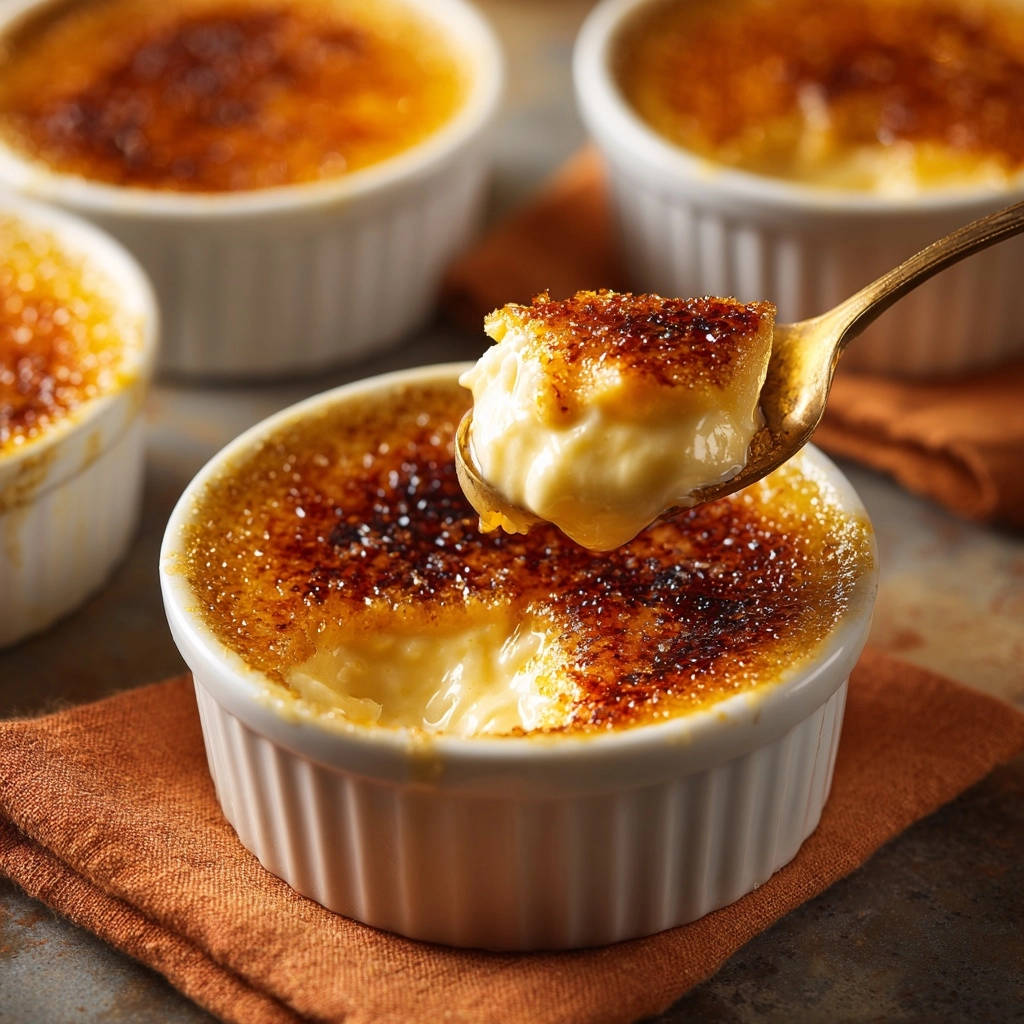
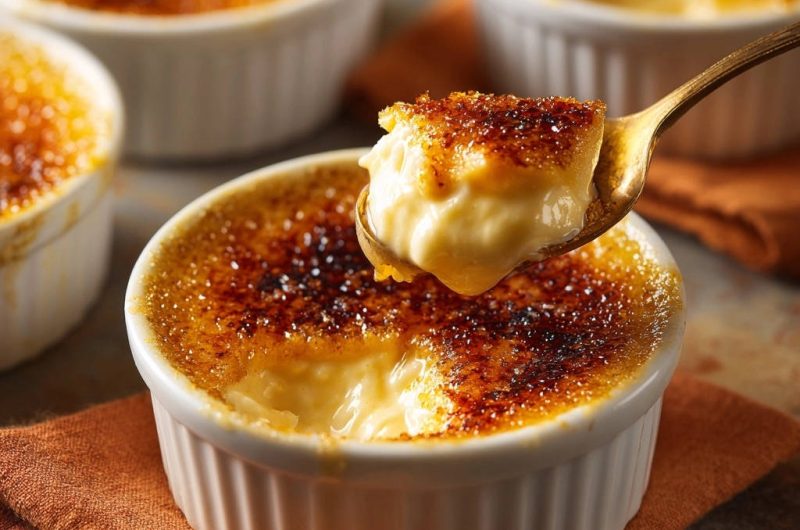
Classic Creme Brulee: Master the Silky Smooth Secret
For years, my quest for the perfect Classic Creme Brulee felt like a delicate dance, often ending in a custard that was either grainy or too firm. That elusive, impossibly smooth texture, beneath a shatteringly crisp caramel shell, seemed just out of reach.
But through meticulous testing and refining, I’ve unlocked the secrets to a Classic Creme Brulee recipe that delivers flawless results every single time, turning what was once daunting into a culinary triumph.
This isn’t just another recipe; it’s your reliable guide to achieving that melt-in-your-mouth creaminess and satisfying crack that will make any occasion feel extraordinary.
Get Our Best Recipes Weekly!
Join thousands of food lovers and get delicious recipes delivered to your inbox.
Why This Classic Creme Brulee Recipe Will Be Your New Favorite
The Unrivaled Silky Smooth Texture (The Custard Secret)
This recipe emphasizes precise techniques like gentle heating and essential straining. These steps ensure your custard is free from any bits, resulting in a luxurious, velvety consistency that truly defines an exceptional Classic Creme Brulee.
Shatteringly Crisp Caramel Top, Every Time
Achieving that signature crack is all about timing and technique with your kitchen torch. We provide clear guidance to create a perfectly caramelized, hard sugar shell that offers an irresistible contrast to the smooth custard below.
Designed for Success: Foolproof Steps for Home Cooks
Every instruction in this Classic Creme Brulee recipe has been carefully crafted for clarity and ease of execution. We break down complex culinary concepts into simple, understandable actions, building your confidence with each step.

Your Essential Kitchen Toolkit for Perfect Creme Brulee
Must-Have Equipment for Success
Ramekins: Four 6-ounce ramekins are ideal for individual portions. Their shallow depth allows for even baking and a good surface area for the caramelized sugar.
Baking Dish: A deep baking dish is crucial for creating the water bath. This gentle cooking environment prevents the custard from overcooking and cracking.
Fine-Mesh Sieve: This unassuming tool is the secret weapon for an unbelievably silky custard. It filters out any tiny bits of cooked egg, ensuring pristine smoothness.
Kitchen Torch: Absolutely essential for achieving the iconic, hard, and crackly sugar topping. While alternatives exist, a torch offers the best and most consistent results.
Whisks & Saucepans: Basic but important for mixing ingredients smoothly and gently heating the cream. A sturdy balloon whisk is perfect for aerating the yolks.
The Simple Star Ingredients Behind Classic Creme Brulee
Heavy Cream: The Foundation of Richness
Full-fat heavy cream is non-negotiable for this Classic Creme Brulee. Its high fat content creates the incredibly rich, decadent base we crave.
Do not substitute with half-and-half or milk, as this will compromise the texture and flavor.
Egg Yolks: The Custard’s Creamy Heart
Large egg yolks are the sole thickener, providing the custard’s signature creamy texture and beautiful pale yellow color. The quality of your eggs truly shines here.
Granulated Sugar: For Sweetness and the Iconic Topping
Granulated sugar provides the perfect level of sweetness to the custard itself.
It also forms that iconic, glassy caramel shell when torched, delivering the quintessential ‘brulee’ experience.
What Else to Savor?
After enjoying the delicate sweetness of creme brulee, consider these comforting dishes that offer a different, yet satisfying experience.
- For a hearty meal before dessert, try the Classic Chicken Pot Pie, featuring its own golden, flaky crust.
- Start your day with the Hearty Sausage & Cheese Breakfast Bake, a satisfying option with similar comforting qualities.
Vanilla Extract: The Aroma of Elegance
High-quality vanilla extract infuses the Classic Creme Brulee with a warm, sophisticated aroma and flavor. Consider vanilla bean paste for visible specks and an even richer profile.
A Pinch of Salt: The Flavor Enhancer
Just a small pinch of salt balances the sweetness and rounds out the overall flavor of the custard. It’s a subtle but essential addition.
Crafting Culinary Bliss: A Step-by-Step Guide to Classic Creme Brulee
-
1. Prepare Your Workspace and Oven:
Preheat your oven to 325F (160C) to ensure it reaches the ideal temperature for gentle baking.
Start boiling a kettle of water simultaneously; this hot water is essential for your water bath later.
-
2. Gently Warm the Heavy Cream:
In a medium saucepan, heat the heavy cream over medium-low heat. You want it to be steamy and just begin to show small bubbles around the edges, indicating a simmer.
Crucially, do not let it come to a vigorous boil, as this can scald the cream and negatively affect the custard’s delicate texture. Once steamy, remove it from the heat.
-
3. Whisk the Yolks to Perfection:
In a separate large bowl, combine the six large egg yolks, 1/2 cup granulated sugar, 1 teaspoon vanilla extract, and a pinch of salt.
Whisk these ingredients thoroughly until the mixture is smooth and slightly pale. This aerates the yolks and ensures the sugar is dissolving evenly.
-
4. The Silky Secret Revealed: Tempering Your Custard:
This is arguably the most vital step for a silky-smooth Classic Creme Brulee. While continuously and vigorously whisking the egg yolk mixture, slowly pour about half of the hot cream into the egg yolks in a thin, steady stream.
This gradual addition, known as tempering, slowly raises the temperature of the eggs, preventing them from scrambling and ensuring a perfectly smooth, lump-free custard base.
-
5. Combine and Lightly Thicken the Custard:
Once tempered, pour the entire egg mixture back into the saucepan with the remaining hot cream. Return the saucepan to low heat, stirring constantly with a heat-resistant spatula.
Continue stirring until the custard thickens slightly and coats the back of a spoon. It should not boil; gentle, constant stirring is key to achieving the correct consistency without curdling.
-
6. The Extra Mile: Straining for Ultimate Smoothness:
For an impeccably smooth and luxurious texture, pour the custard mixture through a fine-mesh sieve into a clean bowl or a large liquid measuring cup.
This crucial step catches any minuscule bits of cooked egg or undissolved sugar, guaranteeing that signature silky feel we’re aiming for in a Classic Creme Brulee.
-
7. Bake in a Soothing Water Bath:
Divide the strained custard evenly among your four 6-ounce ramekins. Carefully place these ramekins into a larger baking dish.
Then, pour the hot water from your kettle into the baking dish, creating a water bath (bain-marie) that comes halfway up the sides of the ramekins. This provides gentle, even heat, preventing the custards from overcooking or cracking.
-
8. Cool, Chill, and Set:
Bake for 30-35 minutes, or until the edges of the custards are set but their centers still jiggle slightly when gently shaken. Carefully remove the ramekins from the water bath and let them cool completely on a wire rack.
Once at room temperature, refrigerate them for at least 4 hours, or preferably overnight. Proper chilling is vital for the custard to fully set and achieve its firm yet creamy, melt-in-your-mouth texture.
-
9. The Grand Finale: Torching Your Sugary Crown:
Just before serving, sprinkle 1/2 tablespoon of granulated sugar evenly over the top of each thoroughly chilled custard. Use a kitchen torch to caramelize the sugar, moving the flame constantly until it turns a deep amber color and forms a hard, crackly shell.
Allow the torched sugar to sit for 1-2 minutes for it to fully harden. This creates the iconic “brulee” experience, a delightful textural contrast to the smooth Classic Creme Brulee beneath.
Mastering Creme Brulee: Expert Tips and Troubleshooting Your Bakes
Top Tips for an Impossibly Smooth Custard
Embrace Tempering: This step cannot be rushed. Pour the hot cream into the yolks slowly, in a thin, steady stream, while whisking continuously. This prevents scrambling and ensures a smooth base.
Don’t Skip the Strain: Even if your custard looks perfectly smooth, straining through a fine-mesh sieve is the ultimate assurance. It removes any tiny imperfections, delivering a truly pristine texture.
Gentle Heat is Your Friend: Both when warming the cream and thickening the custard, avoid vigorous boiling. Low and slow heat prevents scorching and curdling, maintaining the custard’s delicate structure.
Chill Thoroughly: Patience is rewarded with a perfectly set custard. Four hours is the minimum, but overnight chilling allows the custard to firm up beautifully and develop its full flavor and texture.
Torch with Confidence: Keep the kitchen torch moving in a steady, circular motion over the sugar. This ensures even caramelization and prevents burning in one spot, creating a consistent, crisp shell.
Common Creme Brulee Challenges & Solutions
Problem: My Custard is Scrambled or Lumpy
This usually happens if the egg yolks weren’t tempered correctly. You poured the hot cream too quickly, effectively cooking the eggs.
To fix, you can try straining the mixture through a very fine-mesh sieve multiple times, pressing against the solids. For severe scrambling, unfortunately, it’s best to start over, focusing on a slow, steady stream during tempering.
Problem: The Sugar Topping Doesn’t Harden
The sugar likely wasn’t melted and caramelized enough, or it was applied to a warm custard. Ensure your custards are thoroughly chilled before sprinkling sugar.
Torch until the sugar is a deep amber and bubbly, then allow it to cool for a full minute or two. Humidity can also be a factor; try torching right before serving.
Problem: My Custard Isn’t Setting Properly
This often indicates underbaking or insufficient chilling time. The centers should still have a slight jiggle, but not be liquid.
Extend baking time by a few minutes if needed, and always allow for at least 4 hours of refrigeration, preferably overnight, to achieve the ideal set.
Problem: The Custard Cracked While Baking
Cracking is typically a sign of baking at too high a temperature or not using a proper water bath. The water bath (bain-marie) provides a moist, even cooking environment.
Ensure your oven temperature is accurate and the water bath comes sufficiently high up the sides of the ramekins, maintaining that gentle heat.
Enjoying Your Classic Creme Brulee: Serving, Storing, and Making Ahead
Optimal Serving Temperatures and Garnish Ideas
Classic Creme Brulee is best served chilled, directly from the refrigerator, with its freshly torched, warm, crackly topping. The contrast in temperature and texture is part of its charm.
For garnishing, a few fresh berries like raspberries or blueberries offer a beautiful color contrast and a touch of tartness. A small mint leaf also adds an elegant touch.
How to Store Leftover Classic Creme Brulee
Leftover Classic Creme Brulee, without the caramelized topping, can be stored covered in the refrigerator for up to 3-4 days. It’s best to torch the sugar just before serving.
If you have already torched them, the topping will soften over time due to moisture from the custard. They are still edible, but you’ll lose that iconic crunch.
Can You Make Classic Creme Brulee Ahead of Time?
Absolutely! This is one of the best make-ahead desserts. You can prepare and bake the custards up to 2-3 days in advance.
Store them, covered, in the refrigerator. Torch the sugar topping just moments before you plan to serve, ensuring the perfect crispness for your guests.
Your Burning Questions About Classic Creme Brulee, Answered
What is the difference between creme brulee and flan?
While both are custard desserts, creme brulee features a rich, heavy cream-based custard with a hard, caramelized sugar topping applied just before serving.
Flan, on the other hand, is typically milk-based, often lighter, and baked with a liquid caramel sauce already at the bottom of the mold, which then becomes the top when inverted.
Why do you bake creme brulee in a water bath (bain-marie)?
The water bath provides a gentle, even heat that prevents the delicate custard from cooking too quickly or curdling. It also adds moisture to the oven, which helps prevent the custard from cracking on top.
This slow, consistent cooking environment is crucial for achieving the Classic Creme Brulee’s signature smooth, silky texture.
Can I make creme brulee without a kitchen torch?
Yes, you can, but the results may vary. Some people use their oven broiler, placing the sugared custards very close to the heat source for a minute or two, watching them very carefully.
However, an oven broiler is less precise and can easily burn the sugar or heat the custard, potentially softening it. A kitchen torch offers superior control for the perfect hard shell.
How do I know when my creme brulee is set?
Your Classic Creme Brulee is set when the edges are firm but the very center still has a slight, almost wobbly jiggle to it when you gently shake the ramekin.
It will continue to set and firm up significantly as it cools and chills in the refrigerator, achieving its ideal creamy texture.
Is creme brulee naturally gluten-free?
Yes, traditional Classic Creme Brulee is naturally gluten-free. Its primary ingredients are heavy cream, egg yolks, sugar, vanilla, and salt, none of which contain gluten.
Always double-check ingredient labels to ensure no hidden gluten in specific brands, but generally, it’s a safe choice for those avoiding gluten.
Ready to Create Your Own Classic Creme Brulee Masterpiece?
Inspired to create this exquisite dessert yourself? We hope this guide empowers you to achieve the silkiest custard and most satisfyingly crisp topping for your Classic Creme Brulee.
Dive into your kitchen with confidence and get ready to impress your family and friends with this truly elegant treat. Don’t hesitate to share your culinary triumphs with us!
Happy baking!
Classic Creme Brulee
Course: DessertCuisine: French cuisineDifficulty: easy4
servings30
minutes35
minutes300
minutesFrench cuisine
Ingredients
2 cups heavy cream
6 large egg yolks
1/2 cup granulated sugar (plus 2 tablespoons for topping)
1 teaspoon vanilla extract
Pinch of salt
Directions
- Preheat your oven to 325F (160C). Boil a kettle of water for the water bath.
- In a medium saucepan, gently heat the heavy cream over medium-low heat until it’s steamy and just begins to simmer around the edges. Do not let it boil vigorously. Remove from heat.
- In a separate large bowl, whisk together the egg yolks, 1/2 cup granulated sugar, vanilla extract, and pinch of salt until smooth and slightly pale.
- THE SILKY SMOOTH CUSTARD SECRET: While continuously whisking the egg yolk mixture, slowly pour about half of the hot cream into the egg yolks in a thin, steady stream. This is called tempering and prevents the eggs from scrambling. Once combined, pour the tempered egg mixture back into the saucepan with the remaining hot cream.
- Return the saucepan to low heat, stirring constantly with a spatula until the custard thickens slightly and coats the back of the spoon. Do not let it boil.
- For an extra layer of smoothness, strain the custard mixture through a fine-mesh sieve into a clean bowl or a large liquid measuring cup. This removes any small bits of cooked egg or impurities, guaranteeing a silky texture.
- Divide the strained custard among four 6-ounce ramekins. Place the ramekins in a baking dish. Carefully pour the hot water from your kettle into the baking dish, creating a water bath that comes halfway up the sides of the ramekins.
- Bake for 30-35 minutes, or until the edges are set but the centers still jiggle slightly.
- Carefully remove the ramekins from the water bath and let them cool completely on a wire rack. Refrigerate for at least 4 hours, or preferably overnight, until thoroughly chilled and set.
- Before serving, sprinkle 1/2 tablespoon of granulated sugar evenly over the top of each chilled custard. Use a kitchen torch to caramelize the sugar until it turns a deep amber color and forms a hard, crackly shell. Let sit for 1-2 minutes for the sugar to fully harden before serving.
Notes
- The water bath and tempering steps are crucial for achieving the silky smooth custard texture. For best results, chill the creme brulee overnight.